Hi all - to Make things easier with our remote learning, everything will be posted in Google Classroom Only.
Week of March 9
|
Goals: Students will curate and edit photos to demonstrate their understanding of the concept at hand.
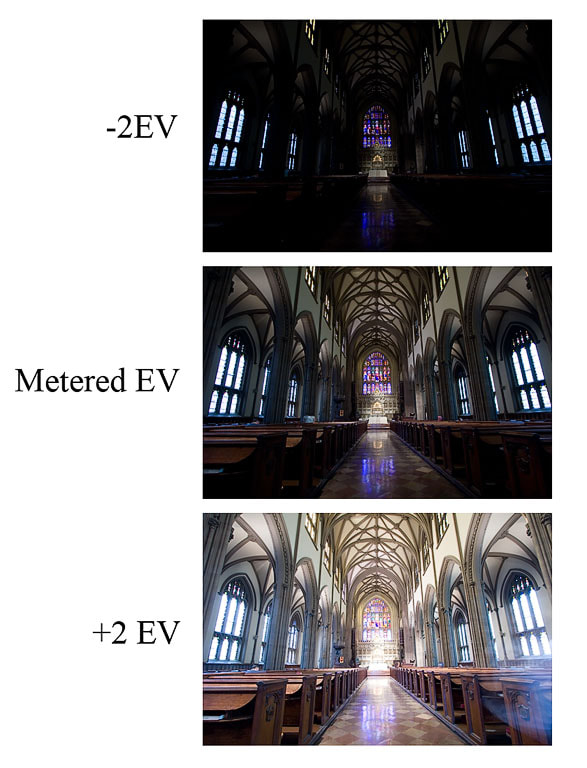
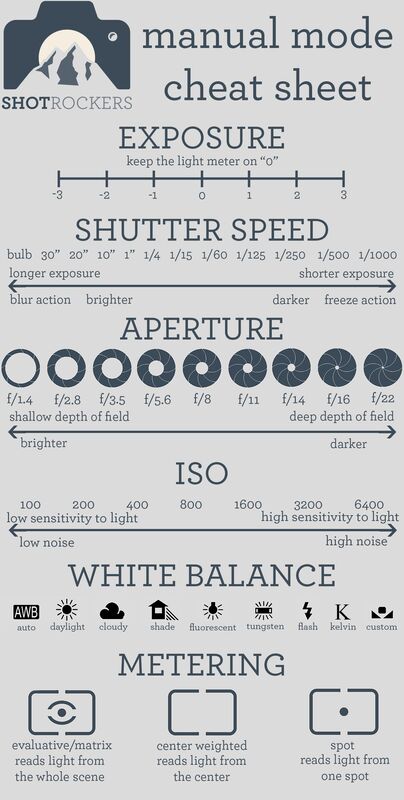
Students will ask their peers and teachers for feedback as well as participate in informal critique sessions. Students will research (reading and writing) ideas for future projects. Students will present their body of work and written reflections in a digital portfolio. Monday Image Analysis Edit and Turn in Photo Challenge From Friday Edit and Turn in Text and Photo Project Tuesday Demo on Manual Mode Practice shooting in Manual - go out and shoot 20+ images using Manual Mode and paying attention to your light meter. Thursday Demo on HDR (in Camera) Photo shoot using HDR techniques Friday Tutorial on HDR in Photoshop (turn in) Start Brainstorming for Passion Project for Spring Update website Monday Image Analysis Finish brainstorming for Passion Project Update website PAST DUE: Food Photography Unit 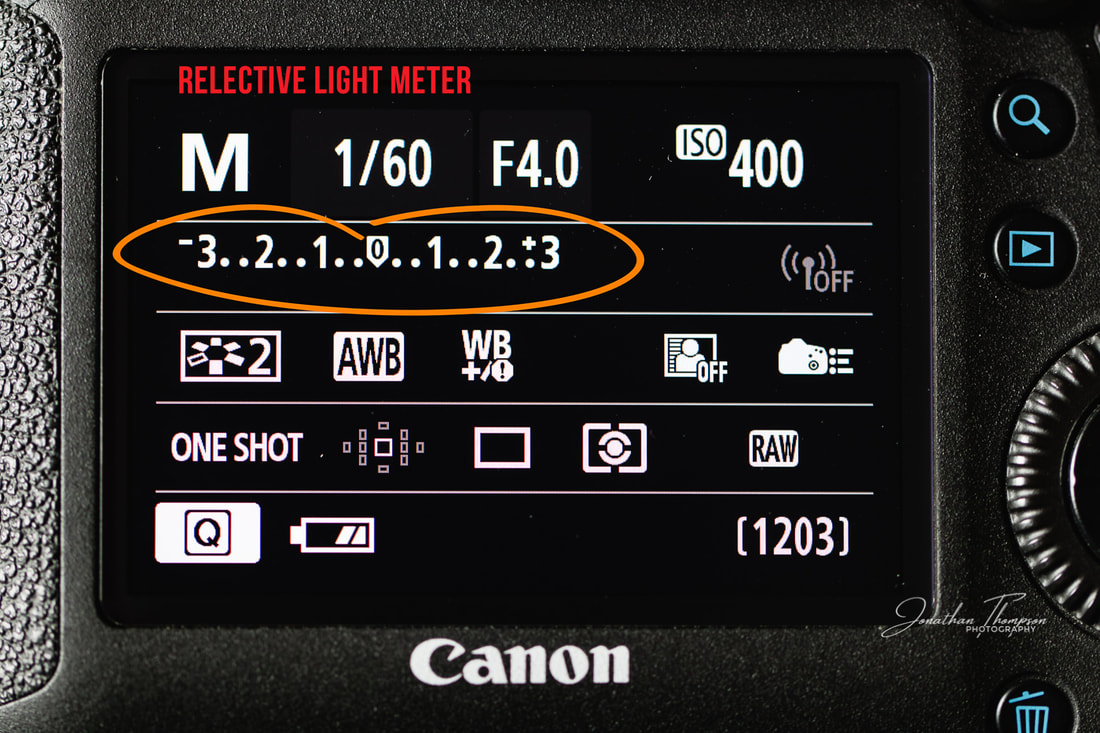
|
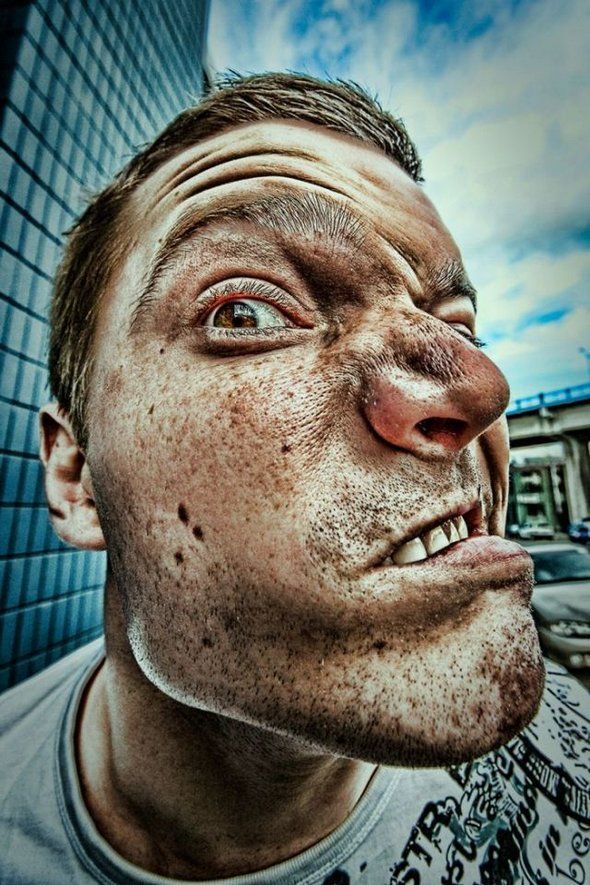  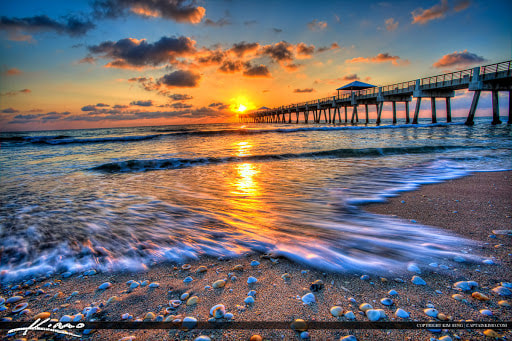  Some HDR examples - notice the sharpened edges and the high color saturation
|
Week of March 2
|
Goals: Students will reflect, through writing and discussion, their work and the work of others.
Students will research ideas for a text and photo project. Students will experiment with text and image to communicate an idea about society. Students will receive and give feedback with peers . Monday Group critique on Food Photography Turn in Food Project Intro to Text and Photo Project (on Projects Page) (if time) Research for new project Tuesday Demo on text in Photoshop Continue research and brainstorming Thursday Work day on Text and Photo Start updating website Friday Turn in Text and Photo Update website PAST DUE: Color Light Studio Project, Color Research |
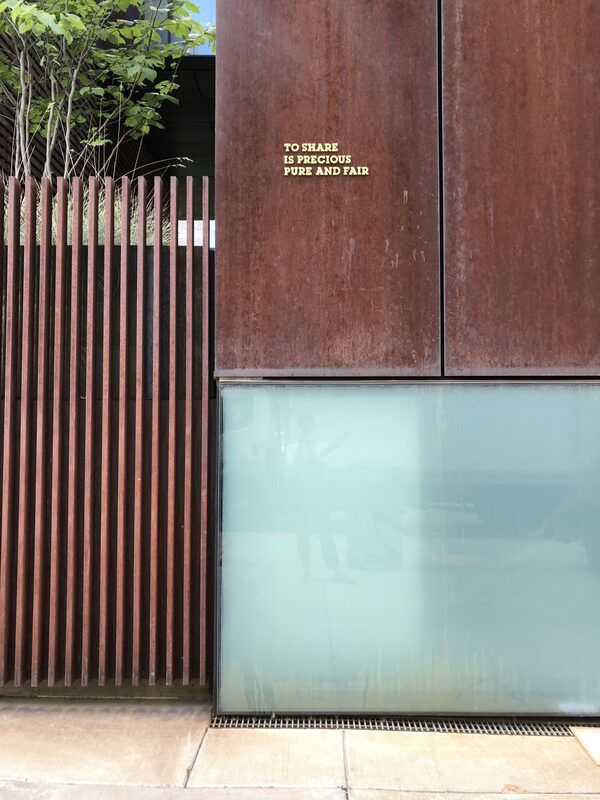  
Barbara Kruger - installation in LA
|
Week of february 24
|
Goals: Students will research techniques and ideas on food photography (commercial practices).
Students will collaborate to create still life food photography images by setting up a table top studio and directing lighting. Students will edit their best food photography images to demonstrate their understanding of the techniques and genre. Monday Intro to food photography (slide deck) Watch video Discuss options Work on research slides Tuesday Demo on still life set ups Read this great article of food photography Divide into groups to plan out photo shoot and create backdrop Thursday Photo shoot day in groups Friday Create contact sheet Edit best 2 images for turning in (may continue on Monday) PAST DUE: Color Light Studio Project 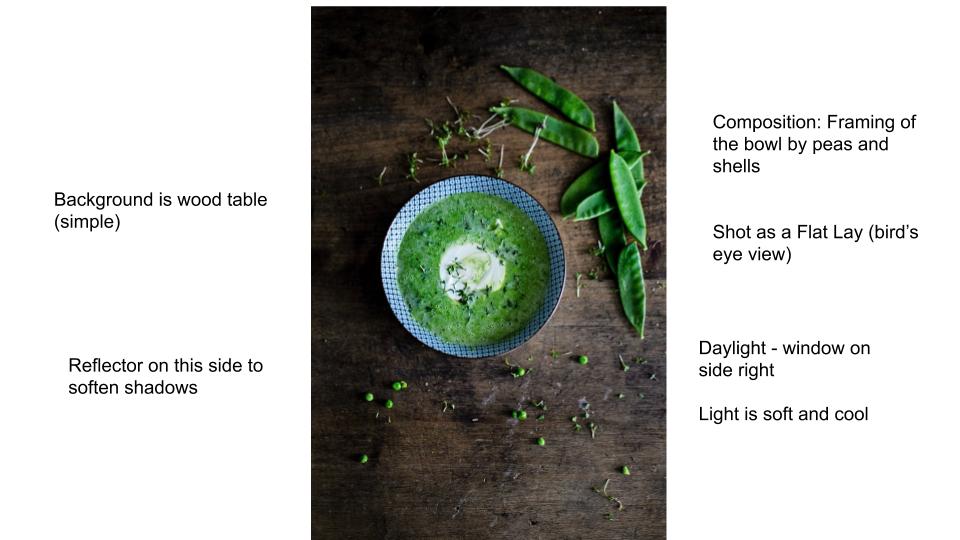
Example of a good research slide
|
|
Week of February 18
|
Goals:
Students will collaborate to create studio portraits using a variety of lighting equipment (listening & speaking). Students will edit their portraits to meet industry standards. Students will give verbal feedback to their peers to help each other edit for the best outcome. Tuesday & Thursday
Image Requirements
2 color light portraits 1 Ring light portrait 1 acetate portrait Editing Concerns
Lightroom portrait editing Photoshop Portrait editing |
Dates to Remember
Wednesday - 2/19 - ACC Field Trip Friday - 2/21 - Studio Portrait Critique End of 6 Weeks on Friday Monday 2/24 - Intro to Food Photography. Bring food in on Tuesday 2/25 if you want to try other items besides cupcakes or strawberries. I have limited fridge space. 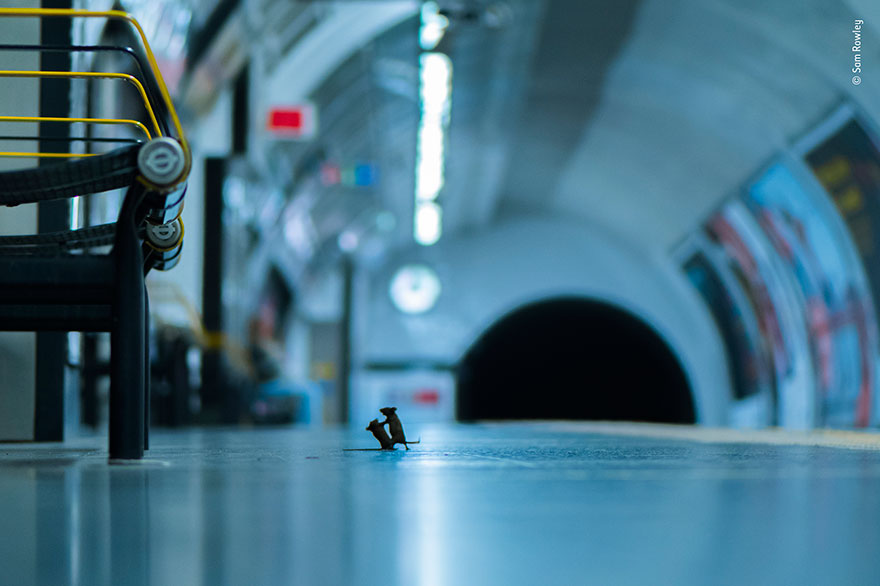
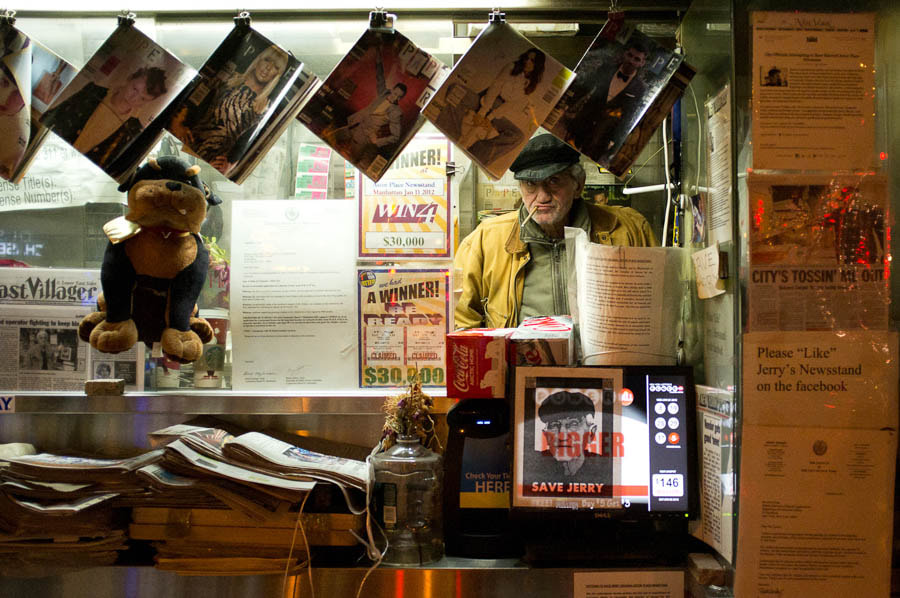
This image just won the People's Choice Award for the Wildlife Photographer of the Year. Click on the image to see other entries. Do you agree with the choice?
|
WEEK OF FEBRUARy 10
Goals:
Students will collaborate to create studio portraits using a variety of lighting equipment (listening & speaking).
Students will edit their portraits to meet industry standards.
Monday, Tuesday, Thursday
Edit your portraits
Create your acetate portrait
Shoot a ring light portrait
Turn in work for Serendipity
Turn in work for District Art Show
Studio Times:
Monday - Evelyn, Samantha, Aedan, & Kip (?)
Tuesday - Adam, Zander, Citlali, & Mia(?)
Thursday - Micaiah, Kobee, Beatrice, and Paula (?)
Week of February 3
|
Goals:
Students will research and plan for a studio lighting project and a alternative portrait project. Students will collaborate to create studio portraits using a variety of lighting equipment. Students will analyze, through writing, an artwork from the Cherry Creek Mobile Art Gallery Monday Cherry Creek Art Analysis Studio Photographers - Camille & Maya, Sydney, Roan, and Chloe Finish research for color studio lighting Work on acetate portrait Work on Ring Light Portrait Submit something for Serendipity Submit for District Art Show Tuesday Cherry Creek Art Analysis - show comes down Thursday morning! Studio Photographers - Annie, Shay, Aitana, & Emma, Peyton Finish research for color studio lighting Work on acetate portrait Work on Ring Light Portrait Submit something for Serendipity Submit for District Art Show Thursday Studio Photographers - Beatrice, Aaliyah, Jade Finish research for color studio lighting Work on acetate portrait Work on Ring Light Portrait Submit something for Serendipity Submit for District Art Show Friday Studio Photographers - Paula, Kip Finish research for color studio lighting Work on acetate portrait Work on Ring Light Portrait Submit something for Serendipity Submit for District Art Show |
Dates to Remember
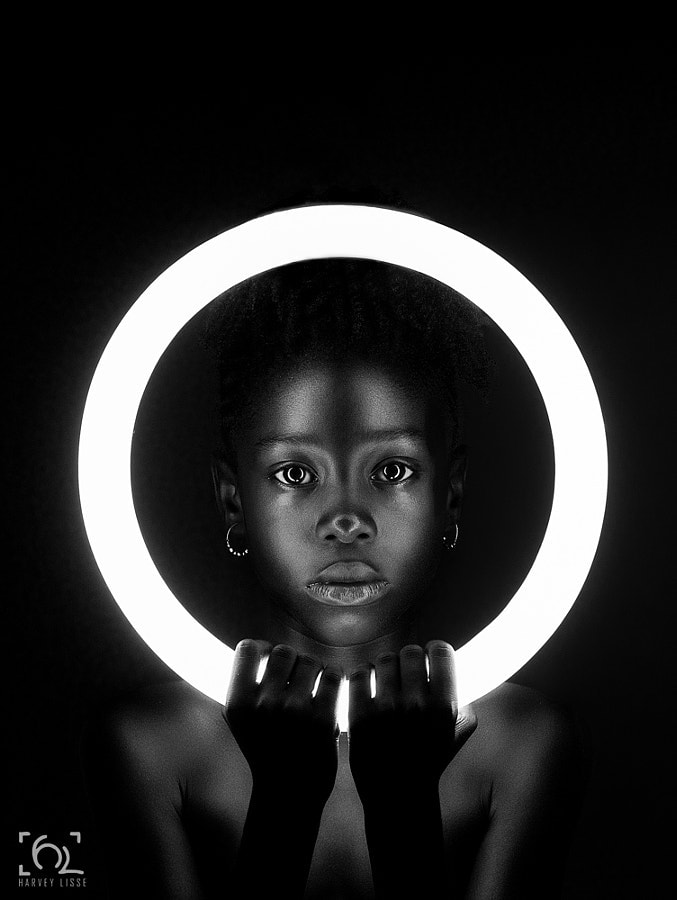
Wednesday - 2/5 - Cherry Creek Image Analysis due Wednesday - 2/12 - Images and Artist Statement for District Art Show due, black and white film due for ACC trip Friday - 2/14 - No School Wednesday - 2/19 - ACC Field Trip Ring light ideas
Image Requirements
2 color light portraits 1 Ring light portrait 1 acetate portrait Editing Concerns
Lightroom portrait editing Photoshop Portrait editing |

Week of January 27
|
Goals:
Students will curate their water and glass images and edit the best ones for final presentation. Students will critique their work and the work of others through discussion and written analysis. Students will research and plan for a studio lighting project and a alternative portrait project. Monday & Tuesday
Thursday
Friday
|
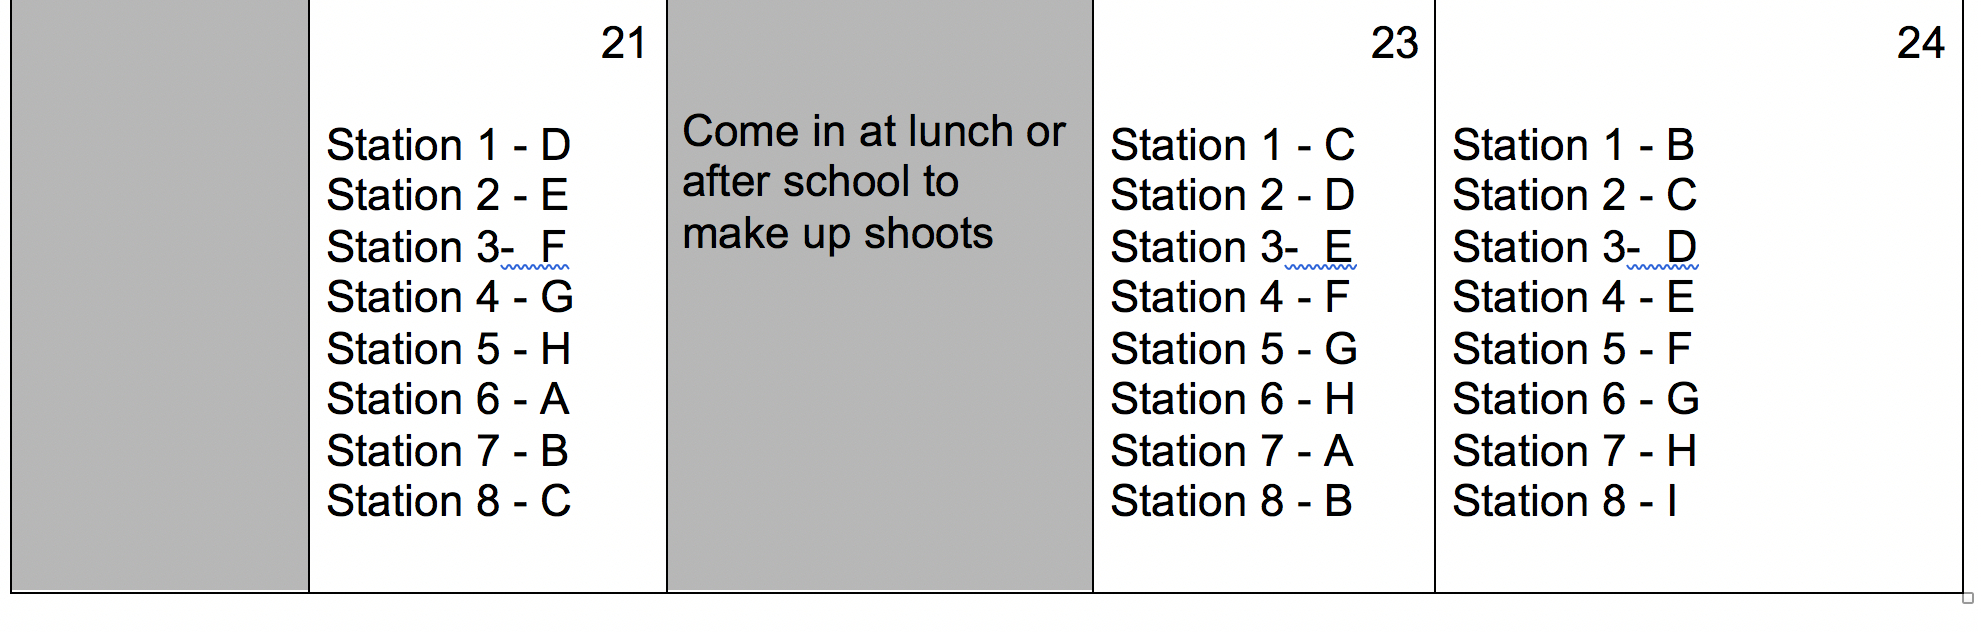
Station 7: Image Analysis – Google doc turned into Classroom
Station #4: Lightroom Tutorials – edited images and written reflection into Classroom with written reflection Station 1: Fish Tank – contact sheet of 10+ images, edit best ONE image
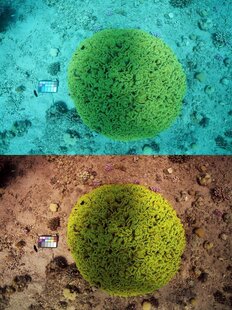
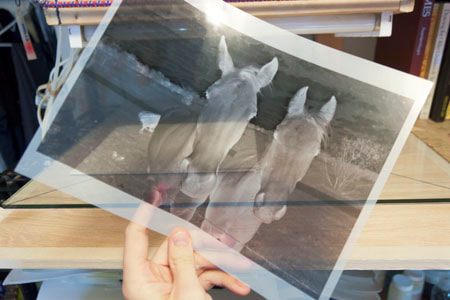
Scientists figure out how to remove water from underwater photos. Click on pic to see more.
|
Week of January 21
|
Goal: Students will work in groups to collaboratively learn studio and natural lighting techniques that show different effects of water and glass distortions.
Monday through Friday
Reminder - all details on each station are on the project page |
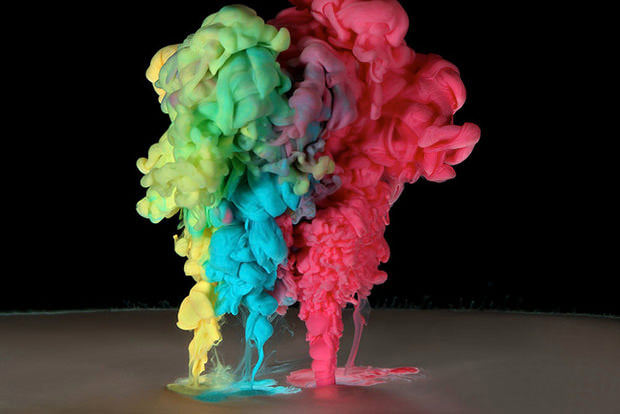
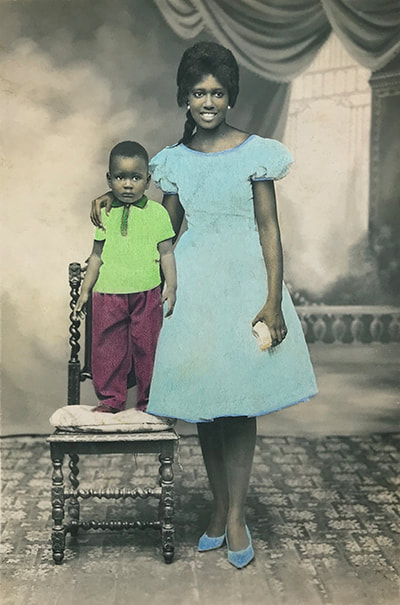
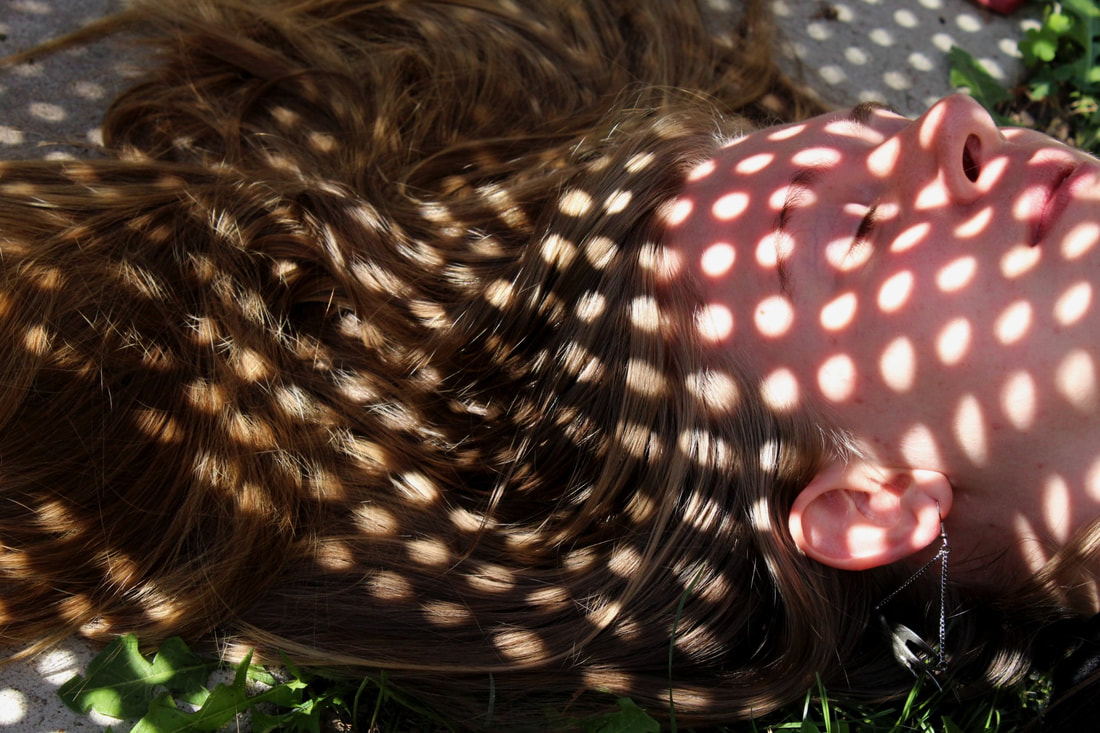
How was this image created?
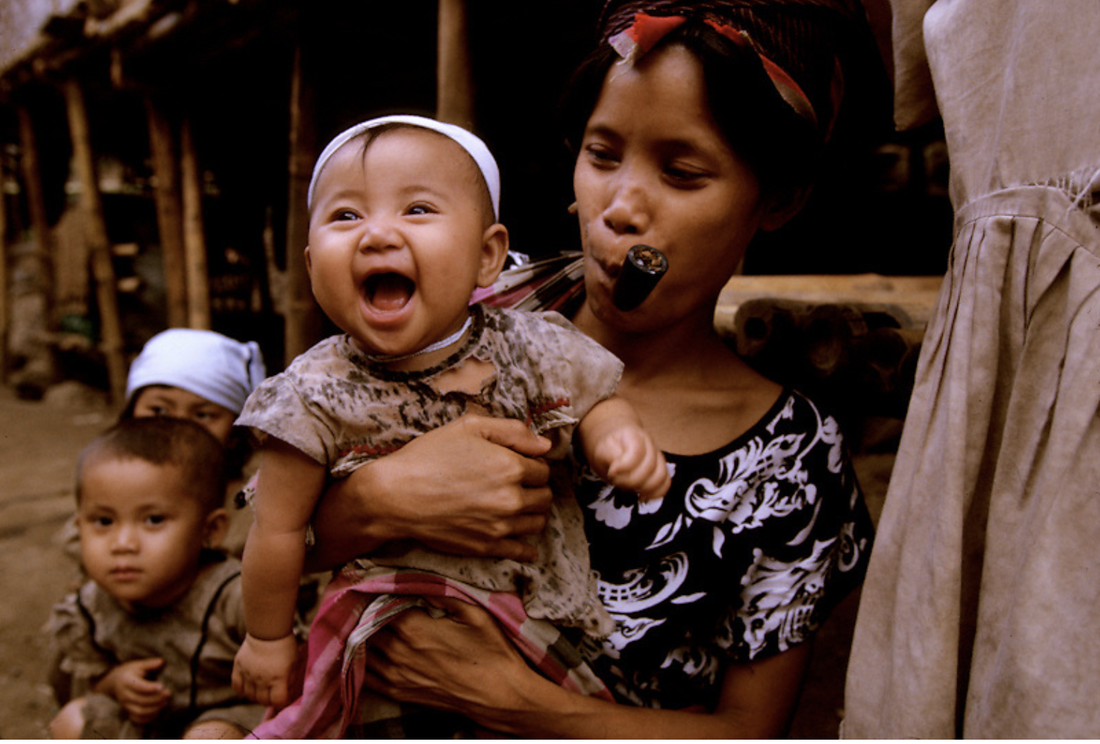
Work by Annie Griffiths. See her website and find out how she uses her imagery to help women around the world by clicking on the image.
|
Week of January 13
|
Goal: Students will work in groups to collaboratively learn studio and natural lighting techniques that show different effects of water and glass distortions.
Monday through Friday Quick Meeting to answer questions, give suggestions Break into groups, hand out equipment, teams work at stations Last 10 minutes is clean up and uploading of images Reminder - all details on each station are on the project page National Portrait Gallery Competition due Wednesday 1/15 |

There is now fruit and some new objects for the fish tank station!
|
Week of January 7
Congrats to Paula for making it into the Drexell University High School Photo Contest!
|
Tuesday - Welcome Back!
Goal: Students will set goals and review prior knowledge through writing, speaking to peers, and listening to a presentation. Warm Up Exercise (GC) Intro to Water Unit (presentation) Talk about Scholastics, NPG Contest, and Jostens Image Analysis Activity (GC) Thursday Goal: Students will work in groups to collaboratively learn studio lighting techniques that show different effects of water and glass distortions. Break into groups of 3 to 4 Walk through stations - understand guidelines and clean up procedures Assign stations to start Get through first station Friday Goal: Students will work in groups to collaboratively learn studio lighting techniques that show different effects of water and glass distortions. Quick meeting for troubleshooting, answering question Next rotation of stations |
Winter Final - FINISH YOUR WEBSITE
|
Portfolio Page
10 of your best images from this semester (projects + personal) (20 points) Artist Statement (7-10 sentences) (20 points)
(EXTRA CREDIT) Personal Photography Page 7-10 images that you took OUTSIDE of class that are not assignment based |
FINAL WEBSITE CHECKLIST
Home Page - Looks professional, welcome message, some of your images Projects Page - Passion Project (images, contact sheet, reflection) - Narrative (1-2 images, contact sheet, reflection) - Light Study Images (8 total images, contact sheet) - Identity (images, contact sheet, reflection) - Fears and Phobias (images, contact sheet, reflection) - Street Photography (images, contact sheet, reflection) - Shutter Speed process board (download as pdf, use a Scrib Doc for the placeholder) - Aperture, ISO, White Balance Process Board - Humans of East HS (images, reflection) - 10 Objects (images, reflection) Research Page Passion Project Research Narrative Research Light Study Research Identity Research Fears and Phobias Research Street Photography Research 25 Images Research |
Week of December 9
|
Goals:
I can create and edit images for my Passion Project series. I can curate my work into a digital portfolio (personal website). PAST DUE: Lighting Study and Narrative Project FUTURE: Scholastics Art Competition - all work and permission forms with parent signature due 1/9. |

|
|
Create and Edit your Passion Project
You will create a series of work that is interesting to you and that pushes your technical and creative skills within photography. Decide what you want to focus on - your choice! This is your opportunity to focus on something you love that may not be a part of our curriculum. You will have to turn in: Contact sheet of 24+ images 3-5 images for your series (dependent on technical complexity) Due on Thursday, 12/12 FINAL EXAM DETAILS
You will be putting the final touches on your website as well as doing an Image Analysis to show your understanding of how to "read" a photograph (so yes, you have to be here) |
FINAL WEBSITE CHECKLIST
Home Page - Looks professional, welcome message, some of your images Projects Page - Passion Project (images, contact sheet, reflection) - Narrative (1-2 images, contact sheet, reflection) - Light Study Images (8 total images, contact sheet) - Identity (images, contact sheet, reflection) - Fears and Phobias (images, contact sheet, reflection) - Street Photography (images, contact sheet, reflection) - Shutter Speed process board (download as pdf, use a Scrib Doc for the placeholder) - Aperture, ISO, White Balance Process Board - Humans of East HS (images, reflection) - 10 Objects (images, reflection) Research Page Passion Project Research Narrative Research Light Study Research Identity Research Fears and Phobias Research Street Photography Research 25 Images Research DUE DAY OF FINAL 12/17 |
Week oF December 2
Goals:
I can create 1-2 images that demonstrate my understanding of how to use light to help tell a story.
I can create and edit images for my Passion Project series.
I can curate my work into a digital portfolio (personal website).
Drexell University's contest now is closing MONDAY 12/2. $10 to enter.
Scholastics Art Awards due before we leave for break. Go to artandwriting.org to create an account and upload work.
|
Finish Your Light Study Project
You must think about COMPOSITION and FOCAL POINT!
Extra Credit:
|
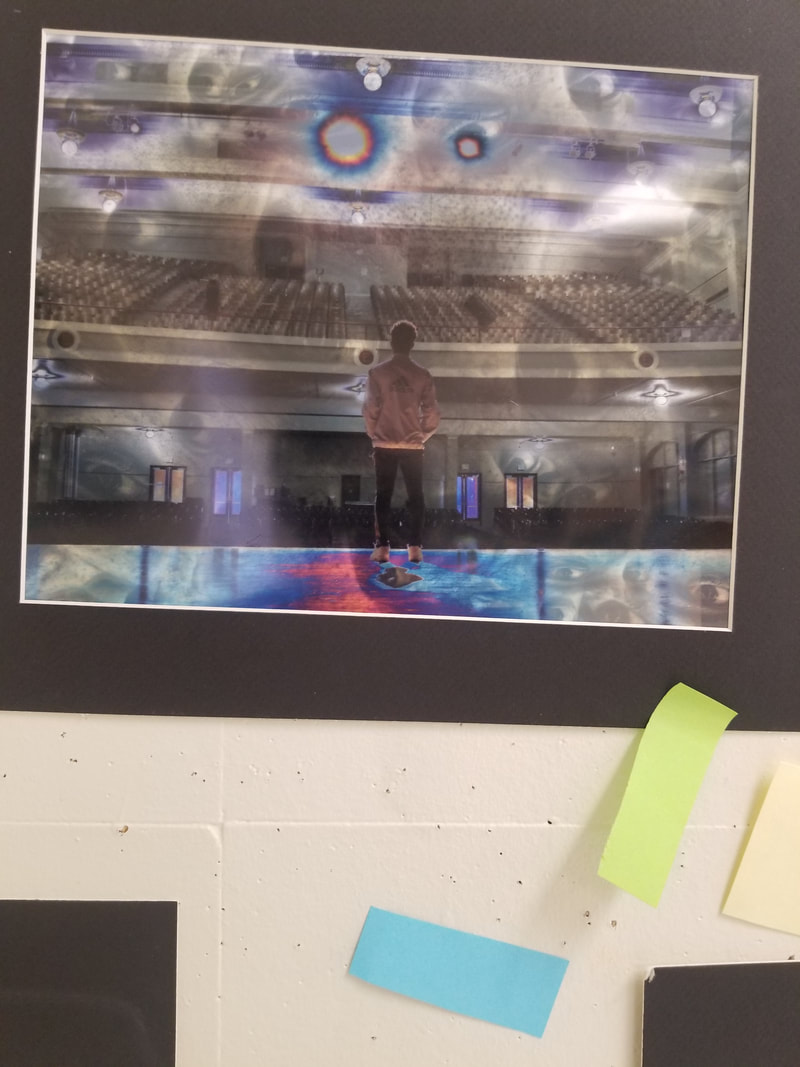
Create and Edit your Narrative Images
PART 1 Create a Google Slide Deck that includes BOTH of the following. Step 1: List 1-2 stories that you want to tell through your photographs, and the lighting you plan to use for each one. (For example: A woman who just got back on a late flight and is sitting in a lonely cafe, I will use backlighting to show this.) Step 2: Include 10+ narrative images that inspire you (look at movie stills as well!) PART 2 Using your knowledge of lighting, create 1-2 images that convey a sense of story and mood. Your contact sheet should have 24+ images. Subject is up to you - you can set up the scene or find your stories through observation. DUE FRIDAY, 12/6 |
Create and Edit your Passion Project
You will create a series of work that is interesting to you and that pushes your technical and creative skills within photography. Decide what you want to focus on - your choice! This is your opportunity to focus on something you love that may not be a part of our curriculum. You will have to turn in: Contact sheet of 24+ images 3-5 images for your series (dependent on technical complexity) Due on Thursday, 12/12 |
WEEK OF NOV 18
|
Monday
Goals: I can edit my lighting study images for presentation I can finish my research (image and text) for the Light Study AGENDA 1. Edit your Light Study images, place into a Google Slide presentation and label with the correct type of lighting. 2. Finish your research for the Light Study and turn in PAST DUE - Identity Images and Reflection Passion Project Contract Tuesday - Intro to Narrative Mood Project Thursday - Field Trip or Work on Mood Project Did you turn in your Light Study images? Finish research for Narrative Mood Project Start working on your Narrative Mood Project Plan your photos shoots for Narrative Mood and your Passion Project Friday - Work Day Goal: I can edit my images to communicate a certain mood and story. 1. You will turn in 2-3 images for this Narrative Mood Project Your contact sheet should have 24+ images. 2. Think about color and light to help tell the story. Don't forget about your dodge and burn tools as well as vignette and texture options. Homework: Start shooting for your Passion Project (your choice assignment) and the Narrative Mood Project |
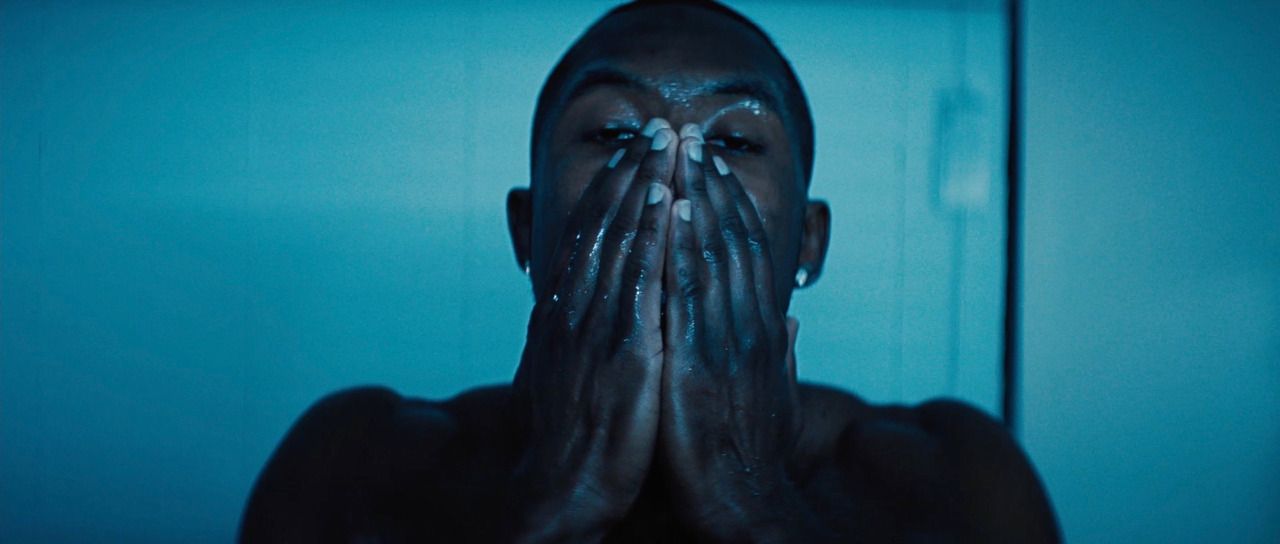

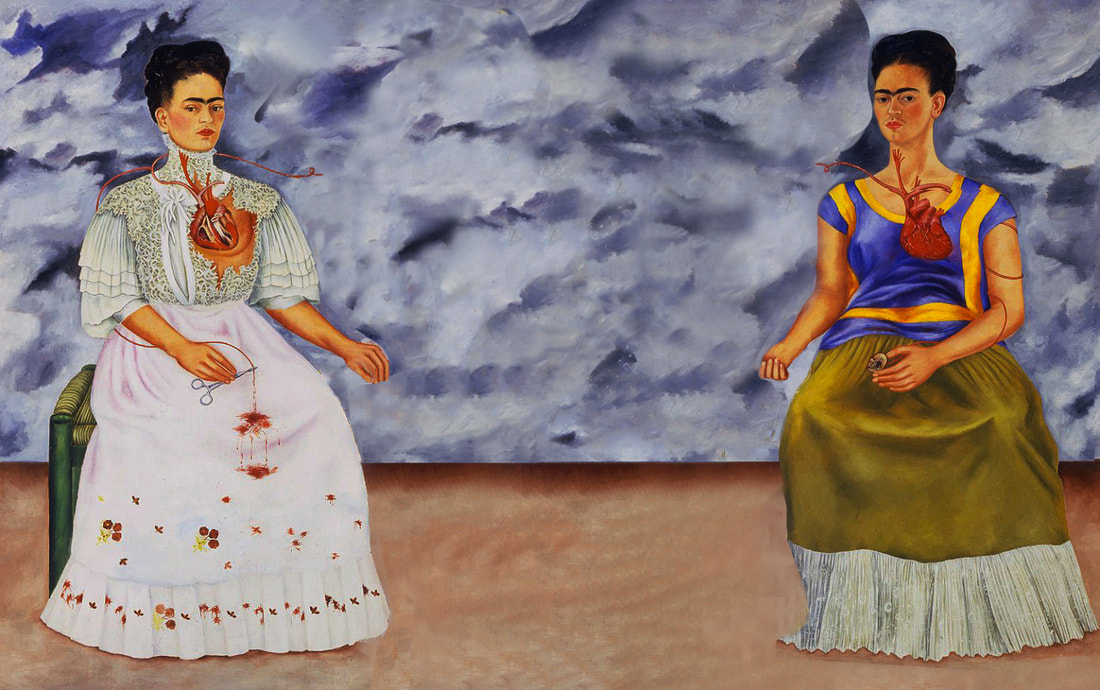
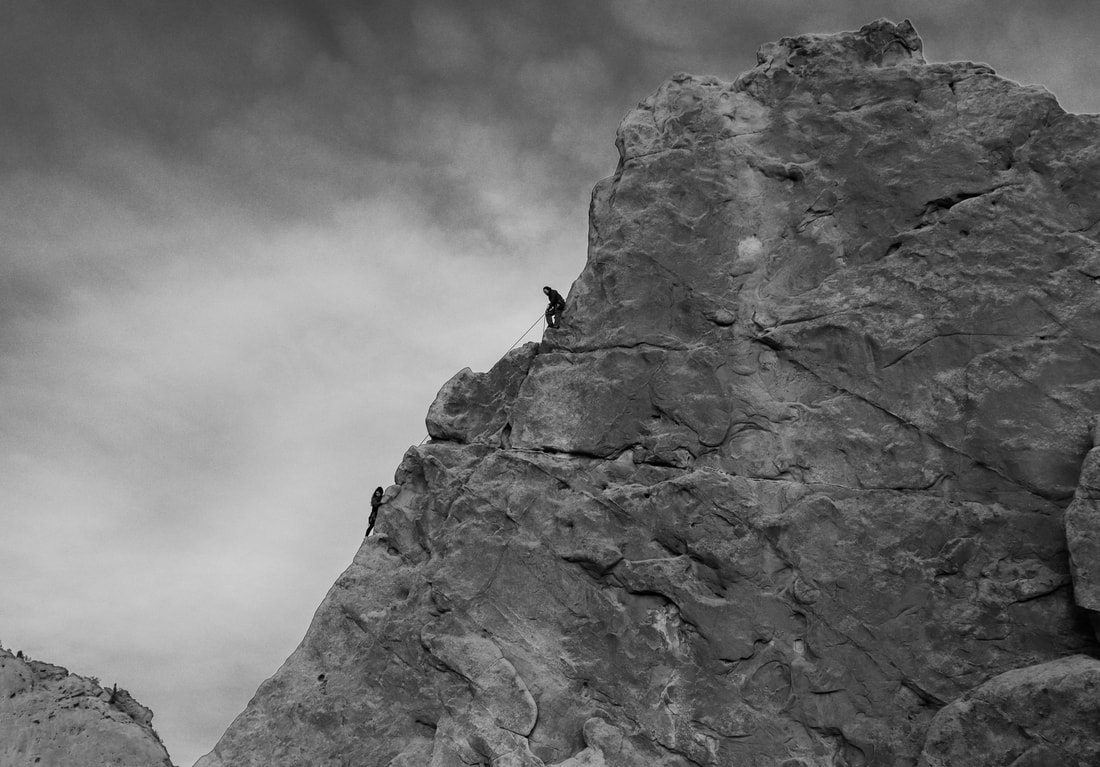
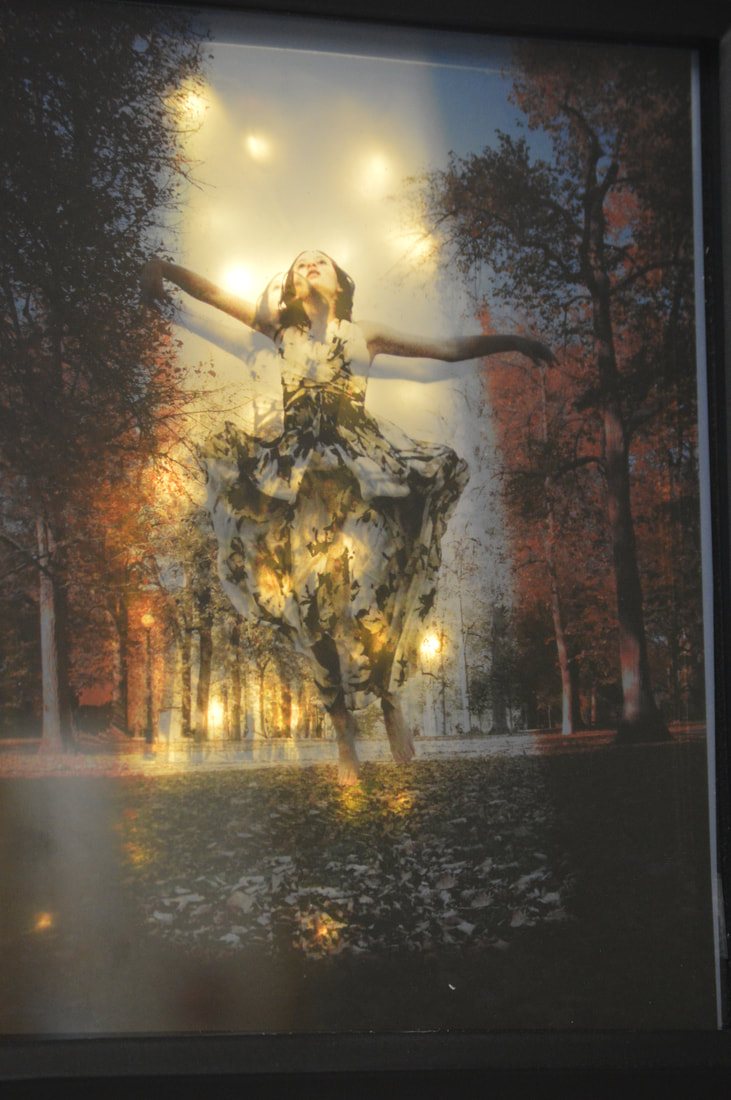
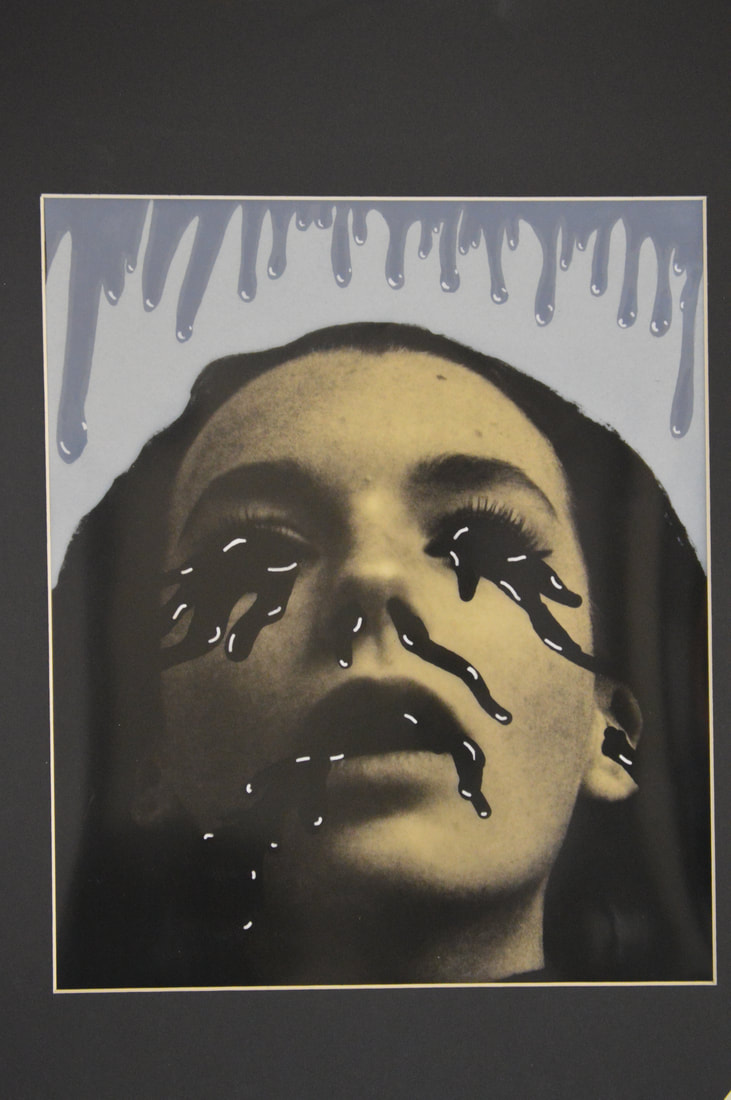
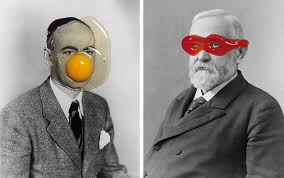
These two image uses similar color of lighting, but evoke two different moods. How did the composition and poses of the subjects effect the mood?
Upcoming Things to Think About:
Winter Final - Your portfolio so far (10-12 pieces with writing) that reflects your growth this semester Scholastics (due end of semester) artandwriting.org Judges are looking for: - Quality of technique and composition - Sense of student voice - Titles are important Seniors can turn in a portfolio of 8 images Everyone one can turn in single pieces - $25 per portfolio - $7 per entry - Fee assistance available through East |
Week of Nov 11
|
MONDAY & TUESDAY
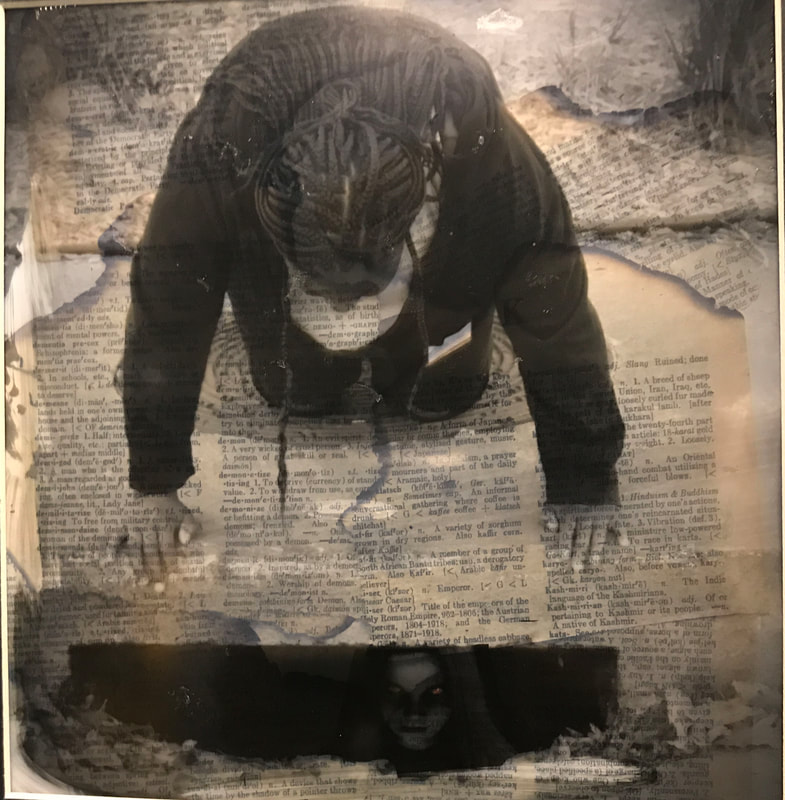
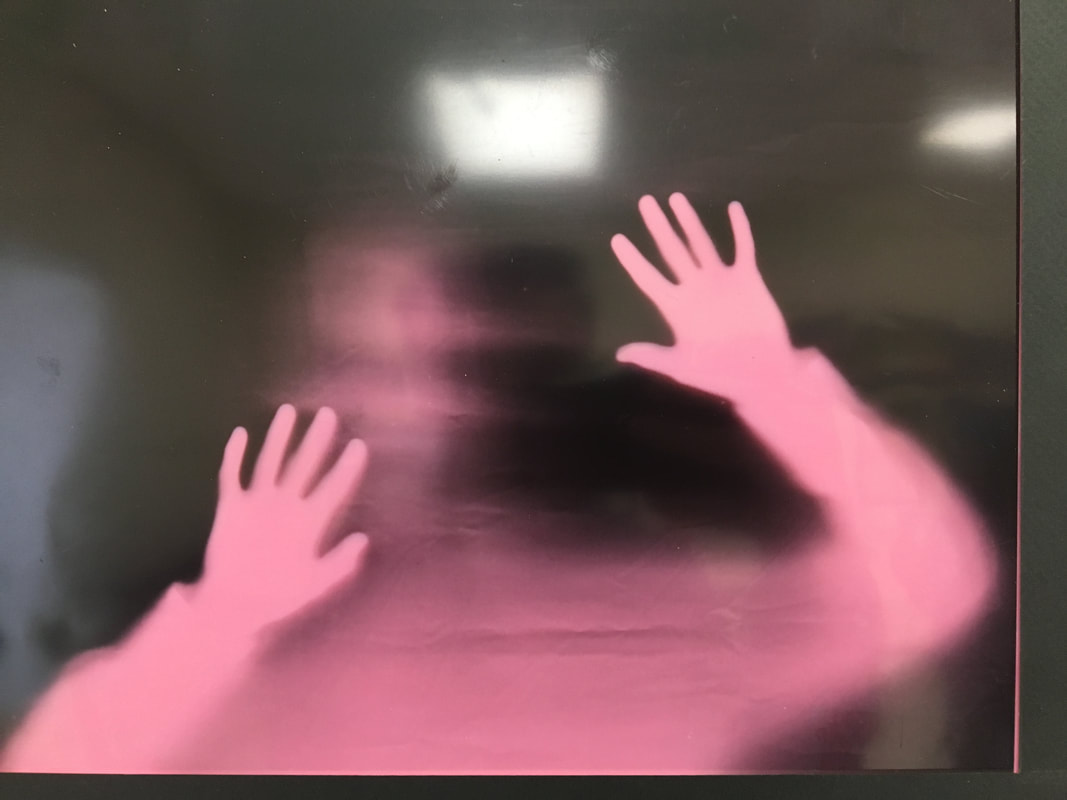
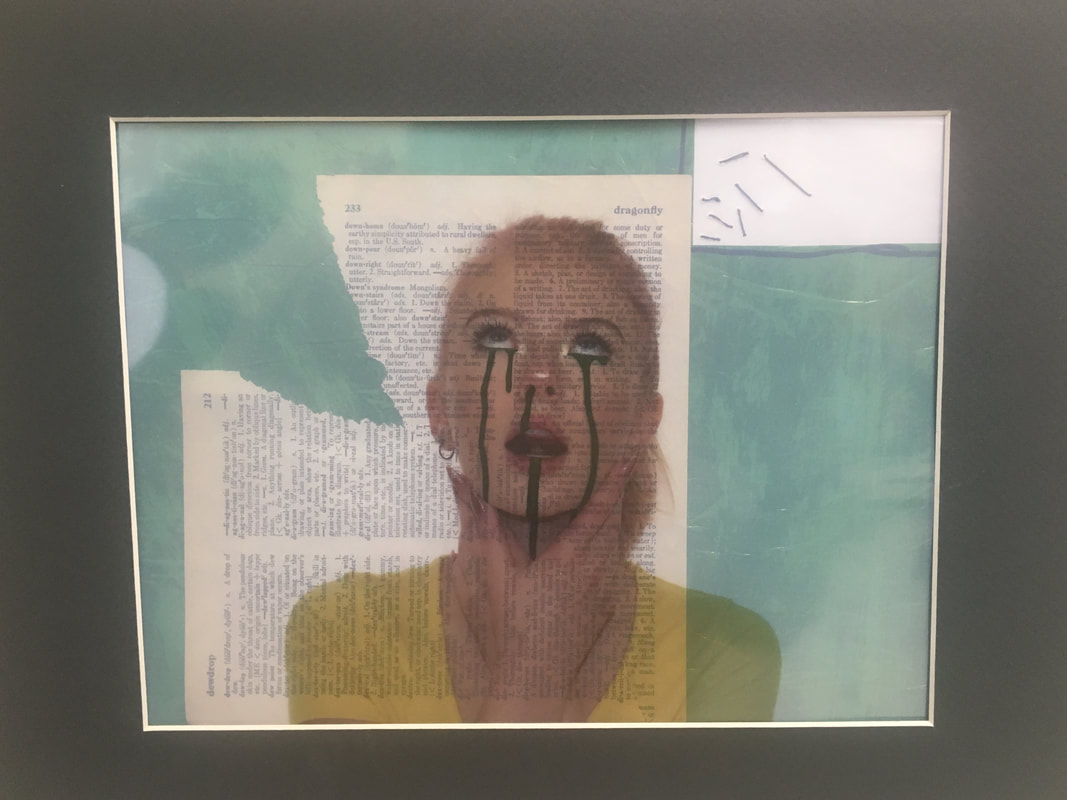
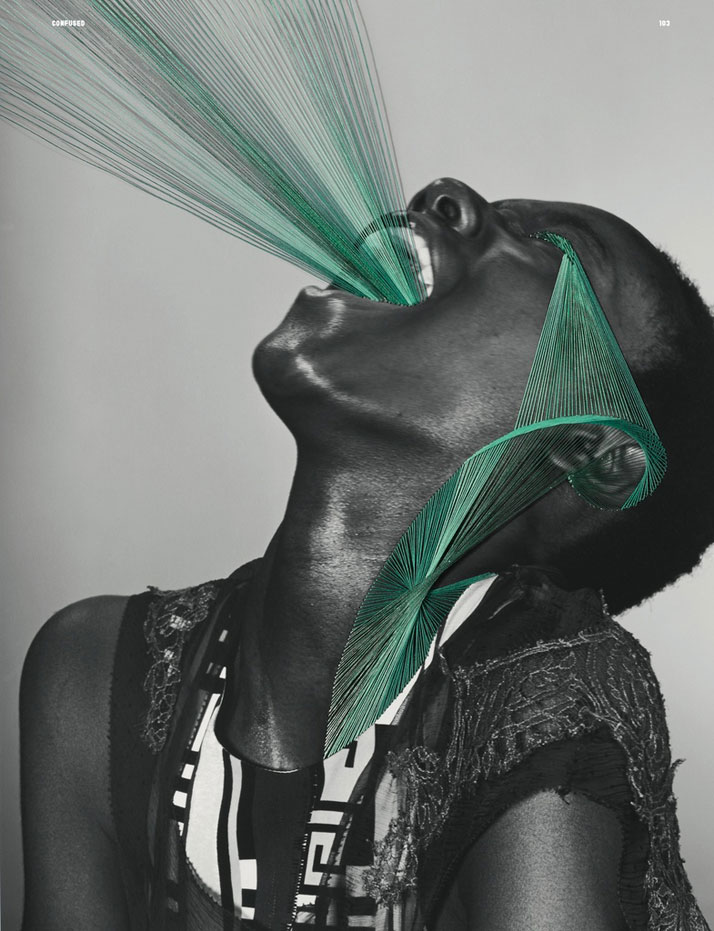
Goals: I can edit my self portraits for the look and message I want. I can start researching for my Mini-Series Project I can create a cyanotype by using the negative I created and listening/following directions. AGENDA 1. Edit your self portraits. You need two final images - one portrait that reflects who you really are and one that shows you as a character/distorted/hidden. We would like to critique these on Friday. 2. Plan what you want to do for your final project of the semester (mini-series). There is a form in GC to fill out for teacher approval. Please go beyond any Photo 1 type of project. DUE BY THURSDAY 3. 5 more people can create their cyanotypes. Thursday - Introduction to Types of Light Goal: I can describe types of available light and demonstrate how to capture that lighting effect successfully. AgendaTalk about field trip Introduce types of light (info on projects page) Finish Self Portraits Finish Cyanotypes Finish Final Project Planning Sheet Start Lighting research and taking images Friday - Identity Critique Goal: I can critique my work and the work of others through discussion and writing. I can reflect on my successes and areas to work on through a written reflection. 1. Small group reflection activity to whole group discussion 2. Written reflection and turn in 3. Time left? Continue Lighting Study (research and taking images) Homework: Finish shooting your Lighting Study images (your phone is ok to use). |
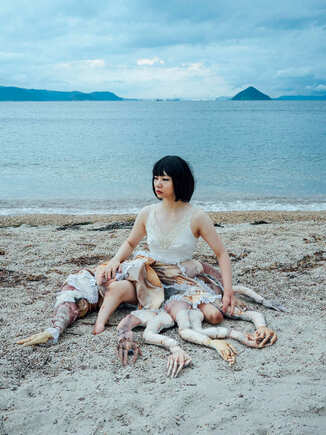
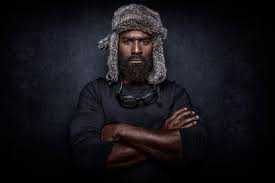
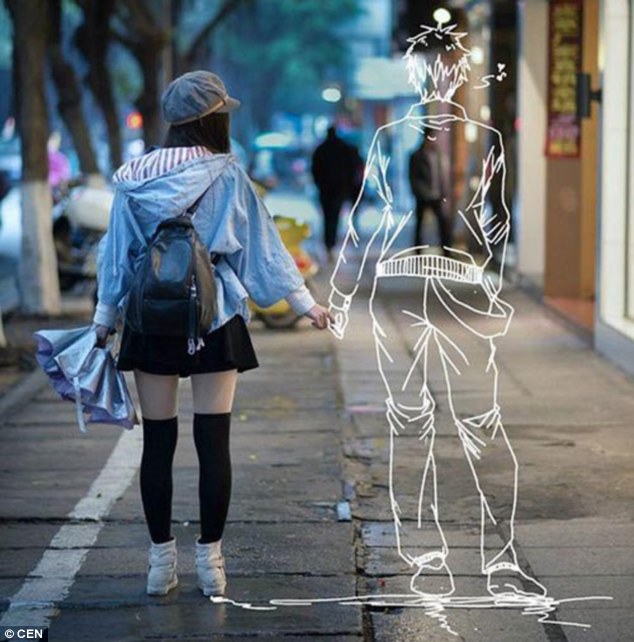
This is a self portrait from Mari Katayama. What do you think she is trying to communicate? Think about it and we will talk about her on Tuesday. Click on the image to read an interview from her.
Upcoming Things to Think About:
Winter Final - Your portfolio so far (10-12 pieces with writing) that reflects your growth this semester Scholastics (due end of semester) artandwriting.org Judges are looking for: - Quality of technique and composition - Sense of student voice - Titles are important Seniors can turn in a portfolio of 8 images Everyone one can turn in single pieces - $25 per portfolio - $7 per entry - Fee assistance available through East |
WEEK OF NOV 4

THURSDAY AND FRIDAY
Goals:
I can edit my self portraits for the look and message I want.
I can start researching for my Mini-Series Project
AGENDA
No one is allowed to go out of the classroom to shoot images these next two days. Thank you for understanding!
1. Create a contact sheet of your Identity Images
2. Start editing your self portraits. You need two final images - one portrait that reflects who you really are and one that shows you as a character/distorted/hidden. We would like to critique these on Tuesday.
3. Plan what you want to do for your final project of the semester (mini-series). There is a form in GC to fill out for teacher approval. Please go beyond any Photo 1 type of project.
Camera check out is after school with Ms. Baker. If you need color cellophane or a light, you need to check that out as well.
|
MONDAY
Goals: I can create a cyanotype with proper exposure from my digital negative. I can plan and shoot for my Identity Project. AGENDA 1. Look over week's agendas 2. Cyanotype Demo 3. Turn in missing work: Identity Research, Cyanotype Negative, Lightroom Tutorials 4. Shoot for your Identity images (due Thursday) |
CYANOTYPE INSTRUCTIONS
1. Find your negative. 2. Grab a clip frame from the counter 3. Ask Dr. O how long the exposure time is today 4. Load your frame in dim light 5. Quickly move your frame outside into the bright sunlight 6. Hang out and make sure no one touches your frame 7. When it's time, bring the clip frame in and put your paper in the water tray 8. Gently rock the paper until all the yellow chemical is removed from the paper 9. Put your print on the drying rack in room 125 10. Put away your clip frame and give your negative back to Dr. O |
|
TUESDAY
Goals: I can create a cyanotype with proper exposure from my digital negative. I can plan and shoot for my Identity Project. AGENDA 1. Looking at Self Portrait Ideas 2. Shoot for your Identity images (due Thursday) 3. Create a cyanotype from your digital negative UNEDITED SELF PORTRAIT IMAGES DUE THURSDAY! Turn in missing work: Identity Research, Cyanotype Negative, Lightroom Tutorials |

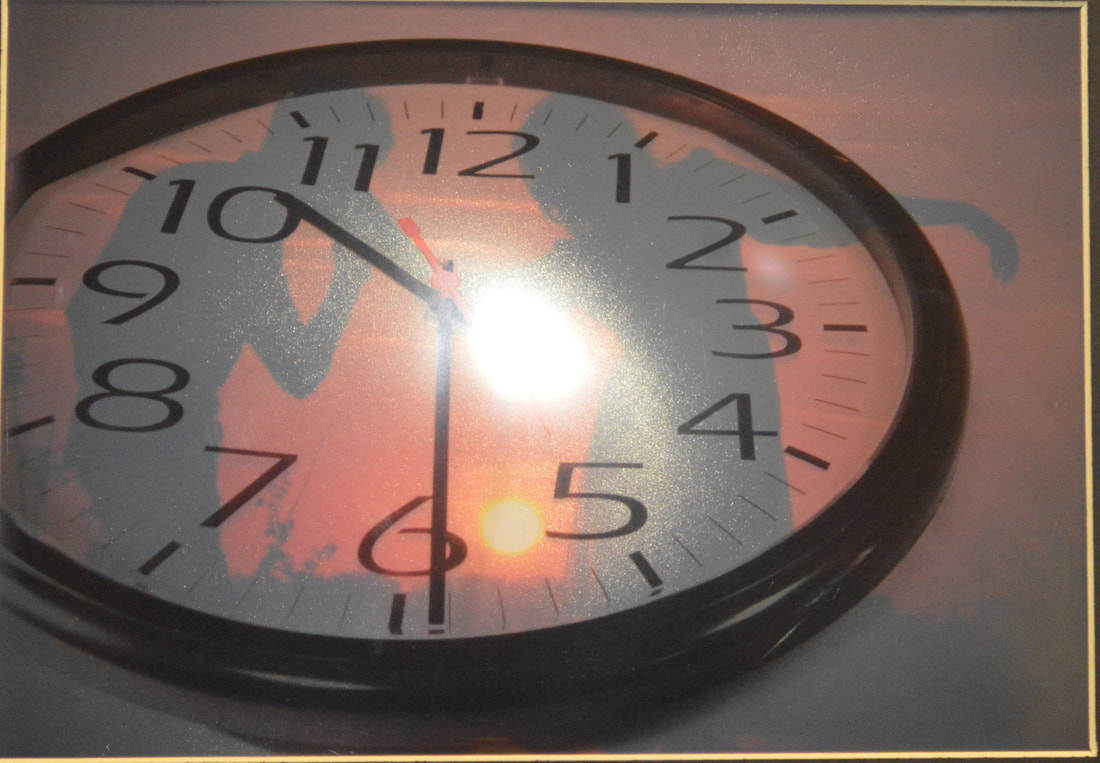
Artists throughout time have created self portraits. Why do you think that is?
|
Week of October 28
AGENDA
1. Make sure your Fears & Phobias images are ready for critique Thursday.
2. Finish your Lightroom Tutorials and turn into GC.
3. Finish your Identity Research (see Friday) and turn into GC.
4. Work on the Cyanotype negative and turn into GC.
1. Make sure your Fears & Phobias images are ready for critique Thursday.
2. Finish your Lightroom Tutorials and turn into GC.
3. Finish your Identity Research (see Friday) and turn into GC.
4. Work on the Cyanotype negative and turn into GC.
|
Cyanotypes
What is cyanotype? Watch this short video. Choose your favorite image from this semester. It should have a good range of values and a strong focal point. Create your negative - Watch this tutorial on how to prepare your image. Turn in your negative to GC (negative_name.jpg) |
|
Week of October 23
|
FRIDAY
Please get these things done: 1. Finish your Fears & Phobias images. All images and supplies are on the wire shelf in the back of the room. Critique on Tuesday! 2. Go through the Lightroom Tutorials (see Thursday). Make sure to fill out the reflection questions in GC. Due Monday 3. Start your research on Identity. Due Monday 
Have fun at Homecoming!
|
LIGHTROOM TUTORIALS
*please note that we only have access to Lightroom Classic (not CC). BOTH are are your computer. Getting to know the Layout of Lightroom Classic (just watch) How to organize your photos in Lightroom (just watch) How to edit your photo in Lightroom Classic (pull in one of your photos to edit along and turn in your results) How to move from Lightroom to Photoshop (just watch) - Don't forget reflection questions in GC Identity Research:
List of 10+ words that describe you Slide of 10+ images of portraits that inspire you |
THURSDAY
Goal: I can use mixed media techniques to enhance my two Fears & Phobias images.
I can ask my peers or teachers for feedback when I get stuck.
I can read and follow tutorials to learn the Lightroom Program and ask my peers and teachers for help (reading, speaking, and listening).
Agenda:
1. Field trip conversation
2. Intro to Lightroom
3. Intro to Identity Project
4. Review of Fears and Phobias Project. Last day to work in class or get anything printed for it.
5. Work on finishing Fears & Phobias and start on Lightroom Tutorials.
6. Done? Shoot for Yearbook (see Dr. O)
LIGHTROOM TUTORIALS
*please note that we only have access to Lightroom Classic (not CC). BOTH are are your computer.
Getting to know the Layout of Lightroom Classic (just watch)
How to organize your photos in Lightroom (just watch)
How to edit your photo in Lightroom Classic (pull in one of your photos to edit along and turn in your results)
How to move from Lightroom to Photoshop (just watch)
Week of OCtober 14
|
Thursday
Goals: I can use mixed media techniques to enhance my two Fears & Phobias images. I can ask my peers or teachers for feedback when I get stuck. I can read and follow tutorials to learn the Lightroom Program and ask my peers and teachers for help (reading, speaking, and listening). 1. Image Analysis on Google Classroom 2. Go over field trip goals - the next time we all see each other will be for the field trip! 3. Work on your TWO Fears & Phobias images. Need them printed? Dr. O can do it at lunch and you can pick it up 4. Done? Work on the following Lightroom Tutorials. LIGHTROOM TUTORIALS
*please note that we only have access to Lightroom Classic (not CC). BOTH are are your computer. Getting to know the Layout of Lightroom Classic (just watch) How to organize your photos in Lightroom (just watch) How to edit your photo in Lightroom Classic (pull in one of your photos to edit along and turn in your results) How to move from Lightroom to Photoshop (just watch) |
Field Trip Goals
9:15ish am - load the bus 10 am - get to Golden 10:15-12:15 - photo shoot and eat lunch 12:15 load the bus 1pm back to East |
|
Monday and Tuesday
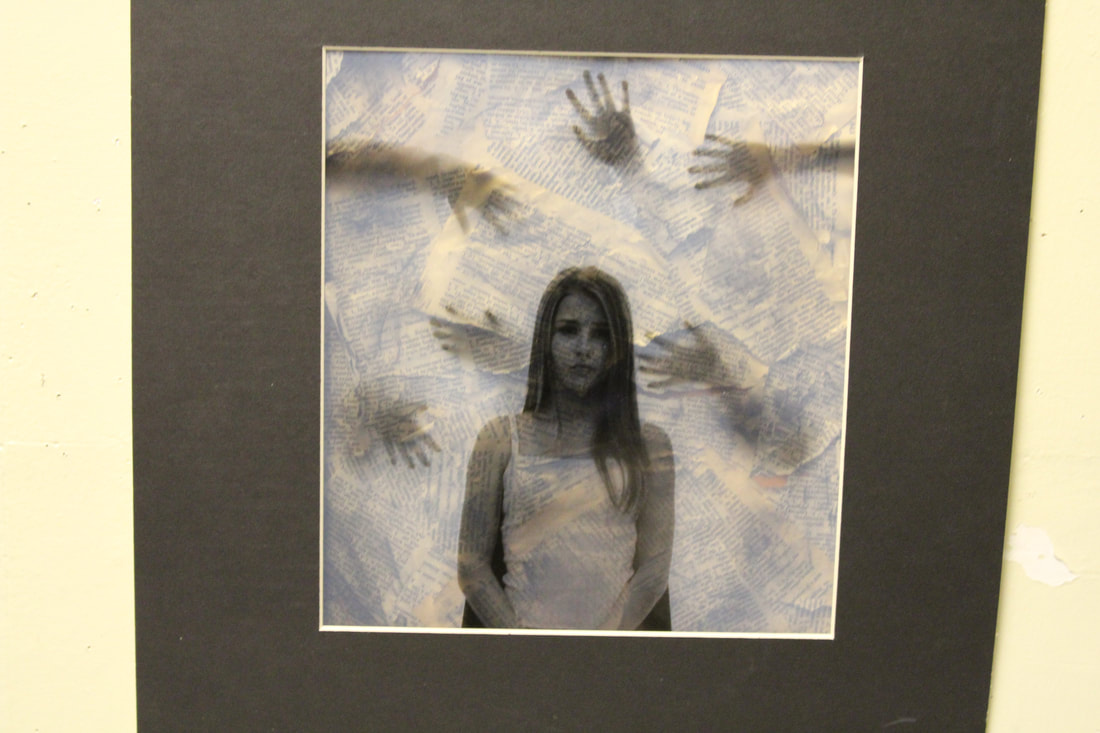
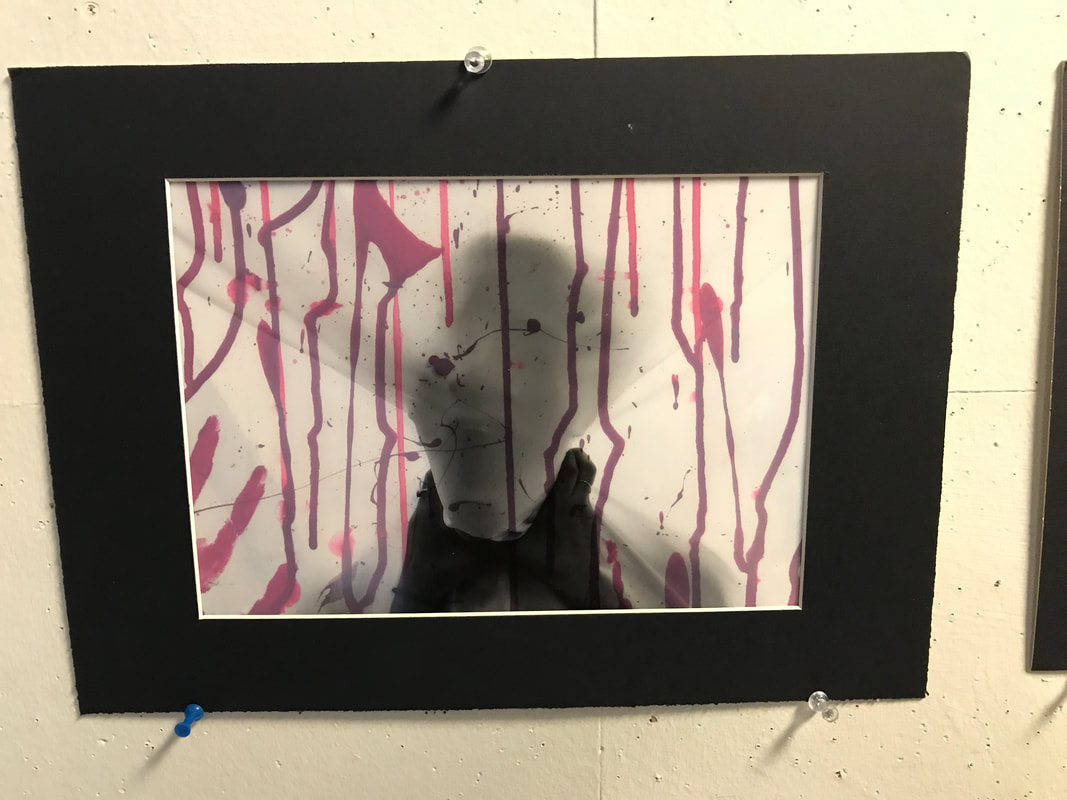
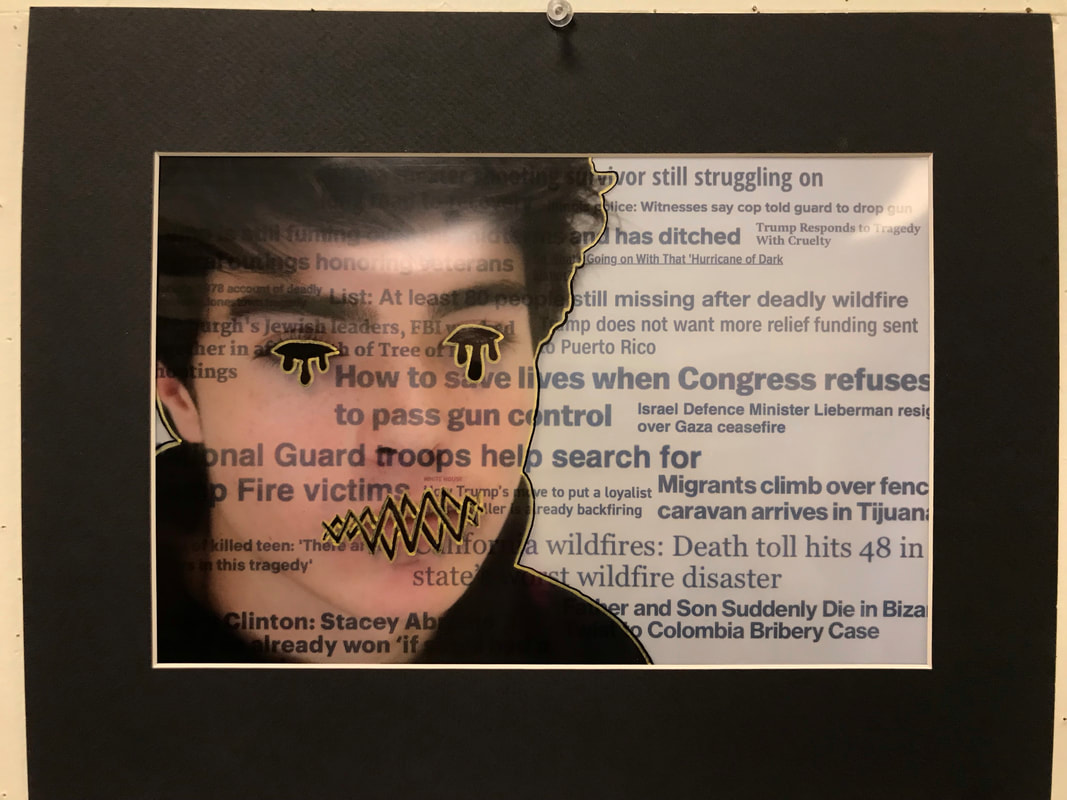
Goals: I can choose and apply a mixed media technique to enhance my Fears & Phobias project (reading) I can present my artwork and writing in a digital portfolio/website (writing). I can read and follow tutorials to learn the Lightroom Program and ask my peers and teachers for help (reading, speaking, and listening). 1. Show the teachers your website (will be counted as missing starting on Tuesday). 2. Finish turning in media experiments. 3. Upload your images and make a contact sheet. 4. Edit your best 2 Fears and Phobias images and turn into folder (let Dr. O know how you want them printed). 5. Start adding your chosen mixed media technique(s). 6. Done? Start Lightroom Tutorials (TBA). LAST DAY TO WORK ON FEARS & PHOBIAS IN CLASS IS THURSDAY. |
TYPES OF PRINTING:
Regular Photo Paper (Sewing, Collage) Matte Photo Paper (to add color) Transparency (Collage, back with text or texture) |


WEEK of OCtober 7
|
Goals:
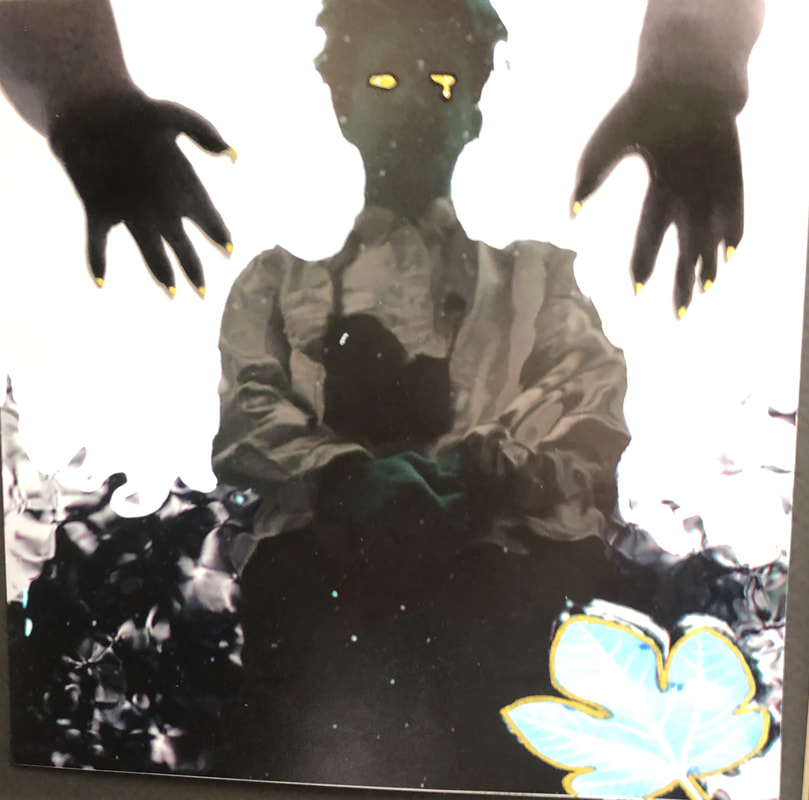
I can experiment with different materials to determine how I want to enhance my Fears & Phobias project. I can present my artwork and writing in a digital portfolio/website.
|
      |
Week OF SEPTEMBER 30
|
Friday, October 4
Goals: I can research images and ideas to plan for my next project. I can present my artwork in a digital portfolio/website. Agenda: 1. Research 10+ images for inspiration for your Fears & Phobias project 2. Watch video and take quick notes about what you learned. What is the difference between a fear and a phobia? What are two examples of this? 3. Look at this list of phobias. What sounds interesting to visualize? 3. Turn slide deck into GC 4. Upload all your work to your website. Use each other to help remember how to navigate Weebly. Website Check next Tuesday. |
What to have on your Website
Grade on Tuesday! Home Page - Looks professional, welcome message, some of your images Projects Page - Street Photography (images, contact sheet, reflection) - Shutter Speed process board (download as pdf, use a Scrib Doc for the placeholder) - Aperture, ISO, White Balance Process Board - Humans of East HS (images, reflection) - 10 Objects (images, reflection) Research Page Street Photography Research 25 Images Research |
|
Thursday, October 3
Goals: I can analyze other people's photographs (speaking and writing). I can modify my images using the feedback I received from my peers (reading). Agenda: 1. Get organized, prepare and pull up images for critique (10 minutes) 2. Critique with partners (20 - 30 minutes) 3. Time to edit and submit Street Photography Project to Google Classroom (30 minutes) 4. Introduction to Fears and Phobias. 5. (If time) Upload work to website. Website Check next Tuesday. |
|
|
Tuesday, October 1
Goals: I can curate my images to find the best 5-7 examples of street photography. I can edit my images using Photoshop and referencing tutorials or videos if I need review in how to use the program. Last day to edit your 5-7 Street Photography images! Things to think about:
Done? Start working on your website (See Projects Page): Projects so far:
|
Helpful Tutorials
How to do Basic Edits in Photoshop Best Way to turn your image to Black and White How to Tone Your Image How to Crop Your Image How to remove distractions using Clone Stamp and Healing Brush How to enhance the image using selective color 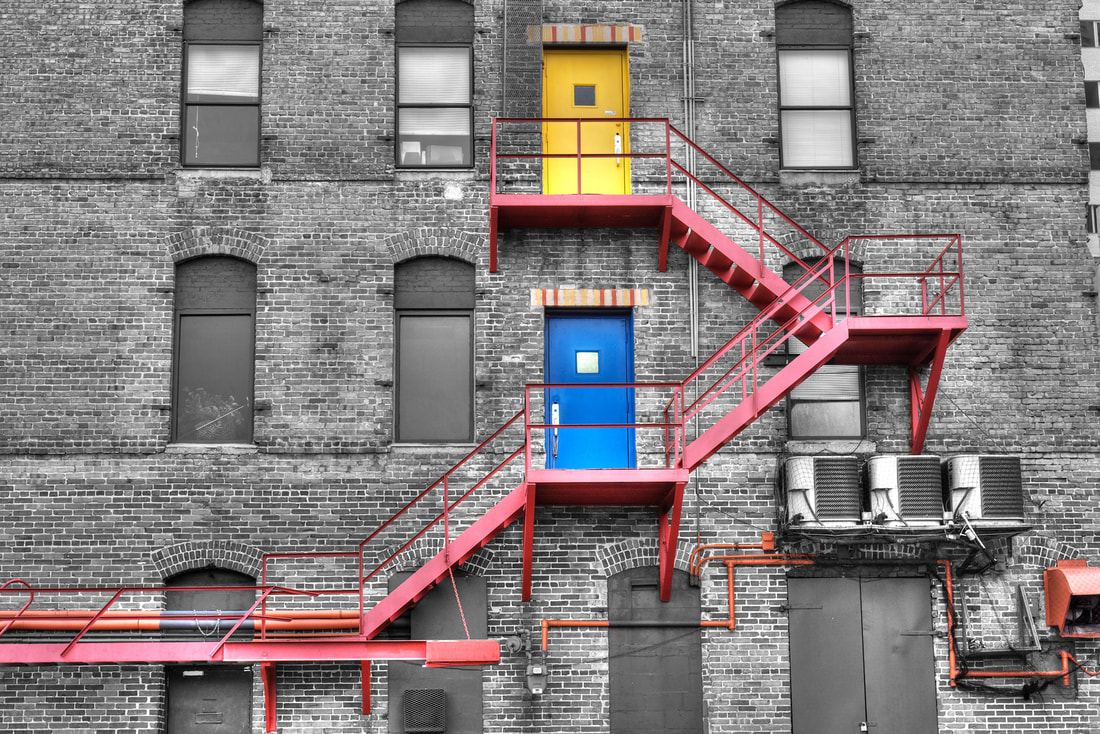
Selective Color

Toned (Sepia)
|
|
Monday, Sept 29
Goals: I can create a contact sheet of all my images by listening to instructions and reviewing the steps with the video. I can curate my images to find the best 5-7 examples of street photography. I can edit my images using Photoshop and referencing tutorials or videos if I need review in how to use the program. 1. Color or black and white - how to determine what works best for your images 2. Basic review of Photoshop 3. Curate and edit 5-7 images from your street photography shoot. |
|
WEEK OF SEPTEMBER 23
Friday, Sept 27
Goals:
I can describe the main features of a successful composition.
I can create a contact sheet of all my images by listening to instructions and reviewing the steps with the video.
I can curate my images to find the best 5-7 examples of street photography.
I can edit my images using Photoshop and referencing tutorials or videos if I need review in how to use the program.
1. Image Analysis on GC
2. Review yesterday's shoot - what went well? Where should we go next?
3. Review how to make a contact sheet - video tutorial is on tutorials page
3. Finish Research for Street Photography (10 images, notes on article and video) - turn in to GC
4. Choose 5-7 of your best images from the shoot. Edit these in Photoshop. If you need a refresher on how to use Photoshop, see the video on the Tutorials page. We will have Monday and Tuesday of next week to edit as well.
NEED TO TURN IN: Shutter Speed Process Board, any past due work
Thursday, Sept 26
Field Trip Day to Union Station/16th Street Mall
Field Trip Day to Union Station/16th Street Mall
|
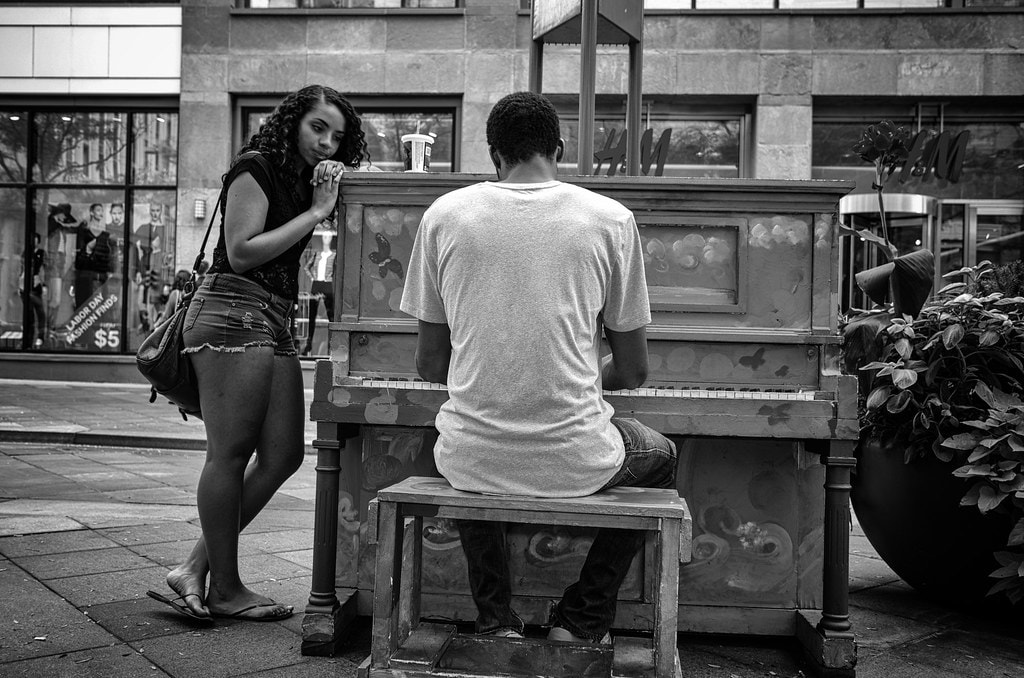
Tuesday, Sept 24
Goals: I can find example of street photography that I am interested in. After watching a video and reading an article, I can describe the basic principles of street photography. 1. Review field trip expectations 2. Watch video and jot down basic principles 3. Read the article and add to your list of basic principles. 4. Find 10+ examples of street photography to create an inspiration board 5. Create a slide deck with your inspiration images, notes from the video, and notes from the article |
|
|
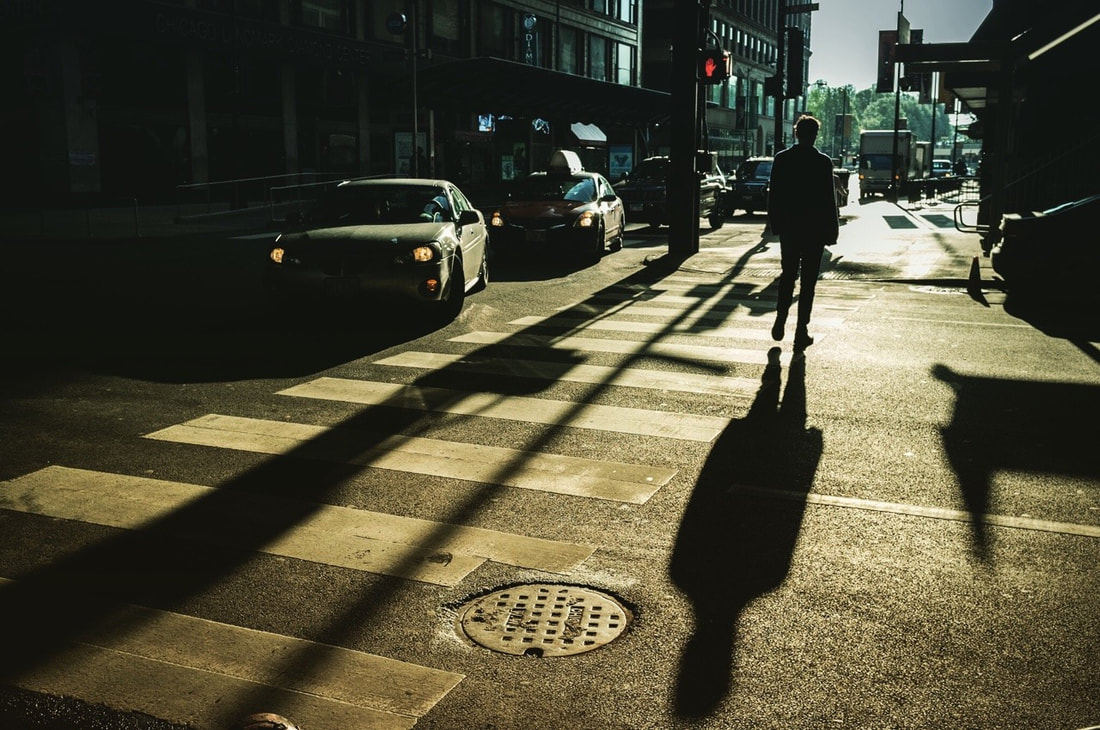
Monday, Sept. 23
Goals: I can explain what street photography is and what the common elements of street photography are. I can demonstrate my understanding of shutter speed through a presentation of my work. 1. Review field trip - forms due tomorrow! 2. What is street photography lecture 3. Finish Shutter Speed Process Board 4. Part 1 of Street Photography research: Find 10 example of street photography that you enjoy. Put all on a Google Slide. Homework: Get field trip form signed, end of 6 weeks Friday (check your grade). |
|
Week of September 16
|
Shutter Speed Process Board
Slide 1: 5 Best images from STOPPED ACTION (edited for exposure and composition) Slide 2: In your own words, explain how to capture stopped action. Slide 3: 3 best images of BLURRED ACTION (edited for exposure and composition) Slide 4: In your own words, explain how to capture blurred action. Slide 5: 2 best images of PANNING (edited for exposure and composition) Slide 6: In your own words, explain how to capture panning. |
Friday, Sept. 20
Goals; I can demonstrate my understanding of shutter speed through a presentation of my work. 1. Demo on contact sheets 2. Demo on finding your metadata in Photoshop 3. Work on your Shutter Speed Process Board 4. Fix your Humans of East High School portraits (if needed) 
|
|
Thursday, Sept. 19
Goals: I can adjust the shutter speed to control motion within the image. I can demonstrate blurred action, stopped action, and panning. AGENDA:
Homework: Come in to make up any work - end of 6 weeks is next Friday |
|
SHUTTER PRIORITY EXPECTATIONS
Shoot at least 36+ images EACH of: Stopped Action Blurred Action Panning We will edit 5 images each of stopped and blurred motion and 2 images of panning. |
|
|
|
Tuesday, 9/17
Goals: I can adjust the shutter speed to control motion within the image. I can demonstrate blurred action, stopped action, and panning. 1. Review portrait assignment. 2. Challenge winners 3. Review shutter priority mode and how to control motion in the camera. 4. Experiment with the camera outside (on campus!) 5. Upload your results to your computer Thursday: Shooting outside for Shutter Priority |
|
|
Monday 9/16
Goals:
1. Review parameters for portraits and layout 2. Peer check BEFORE you turn in 3. Turn in 3 portraits into GC and write your reflection. Are you missing any work? PLEASE get it turned in! Done? Shoot for Yearbook (see Dr. O) |

|
Week of September 9
|
Friday 9/13 -
Internet went down - Photo challenge task instead Goals:
1. Review parameters for portraits and layout 2. Peer check BEFORE you turn in 3. Turn in 3 portraits into GC and write your reflection. Are you missing any work? PLEASE get it turned in! Done? Shoot for Yearbook (see Dr. O) |
|
Thursday 9/12
|
Goals:
1. 9/11 video on famous photo. Google Classroom response. 2. Survey for Ms. Skala 3. Grades and missing work 4. Talk about specific for editing your Humans of East HS work. 5. Time to edit your portraits. You must have at least one other person look at your work for spelling and format issues. |
|
|
Monday 9/9 and Tuesday 9/10
Goals: I can explain how ISO, White Balance, and f-stops work by the example photos I shot as well as describe what each camera operation does (writing). I can plan and shoot for my "Humans of East HS" portraits by setting time in my schedule, choosing questions to ask, and deciding on my subjects. 1. Create process board of your work from the past two days and turn into GC. 2. Refine your 10 Objects projects (if it got sent back) 3. Plan out your "Humans of East HS" project (unedited photos due next Thursday) 4. Still have time? You may go out and try to capture a portrait and interview. 5. Yearbook needs some images (see Dr. O). HOMEWORK: Shoot for "Humans of East HS" (due Thursday) |
|
Week of September 3
|
Goals:
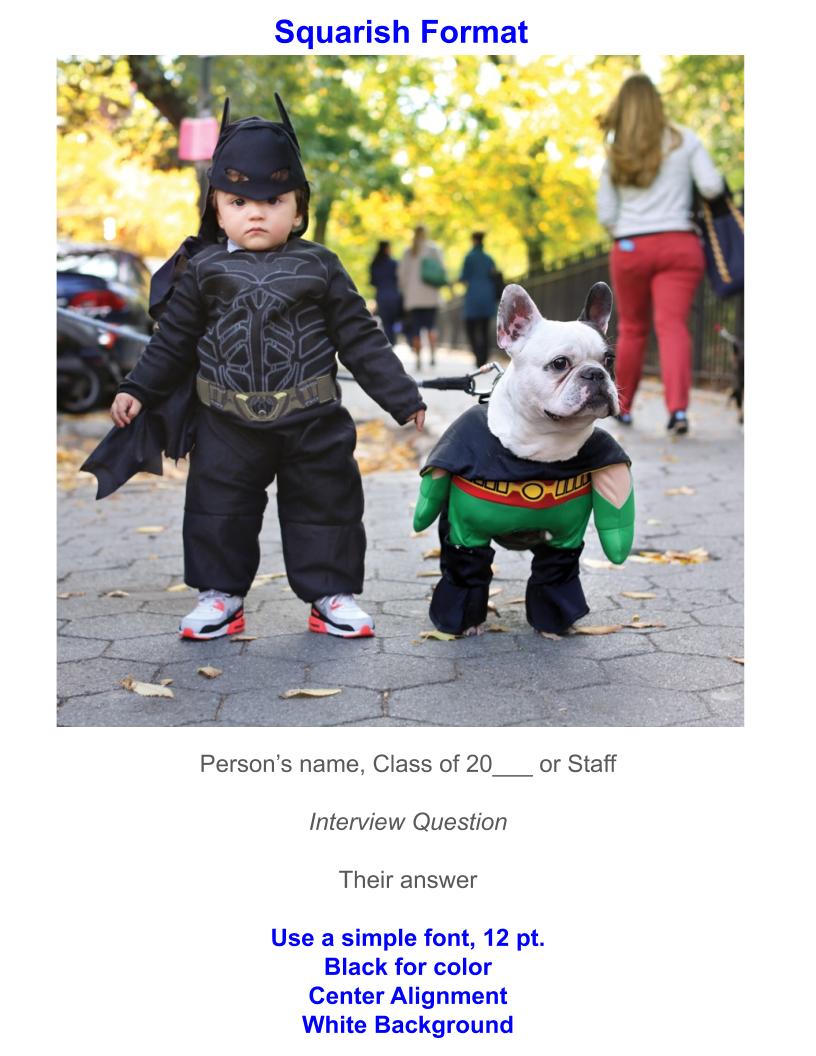
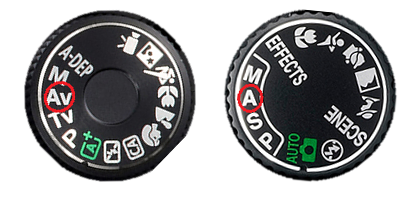
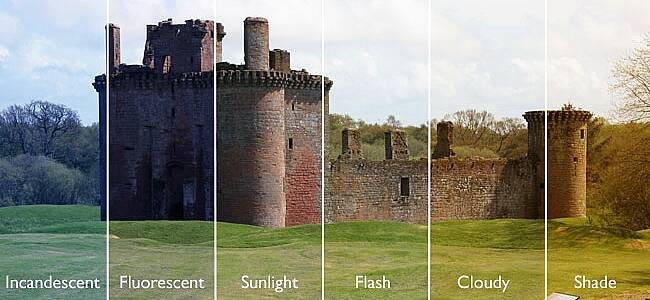
I can explain how ISO, White Balance, and f-stops work by the example photos I shot as well as describe what each camera operation does (writing). I can plan for my "Humans of East HS" portraits by setting time in my schedule, choosing questions to ask, and deciding on my subjects. 1. Review concepts of ISO, White Balance, and Aperture by watching videos by Canon Australia. 2. How can we see the metadata in our photos? 3. Create process board of your work from the past two days and turn into GC. 4. Refine your 10 Objects projects (if it got sent back) 5. Plan out your "Humans of East HS" project (unedited photos due next Thursday) 6. Still have time? You may go out and try to capture a portrait and interview. HOMEWORK: Start shooting for "Humans of East HS" 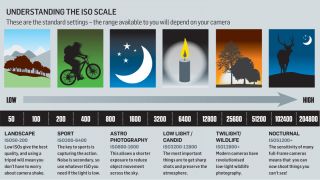

|
ISO, White Balance, and Aperture Process Board
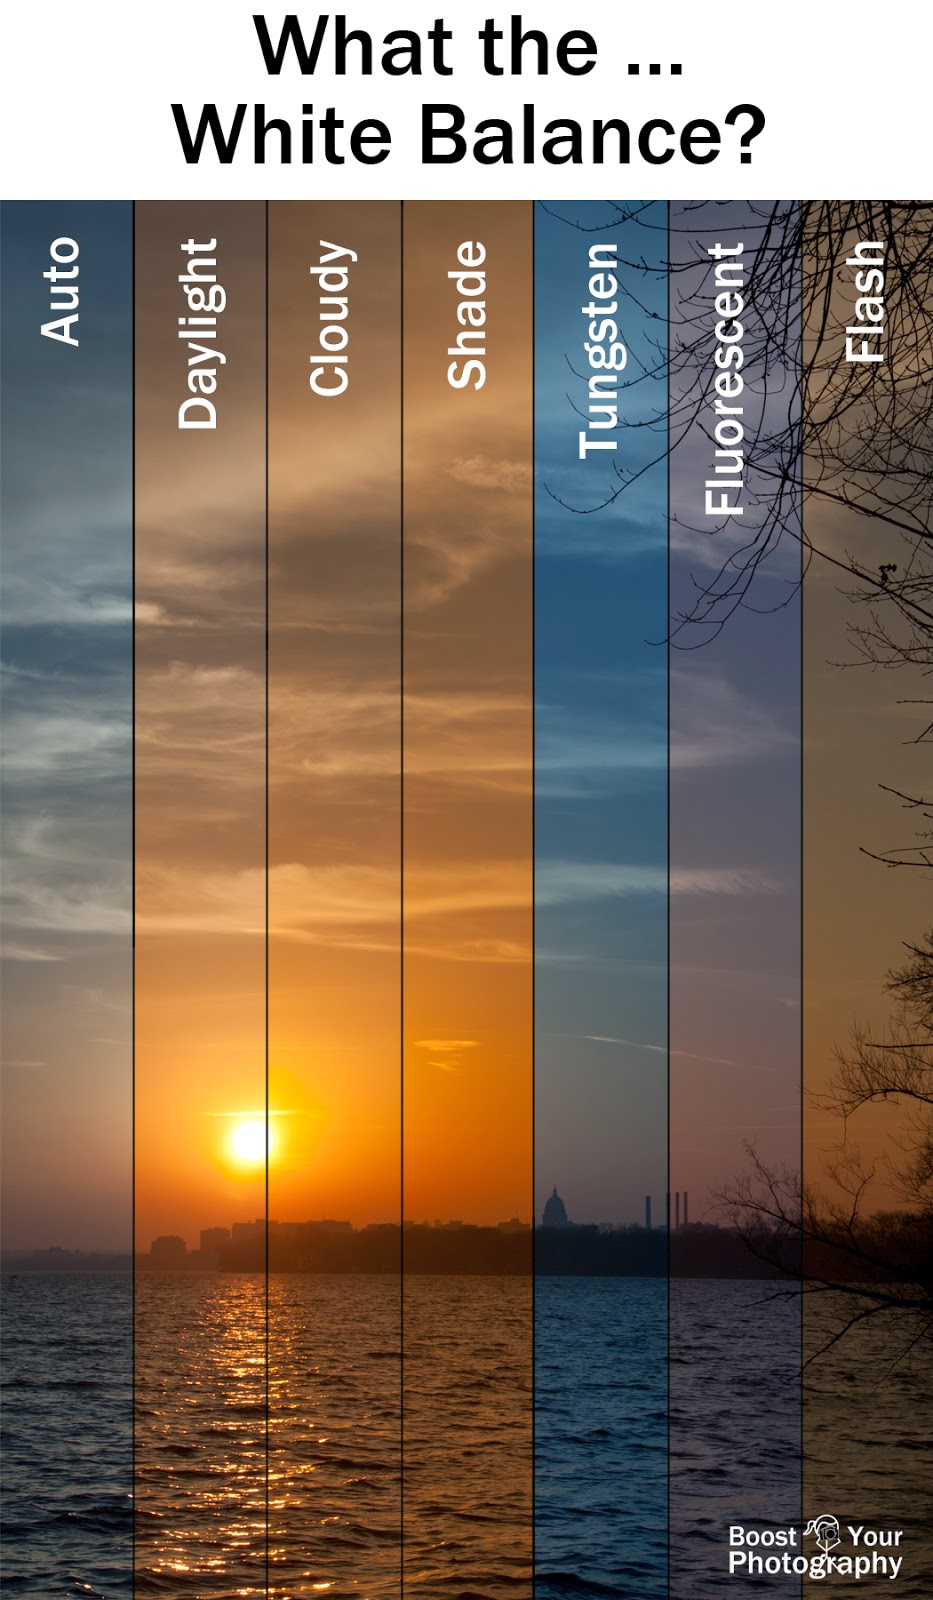
*edit/crop in Pixlr if needed In Google Slides: Slide 1: Find your outside shots (6 images) where you changed the ISO. Organize those in a table/grid on your slide, labeling which ISO was which. Slide 2: Find your inside shots (6 images) where you changed the ISO. Organize those in a table/grid on your slide, labeling which ISO was which. Slide 3: In your own words, explain what the ISO does Slide 4: Find your outside shots (5-6 images) where you changed the White Balance. Organize those in a table/grid on your slide, labeling which White Balance was which. Slide 5: Find your inside shots (5-6 images) where you changed the White Balance. Organize those in a table/grid on your slide, labeling which White Balance was which. Slide 6: In your own words, explain what the White Balance does Slide 7: Find 5 images that demonstrate Short Depth of Field. Organize those in a table/grid on your slide, labeling which f-stop you used. Slide 8: Find 5 images that demonstrate Long Depth of Field. Organize those in a table/grid on your slide, labeling which f-stop you used. Slide 9: In your own words, explain what the aperture is. How does it affect depth of field? |
|
Thursday, Sept 5
Goal:
AGENDA

|
APERTURE EXERCISE
Aperture Priority Mode - you choose the f-stop and the camera chooses the shutter speed for a proper exposure
City Park Shoot
|


|
Tuesday, Sept 3
Goal:
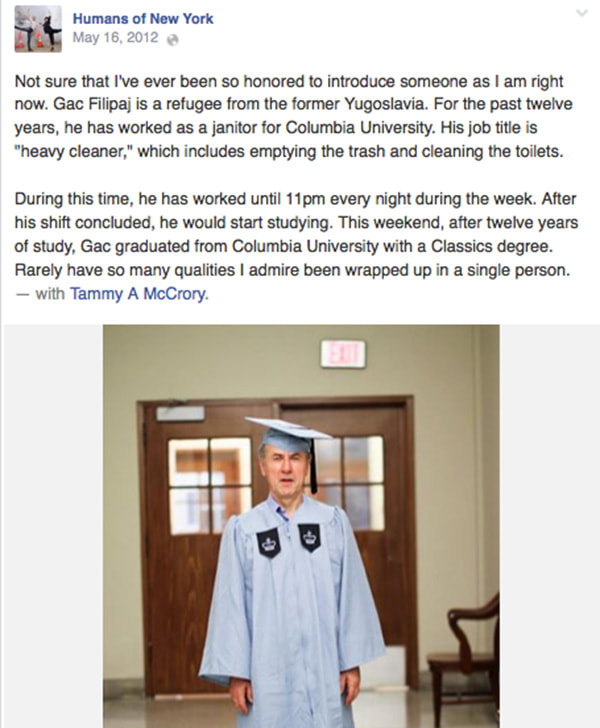
1. Review of "Humans of NY" project. What interview question should we ask? What are the parameters of the project? 2. Review proper camera handling, checkout procedures, and pass rules. 3. Review ISO and White Balance controls 4. Shoot both outside and inside to while manipulating the ISO and White Balance 5. Last 10 minutes of class: Download your images and turn in your pass. |

WHITE BALANCE AND ISO MANIPULATION
1. Go OUTSIDE and find an interesting composition. You can shoot in Program Mode and shoot the same image with the following ISOs: 100, 200, 400, 800, 1600, 3200 2. Find another interesting composition OUTSIDE. Shoot in Program Mode with an ISO of 200. This time, change the White Balance: Daylight/sunny, Cloudy, Shade, Tungsten, and Fluorescent 3. Go INSIDE and find an interesting composition. You can shoot in Program Mode and shoot the same image with the following ISOs: 100, 200, 400, 800, 1600, 3200 2. Find another interesting composition INSIDE. Shoot in Program Mode with an ISO of 200. This time, change the White Balance: Daylight/sunny, Cloudy, Shade, Tungsten, and Fluorescent 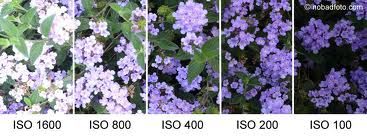
|
Week of August 26
|
Monday, 8/26
Goal: Students will participate in a demo about how to shoot their "10 Objects" and then continue to explore the Snapseed and Pixlr editing programs. (listening and reading). 1. Demo on how to correctly shoot your "10 Objects". 2. Finish your editing tutorials from Friday and turn in. 3. Start shooting your "10 Objects" in the gallery. HW: Shoot for your "10 Objects" (due Thursday), get your fee paid 
|
|
|
Tuesday, 8/27
Goal: Students will work in small groups to apply their knowledge of knolling, camera operations, and lighting to shoot their "10 Objects" imagery. (speaking and listening). 1. Watch demo on creating a diptych. Missed something? Video on Editing in Pixlr Video on Creating Diptych in Pixlr 2. Work with a partner or small group to shoot your images for your "10 Objects" project. 3. Already done or you will be shooting at home? Try the challenges to the right. HW: Shoot for your "10 Objects" (due Thursday), get your fee paid How to create your Diptych 1. Upload your images into your computer. Place all the images in one folder on your desktop. Name this folder "10 Objects". 2. Choose your best image to edit. Edit the image for exposure, tone (get rid of any yellow cast), sharpen a bit, and remove any distraction/blemishes. See if your can crop your composition to a square. 3. Create your diptych. Start with an image size of about 13" x 19". 4. The left side of your diptych should be your image while your right side is the text. |
CHALLENGE WORK (Extra Credit)
Done with everything? Option 1: Create a knolled or flat lay image to be used for a social media campaign (fake or real). Make sure the composition is a square. What are you selling or communicating? Edit for a finished image and turn into GC. Option 2: Pixlr Surreal Landscape With Layers AND Cutout and Change Your Background. You will need to use regular Pixlr (not Pixlr X) for the Surreal Landscape, so let me know when you need the permissions to use Flash. Follow the tutorials using one of your own images. Turn into GC. 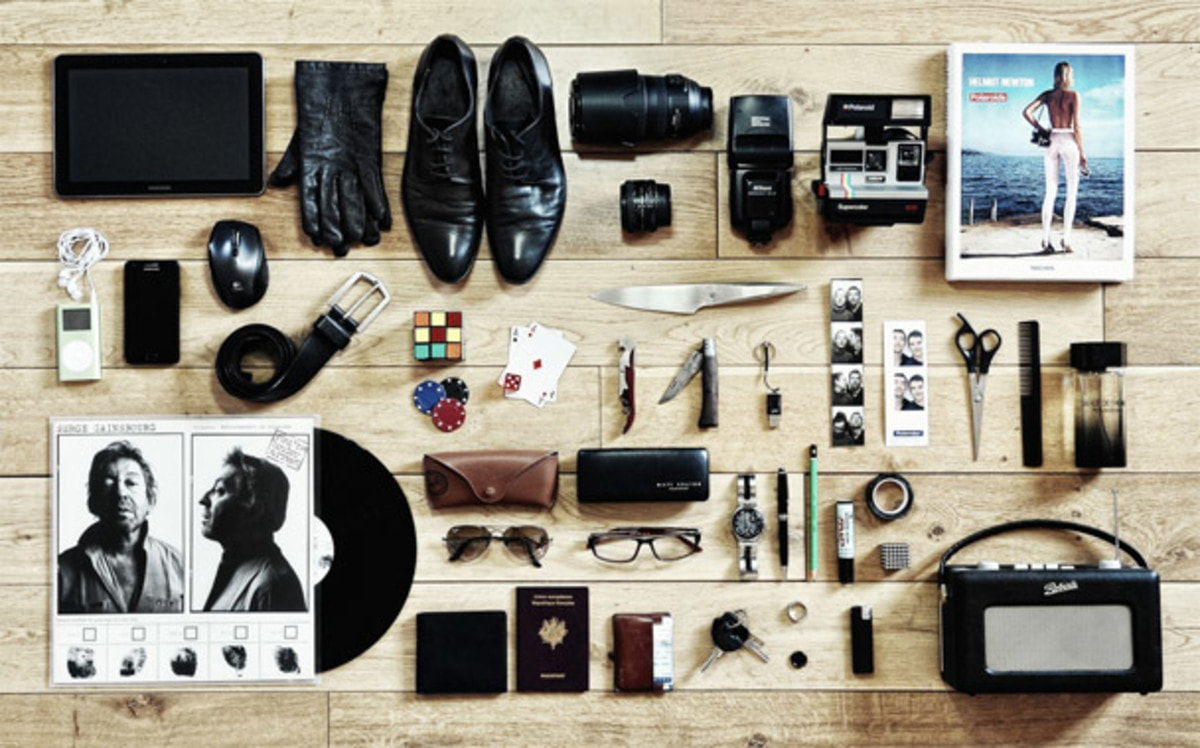
|
|
Thursday, 8/29
Goal: Students will learn how to create a diptych within the Pixlr editing software and start the editing process for their "10 Objects" image . (listening and reading). 1. Image Analysis in GC. 2. Review of requirements for diptych - Missed something on the demo? Watch videos posted on Tuesday to hear the information again. 3. Upload your images into your computer. Place all the images in one folder on your desktop. Name this folder "10 Objects". 4. Choose your best image to edit. Edit the image for exposure, tone (get rid of any yellow cast), sharpen a bit, and remove any distraction/blemishes. See if your can crop your composition to a square. 5. Create your diptych. Start with the biggest size possible. 6. The left side of your diptych should be your image while your right side is the text. Mid-point critique halfway through the period. If you have time...play the Canon Camera Challenge. Show Dr. Overby the result for extra credit! HW: Get your fee paid |
|
Friday, 8/30
Goal: Students will reflect upon their work and the work of others through verbal group critique and a written self reflection.
1. Bring your diptych up on your screen.
2. In small groups, look at the diptych from each member of your group and work through the questions on the critique sheet.
3. Whole group discussion - what makes a successful diptych?
4. Spend some time to refine your image according to the feedback you received. Make sure your image is saved as diptych_name.jpg
5. Fill out the Self Reflection questions and turn in your diptych in GC.
6. Introduce new project.
HW: get your fee paid
First Week - Welcome back!

|
Welcome back!
This week we will: - Get to know one another - Set up the computers and accounts - Introduction to Photo 2 - Start Introduction and Review of Photography Concepts |
|
WEDNESDAY
|
THURSDAY
|
|
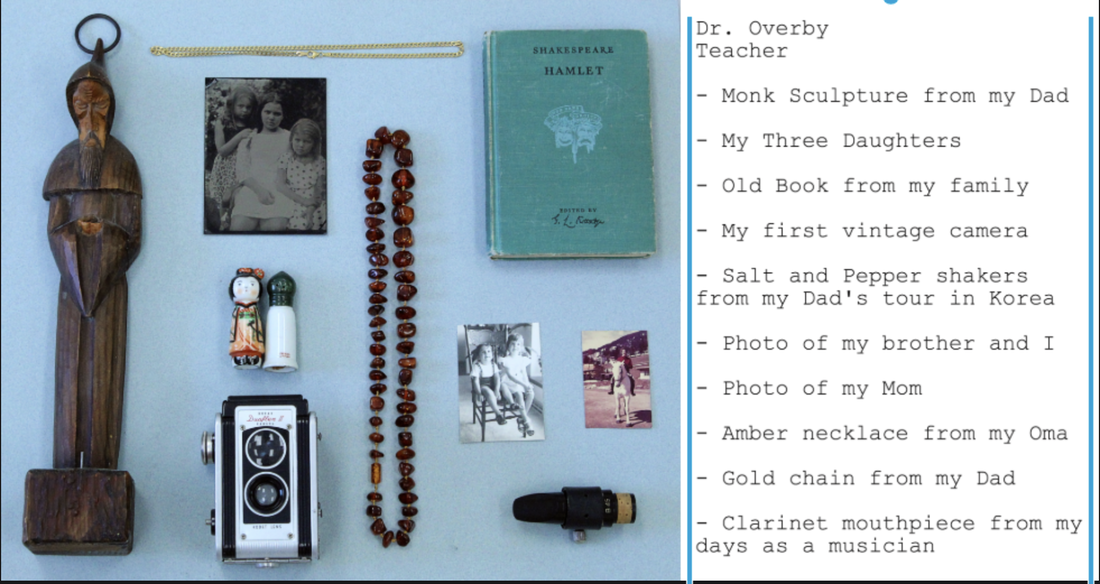
This to That Activity
Go Over Syllabus Get parent slip signed by Monday Go Over 10 Things Project Shot images due Thursday, August 29 Aim for 10+ images for your contact sheet Log into Student account... 1) Bookmark class website 2) Join Google Classroom Student Survey (Google Classroom) Image Analysis (Google Classroom) Homework: start shooting for 10 Things, get parent slips signed |
Assignment
Find 25 examples of professional photography that you like. Put them neatly into 2 or 3 Google Slides. Create an additional slide with the following responses: 1. How did you find your images? Did you search for particular photographers or did you search by theme? Explain. 2. Looking at the 25 images as a whole, what commonalities do you see (subject, color, editing, point of view, purpose)? 3. How will these images influence your own style of photography? What are you interested in? How do you want your images to look? Done? Look up examples of knolling/flat lay |
Friday
|
GOOGLE DRIVE
Make sure you load the Google Drive app on your phone SNAPSEED 1. Add the Snapseed app to your phone. 2. Go through this tutorial and edit one of your photos from your phone. Save as a COPY (keep original). 3. Put these two images (the original and the edited photo) on your computer using email or putting the files in your Google Drive. PIXLR 1. Open Pixlr on your computer (Use Pixlr X). 2. Choose a stock photo on Pixlr and save a copy to your computer. 3. Watch the tutorial. Practice the skills shown with your stock image. 4. Undo the edits you just tried. 5. Edit your photo to what looks good to you. 6. Save your edited photo on your computer. IN GOOGLE CLASSROOM 1. Find the assignment - Pixlr and Snapseed 2. Access the template. Make yourself a copy. 3. Add your photos and write your reflection. 4. Turn your document into Classroom. Shooting this weekend for "10 Objects"? Watch this video to see how to set everything up.
|


|
