Wednesday, May 20
Finish Assignments
- 7 to 10 glitch images
- 5 to 7 scanner images
- last presentations for websites
Extra Credit (choose one) - files found via Google Classroom
Stranger Things Cinemagraph (gif animation)
Give yourself a Realistic Tattoo
Create a photo mosaic
Create a composite night scene
Outside Extra Credit
Go to the student parking lot and capture 15+ interesting close ups of car parts
MOnday, May 18 & Tuesday May 19
Scanography & Glitch Tutorial
|
What is scanography?
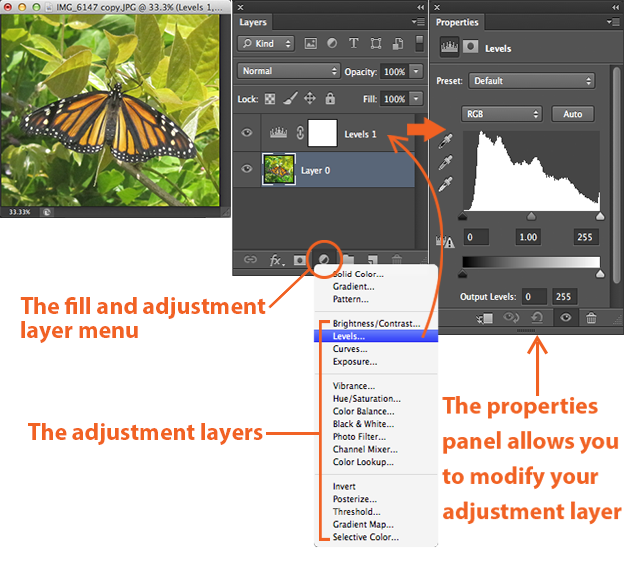
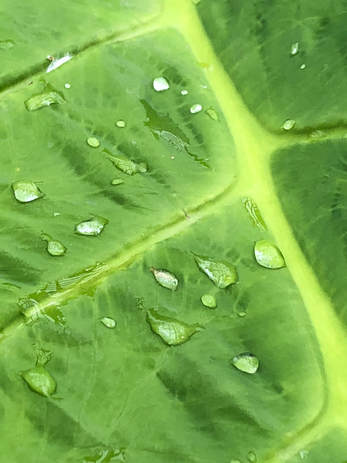
Scanography (also spelled scannography), more commonly referred to as scanner photography, is the process of capturing digitized images of objects for the purpose of creating printable art using a flatbed "photo" scanner with a CCD (charge-coupled device) array capturing device. (Wikipedia) Website devoted to scanning Tutorial on Scanography National Geographic Scanography Submissions You will create 1 to 2 scanographs using objects and food provided as well as things you brought in Think about: Self Portrait or portrait of someone (keep your eyes closed) I Spy composition Pattern/Repetition Study of a botanical object YOU are responsible for cleaning up the scanner and the area around it - no liquid, sugar, sand, etc. that could scratch the glass or ruin the electronics! |
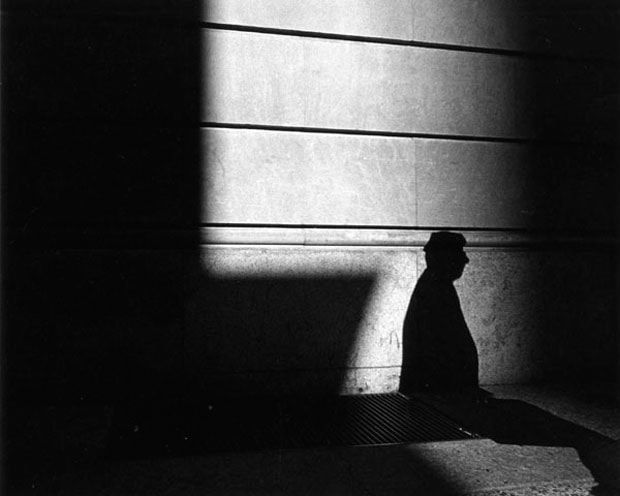
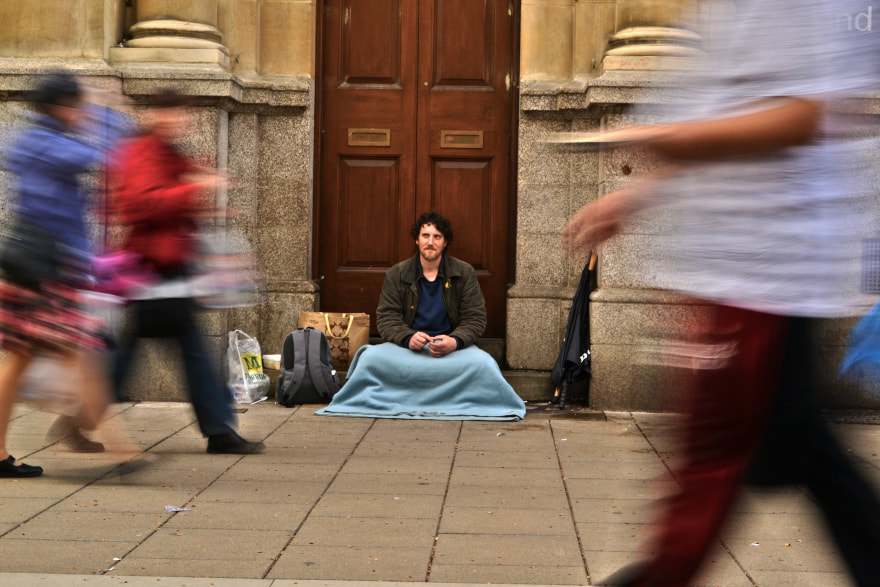
This project is going to test your compositional skills. You need to make sure you composition is balanced and has a clear sense of organization, Too much empty space will cause your image to lack interest/energy.
How do the examples above use compositional rules to create a stable image? |
|
Glitch Tutorial
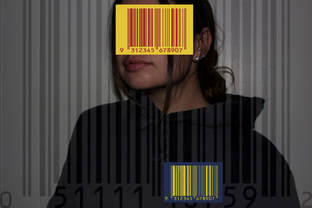
What is a glitch? A glitch is the unexpected result of a malfunction, digital or analog errors of electronic devices like TV, VHS tape, SD card, etc. CHOOSE: The Text Editor and online Glitch Tool (make 7-10 images) OR do the Photoshop Tutorial (1 to 2 images). Use your own images |
ONLINE GLITCH TOOL
Image Glitch PHOTOSHOP TUTORIAL
Advanced Photoshop tutorial USING THE TEXT EDITOR
!. Make a copy of the image you want to use. Save it as a different file name. 2. Open the image in Text Edit 3. After loading, a document with a wealth of text will appear. The first few lines of text are important and contain information that tells the image how to open. Scroll down to about midway through the text file and select and copy a few lines of text. 4. Paste the copied text into other areas around the middle of the file. 5. Click File > Save As and open the glitched image in Preview to view the result. Always rename your file or you will corrupt the original. Try as many variations as you can to get the best result. |
Friday, May 17
Finish and present websites
Start uploading files to Google Drive off your computer
Homework: Bring objects to use for Scanography
Start uploading files to Google Drive off your computer
Homework: Bring objects to use for Scanography
Final Exam Requirements - Presentations on Tues. 5/15 & Wed. 5/16
|
Home Page
Professional Welcome message Remove stock imagery and replace with your own Semester Two Page: Water Project (9 images, contact sheet, reflection) Narrative Project (3 images, contact sheet, reflection) Text + Photo (1 image, reflection) Studio Gel Project (3 images, contact sheet, reflection Photo Challenge Project (if you have it) Teen Issue Project (save the pdf as a jpeg OR use the Scribd Doc placeholder) (image, contact sheet) HDR Project (real image and fake HDR) (2 images, contact sheet) Passion Project (3-5 images, contact sheet, reflection) Inspiration Page Research Slide for Water Project Research Slide for Narrative Project Tutorial Results for Narrative ProjectOn Inspiration Page: Research Slide for Studio Gels Research Slide for Teen Issue Project Research Slide for Passion Project Personal Photography Page 7-10 images that you have shot outside of school, not for projects but for your interests Portfolio Page 12-15 of your best images from the year (projects + personal) Artist Statement (7-10 sentences) - How have you grown as a photographer this year? - What new techniques have you learned? - Are you starting to develop an artistic style in your photography? - Are there certain subjects that your are drawn to to take photos of? - How will photography influence your future career/personal life? - What do you want to learn more about (in the field of photography)?) |
Website Presentation
Show off your Projects Page - what was your favorite project and why? Show off your Portfolio Page. Point out a few of your favorite images from this year - why are they your favorite? Show off your Personal Photography Page. What do you take photos of in your spare time? SENIOR SURVEY IN GOOGLE CLASSROOM - WORTH POINTS!
|
Monday - Wednesday May 6-8
|
Goal: Students will curate and edit a series of 3 to 5 images to meet the requirements of the Passion Project.
3. HDR assignment If you did not turn in BOTH images (one true HDR technique, one fake), please do so ASAP 4. Start updating your website (list to come tomorrow) |
Artswalk image?
Essence Maddie P Aniyah Aaron Braden Kip Dom (put a file in the folder or find your image in the pile of work) |
EVENTS COMING UP THIS WEEK
Thursday - Artswalk from 5:30 to 8 Friday - DPS Photo Show (Robert Anderson Gallery) 5pm to 8pm Saturday - Installation of Utility Boxes 8am to Noon SCHEDULE FOR THE WEEK
Monday - Wednesday - Edit Passion Project Friday - Start Website update Monday 5/13 - Grade Passion Projects Tuesday - Website Update Wednesday - Website presentations (final foe Seniors) |
Friday, May 3
HDR in Lightroom - https://helpx.adobe.com/photoshop/how-to/photoshop-merge-to-hdr.html
HDR in Photoshop - https://helpx.adobe.com/photoshop/using/high-dynamic-range-images.html
Fake HDR - https://prodigalconcepts.com/8-steps-to-fake-hdr/
HDR in Photoshop - https://helpx.adobe.com/photoshop/using/high-dynamic-range-images.html
Fake HDR - https://prodigalconcepts.com/8-steps-to-fake-hdr/
Wednesday, May 1
|
HDR stands for High Dynamic Range. The dynamic range of a scene tells you how different the brightest parts of the scene (the highlights) are from the darkest parts of the scene (the shadows). The human eye can see a much greater dynamic range than any camera, including the camera of your iPhone.
While your cell phone will do all the HDR work for you, we will learn how to create HDR images through the SLR camera and Photoshop. You will need to take 5 exposures (one underexposed by two stops, one underexposed by one stop, one exposed correctly, one overexposed by one stop, one overexposed two stops) to get the full dynamic range. Tripods are a MUST to line up the scene. |

Top Row (l. to r.) The bracket of five exposures: [+2EV] [+1EV] [0] [-1EV] [-2EV]; with the final HDR image.
|

Friday, APril 26 & Tuesday, April 30
|
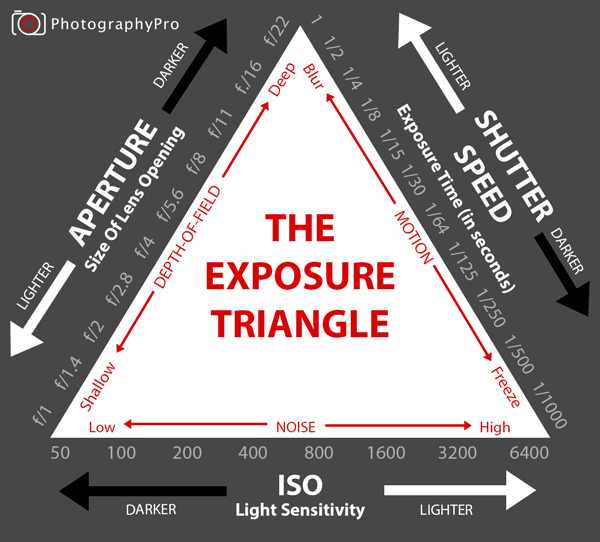
Goal: Students will explore camera operations using Manual Mode to achieve properly exposed images.
Demo on Manual Mode, review vocabulary and camera operations Photo Shoot - practice using Manual Mode, focusing on a properly exposed image Upload your images for a contact sheet Turn into GC |
|
Monday & Tuesday April 22 & 23
Goal: Students will create a photo spread of 3 to 5 images plus a written artist statement that illustrate a major teen concern (writing).
|
WAYS TO CREATE A PHOTO SPREAD
- Photoshop 13" x 19" document - Google Slide (everything one ONE slide) - InDesign (if you know how to use it) - use this template |
Done with your layout?
Have a student check it and then have Dr. O check it - we need to make sure everything is spelled correctly! May 5th - Artswalk image due (matted) May 9 - Artswalk May 10th - DPS Show Reception & Failure Lab applications due |
|

|
FRIday, APril 17
|
Goal: Students will continue to edit their images to crate a series of work based off one teen issue. Students will also start developing their written artist statement to accompany their photos.
For this project, you will need:
|
WAYS TO CREATE A PHOTO SPREAD
- Photoshop 13" x 19" document - Google Slide (everything one ONE slide) - InDesign (if you know how to use it) |

MOnday, April 15 & Tuesday, April 16
|
Goal: Students will analyze their photo shoots so far and start to make decisions on what techniques and elements they will use to unify their images (reading, speaking).
Agenda: Warm-up - How would you take this image and create a series? Upload your images and create a contact sheet Think about the following:
|

|
Friday, April 12
|
Goal: Students will analyze professional work, their own work (so far), and continue to plan and research for their Teen Issue project by discussion with peers and the class, comparing their work to the work of others, reading resources materials, and planning their next steps.
Agenda: Finish your research slides and turn into GC. Continue to plan or use a camera to capture some of your ideas (stay on campus) Plan for more shooting - you have the weekend to finish getting your images PAST DUE: Research Slide |
Look at the series provided - What is the issue? How is the photographer showing the effect of the behavior/situation? What are issues with this body of work as a series?
|
Thursday, April 11
Goal: Students will analyze professional work, their own work (so far), and continue to plan and research for their Teen Issue project by discussion with peers and the class, comparing their work to the work of others, reading resources materials, and planning their next steps.
Agenda:
Look at the series provided - What is the issue? How is the photographer showing the effect of the behavior/situation?
Upload what you have shot so far. Create a contact sheet and turn into GC.
Finish your research slides and turn into GC.
Plan for more shooting - you have tonight, tomorrow during class, and the weekend.
|
|
|
Wednesday, April 3
Due Today in GC:
1. Make a contact sheet of the photos you took yesterday
2. Edit your best 3 images from yesterday's shoot
3. Create an altered image using ONE of the following tutorials:
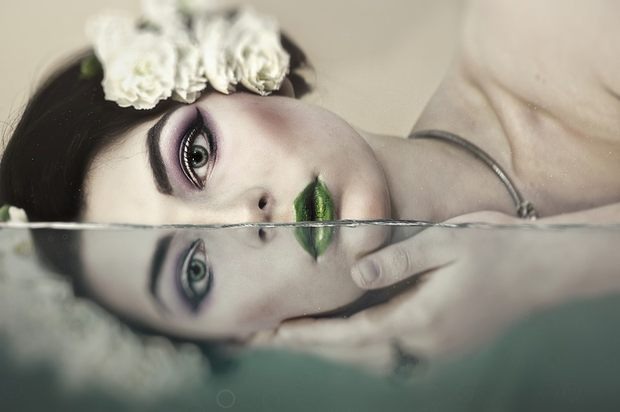
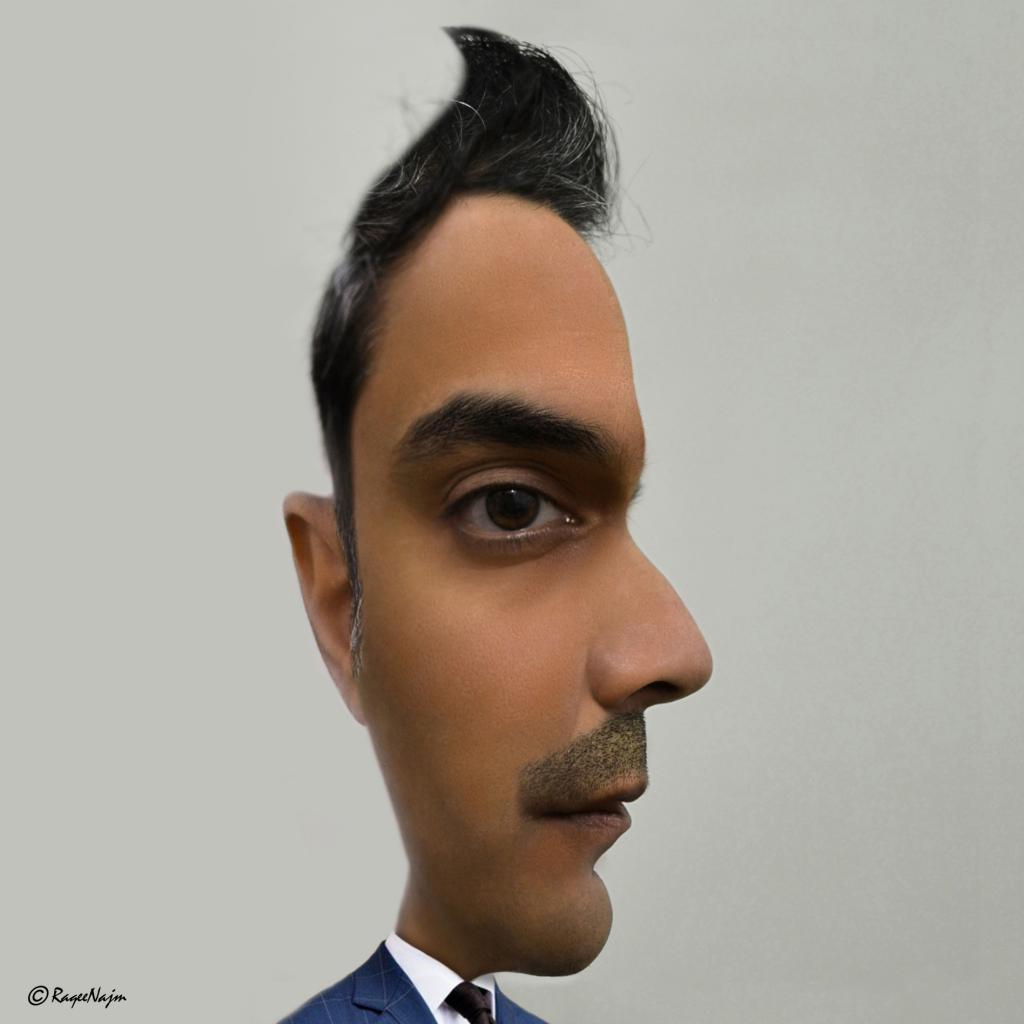
Reflection (easy)
Mirror Effect (easy)
Kaleidoscope effect (intermediate)
Done? Finish updating your website and finish any missing work (grades due Friday!)
1. Make a contact sheet of the photos you took yesterday
2. Edit your best 3 images from yesterday's shoot
3. Create an altered image using ONE of the following tutorials:
Reflection (easy)
Mirror Effect (easy)
Kaleidoscope effect (intermediate)
Done? Finish updating your website and finish any missing work (grades due Friday!)
Week of April 1
|
Monday
Group Critique on Color Gel Assignment Self Reflection on Color Gel Assignment (turn into GC) Intro to Scavenger Hunt on Tuesday LAST DAY TO UPLOAD FOR AUM Tuesday Photo 2 Challenge April 2
Wednesday Edit results from Scavenger Hunt Create mirror image (easy or advanced) Finish updating websites Friday Introduction to next project Last website check before grades |
Color Gel Photos and website update will be in grades for this grading period (ends on Friday).
WEBSITE CHECK
On Semester Two Page: Water Project (9 images, contact sheet, reflection) Narrative Project (3 images, contact sheet, reflection) Text + Photo (1 image, reflection) On Inspiration Page: Research Slide for Water Project Research Slide for Narrative Project Tutorial Results for Narrative Project Research Slide for Studio Gels |
Week of March 18
|
Goal: Students will research and apply techniques of studio lighting using color gels (writing, listening and speaking). Students will collaborate to operate the studio lighting equipment. Students will refine their personal website to demonstrate their growth this semester (writing)
Monday - Lecture w/ Jordan Casteel (choir room)
Tuesday - Niy, Lonnell, Essence, Reed &Co Wednesday - Eduardo, Reed & Co. , Tanner Friday - finish editing images, turn in to Google Classroom, DPS SHOW DUE, AUM SHOW DUE
|
THINGS TO TURN IN BY FRIDAY
|


Week of March 11
|
Goal: Students will research and apply techniques of studio lighting using color gels (writing, listening and speaking). Students will collaborate to operate the studio lighting equipment. Students will refine their personal website to demonstrate their growth this semester (writing).
Monday - Shooting: Elayna/Maddie N, Xander, Chris Other students work on tasks in classroom (see right). Tuesday - Aaron, Eduardo, Jack Other students work on tasks in classroom (see right). Wednesday - Niy, Essence, Lonnell, Anya, Abby Other students work on tasks in classroom (see right). Friday - Briaja, Reed, Will, Kip, Dom Other students work on tasks in classroom (see right). Show Dr. Overby your website when updated. - research slide, article search, and website will be marked as "0" if not completed by Friday. |
Tasks to complete this week:
WEBSITE CHECK
On Semester Two Page: Water Project (9 images, contact sheet, reflection) Narrative Project (3 images, contact sheet, reflection) Text + Photo (1 image, reflection) On Inspiration Page: Research Slide for Water Project Research Slide for Narrative Project Tutorial Results for Narrative Project Research Slide for Studio Gels |
Week of March 5th
|
Goal: Students will research and apply techniques of studio lighting using color gels (writing, listening and speaking). Students will collaborate to operate the studio lighting equipment. Students will refine their personal website to demonstrate their growth this semester (writing).
Tuesday - Continue Intro to Color Gel lights. First group starts shooting. Wednesday - Some groups shoot. Other students work on tasks in classroom (see right). Friday - Some groups shoot. Other students work on tasks in classroom (see right). |
Tasks to complete this week:
WEBSITE CHECK
On Semester Two Page: Water Project (9 images, contact sheet, reflection) Narrative Project (3 images, contact sheet, reflection) Text + Photo (1 image, reflection) On Inspiration Page: Research Slide for Water Project Research Slide for Narrative Project Tutorial Results for Narrative Project Notes from Video:
Color can separate time and place - Maddie P Think about Hue, Saturation, Value, & Tone - Josi Creates atmosphere - Jack Color has a psychological effect - Eduardo Color is often the context of a picture - Essence Color can be tinted (white added) - Braden [Color describes] different time periods - Dom Analogous color schemes can help create a calming effect - Maia |
Week of Feb 25th
|
Goal: Students will explore concepts of narrative through creating and editing traditional photographs and text-based work (listening and reading).
Monday & Tuesday - Finish editing 3 Narrative Photos and 1 Text & Image Photo (no more shooting in class) Wednesday - Critique on both projects, turn in MOP entries, update websites Friday - Intro to Color Gel Project, Color Theory Teen MOP Show - Due Feb. 28th.
One entry per student Label your file correctly - mopteen_firstnamelastname.jpg All students MUST enter. |
What type of story am I trying to tell?
How does my composition enhance my story? What editing techniques help bring clarity and emotion to my images? |
Week of Feb 19th
|
Goal: Students will explore concepts of narrative through creating and editing traditional photographs and text-based work (listening and reading).
Tuesday - review concepts, upload images to computer, start editing Wednesday - edit images, shoot more if needed Friday - finish editing images Critique on Monday, 2/25! End of 6 week grades due Friday! Teen MOP Show - One entry per student. Due Feb. 28th
|
What type of story am I trying to tell?
How does my composition enhance my story? What editing techniques help bring clarity and emotion to my images? 
|
Friday, Feb. 15
Hi all! Sorry to have missed you today, but I promised to chaperone a winterguard competition to Omaha a long time ago. Please be good for the sub and get some stuff done so we can move on next week.
You have to stay in the classroom today (no shooting). Camera checkout can be done with Ms. Walsh or Ms. Baker at the end of the day.
Things to get done TODAY:
1. Turn in any late work and put it on the Late Work clipboard (6 weeks grades are being pushed to next Friday 2/22)
2. Finish these tutorials (3 total) and TURN IN:
Everyone does these TWO tutorials:
Sharpening in Lightroom
Black and White Conversions in Lightroom
Choose an additional one from this list:
Creating Dramatic Edits in lR
Cinematic Effects in LR
Cool Urban Desaturated Look in LR
Color Grade in LR
Dramatic Black and White in LR
3. Finish your research (10 narrative images that are interesting to you) and TURN IN.
4. Work on your Text Project or edit any strike photos you may have.
Unedited images for your Narrative Project are due Tuesday 2/19 when we return!!!!!!
Week of Feb 4
|
Goal: Students will explore concepts of narrative through research, brainstorming, image analysis, and learning technical skill (listening and reading).
Monday - review Water Unit grades, work on tutorials for Narrative photography Tuesday - Intro Text + Photo Project, text tutorial Wednesday - shoot images and create text image
Friday - finish text image, finish Narrative tutorials NARRATIVE IMAGES SHOT BY WEDNESDAY, FEB.13
|
Teen MOP Show - One entry per student. Due Feb. 28th
|
Week of jan 28
|
Goal: Students will curate and edit their strongest water images to demonstrate their understanding of capturing movement and properties of water. Students will ask for help from their peers and teacher when needed. (reading, listening, and speaking).
GROUP CRITIQUE & INTRO TO NEW PROJECTS ON WEDNESDAY Done? Update your website (new folks, I need to create your account) Try this water splash tutorial (extra credit) |
How to reduce noise tutorial
|
Week of Jan 22
Goal: Students will collaborate in groups to research and explore a variety of studio setups in which they will experiment with the use of light, glass, and water to create unique compositions. (speaking, listening, and reading).
Look on the Projects Page for info on Stations 4 and 7
Look on the Projects Page for info on Stations 4 and 7
|
|
|
Week of January 14
|
Goal: Students will collaborate in groups to research and explore a variety of studio setups in which they will experiment with the use of light, glass, and water to create unique compositions. (speaking, listening, and reading).
Look on the Projects Page for info on Stations 4 and 7 Nat Geo lecture on Friday - who is going??? 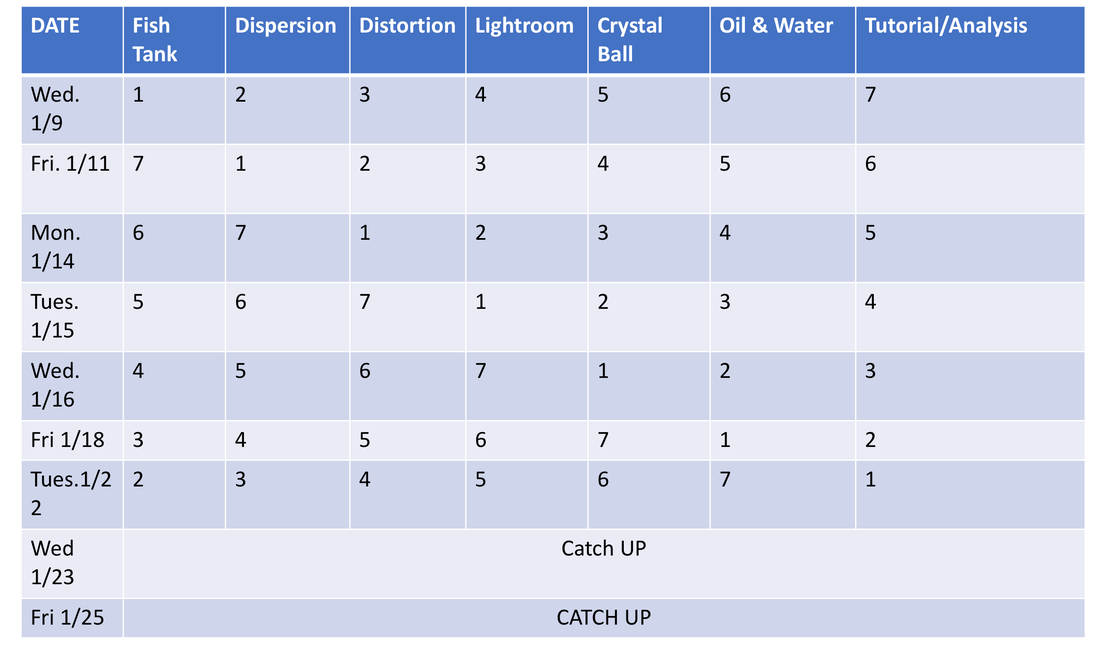
|
|
Week of January 7
|
Goal: Students will collaborate in groups to research and explore a variety of studio setups in which they will experiment with the use of light, glass, and water to create unique compositions. (speaking, listening, and reading).
Monday - Turn in work for Scholastics - artandwriting.org (optional - I spoke to some of you already). Go over next unit - Water and Glass. Start researching ideas. Tuesday - Research ideas. Create computer accounts. Break up into teams. Walk through stations. Wednesday - Rotation #1 of unit. Make sure to download all images from camera before the end of the period. We will edit these images AFTER all rotations (or any down time you may have). Friday - Start Rotation #2 RESEARCH
1. Find 5 exemplar images for each technique:
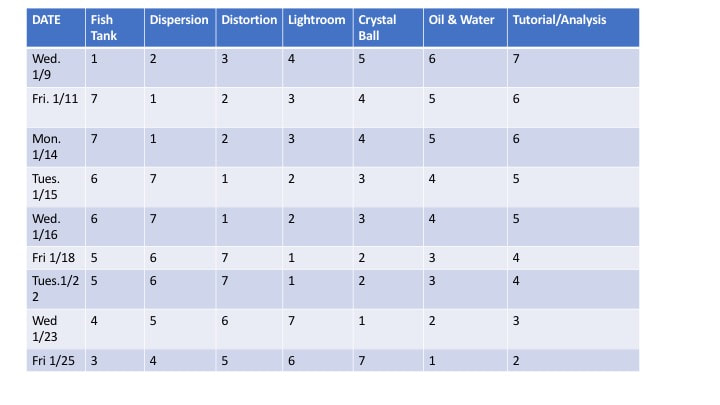
Make a Google Slide presentation (one slide per technique, label each slide). Turn into GC. 2. Look at the following resources to help you understand what we are doing: After reading, add at least ONE question to our Google Classroom about something you are unsure of. Dropping Objects into Water Oil and Water Food Dye with Paint/Cream (advanced) Food Dye Only 3. Make a list of things YOU need to bring (and on what days) so you can create unique images. I will provide the containers, crystal balls, and food coloring, BUT THAT IS IT. Put the list on your phone or your planner - wherever you will remember to access it. |
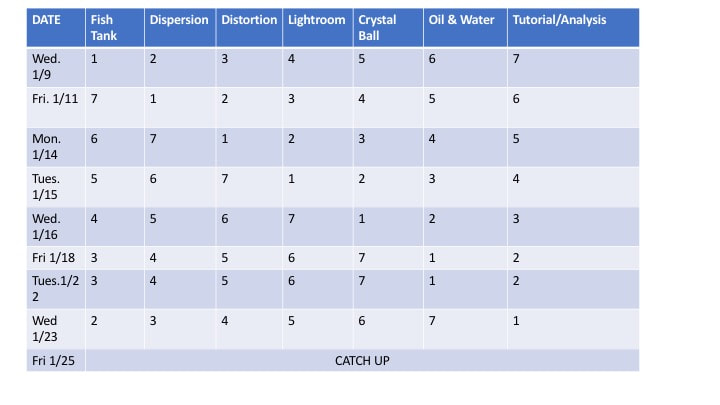
Stations:
YOUR TEAM IS RESPONSIBLE FOR CLEANUP - points will be lost if you leave a mess or disrupt the other classes.
* = Team Captain
|
Wednesday 12/12

|
Things to Get Done Today:
1. Turn in your Passion Project Images, write your reflection, and fill out the grade sheet 2. Take the paper off your Photo Transfer (or paint the transfer medium on your board and apply your image) 3. Finish updating your website 4. Bokeh exercise (extra credit) FRIDAY: WEBSITE GRADING, finish photo transfer, bokeh exercise |
TUESDAY 12/11
Hi guys - I have a sick kiddo at home today. Please update your webpage - tomorrow we will critique/grade your Passion Project and finish the image transfers.
WEBSITE REQUIREMENTS
Make the following pages:
- Home
- Semester 1
- Portfolio
- Inspiration
(returning students - make two new pages/tabs - one called Photo 2 and one called Photo 1. Make your other pages subpages of these)
Home Page - Personalized with your text and images
Semester 1 Page/Project Page –
- 7 Questions (images, contact sheet, & reflection)
- Composition Project (images, contact sheet, & reflection)
- Identity Project (images, contact sheet, reflection, & research)
- Beautiful Decay (images, contact sheet, & reflection)
- Anti-Cliche (images, contact sheet, & reflection)
- Extended Exposure (images, contact sheet, & reflection)
- Fears & Phobias (images, contact sheet, research, & reflection)
- Light Study (images, contact sheet, research, & reflection)
- Passion Project (images, contact sheet, research, & reflection)
Inspiration Page
- Find 10+ images of professional photography that inspire you
- Bach vs Beethoven activity
Monday 12/10
Goal: Students will explore the alternative process of photo transfers as well as finishing the edits for their Passion Project. (listening & speaking).
|
PHOTO TRANSFER
|
PASSION PROJECT
Edit Your best 3-5 images Critique on Tuesday How can you unify a collection of images BEYOND the subject matter? •Technique (Camera or Photoshop) •Color •Composition •Aspect Ratio •Presentation |
FRIDAY, DECEMBER 7
|
Goal: Students will analyze their Passion Project images through the lens of building a series of images through group discussion, peer help, and research (listening, speaking, and writing).
DO NOW: Crop you favorite image to a 4" x 6" and put in the Photo Transfer folder. 1. Group discussion - What is a series? 2. Organize your work to create a series of 3 to 5 images. What will be your unifying elements to create a connected series? 3. Use your peers to help you narrow down your choices 4. Mid-class gallery walk. Give a suggestions to 5 different people - how can they make their images a unified series? We will critique our Passion Projects on Tuesday. Done? Work on your website (See Projects Page). |
What is a Series?
Creating a collection of pieces of art that have a common theme •Home •Political agendas •Conflict •Landscape (Urban or rural) •Portraits •Idea (beautiful decay, fears, etc.) How can you unify a collection of images BEYOND the subject matter?
•Technique (Camera or Photoshop) •Color •Composition •Aspect Ratio •Presentation |
Wednesday, December 5
Goal: Students will analyze their Passion Project images through the lens of building a series of images through group discussion, peer help, and research (listening, speaking, and writing).
1. Group discussion - What is a series?
2. Upload your images and start organizing your work to create a series of 3 to 5 images. What will be your unifying elements to create a connected series?
3. Use your peers to help you narrow down your choices
4. Mid-class gallery walk. Give a suggestions to 5 different people - how can they make their images a unified series?
5. Exit ticket in Google Classroom - how will you be unifying your images to create a series?
TUESDAY, DECEMBER 4
Goal: Students will analyze their photographs for the type of light and the effectiveness of enhancing the subject with that light through peer analysis and self reflection. (speaking and listening).
Agenda:
1. Do Now - Image Analysis
2. Out of your 8 images (one for each lighting situation), CHOOSE 6 TO EDIT AND TURN IN. Use a peer to help you choose the best ones.
3. Save these images with the lighting situation in the file name (ex. "sunrise_briaja.jpg")
4. Make a contact sheet of all your work.
5. Exit ticket - Reflection on your Light Study Project
Homework: work on Passion Project
Past Due: Fears & Phobias Project, Lighting Study Research
Coming Up: Passion Project unedited images due Wednesday, Photo Transfer and Bokeh next week
Final Exam: Finished Website, Portfolio with Artist Statement (writing)
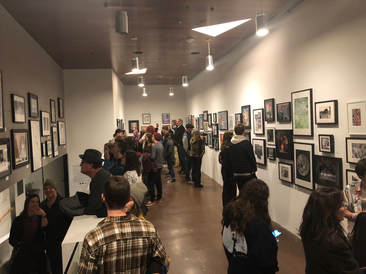
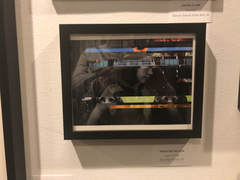
CONGRATS TO MADDIE N., NELL, AND MADDIE P. FOR HAVING THEIR WORK IN THE MUSEUM OF CONTEMPORARY ART (STILL LOADING SHOW)
|

|
MOnday, December 3
|
Goal: Students will analyze their photographs for the type of light and the effectiveness of enhancing the subject with that light through group discussion, peer analysis, and self reflection. (speaking and listening).
Agenda: 1. Do Now - Image Analysis 2. 10 minutes - download your images from the weekend, organize your folder, make a contact sheet 3. 10 minutes - Peer analysis - help each other choose the best examples of using light to enhance your subject. 4. 15 minutes - Start editing your best images. You will need to turn in your best 6 images. 5. Exit ticket - Progress check Homework: Shoot any missing examples for the Light Study, work on Passion Project Past Due: Fears & Phobias Project, Lighting Study Research Coming Up: Passion Project unedited images due Wednesday, Photo Transfer and Bokeh next week Final Exam: Finished Website, Portfolio with Artist Statement (writing) |
LIGHTING PROMPTS (Photo Shoot):
COMPOSITION IS EVERYTHING!
Extra Credit:
|
Friday, NOvember 30
|
Goals: Student will research types of available light that photographers can use to enhance their images (reading and speaking) as well as experiment with capturing images around school that exemplify the lighting techniques discussed.
1. Look at images captured during Wednesday's class time - what can we do better? 2. Look at your own images. What can you do better? 3. Shooting time 4. Load your images at the end of class in GC. 5. Plan for your photography this weekend. Lighting Study turned in by Tuesday Passion Project Photos due no later than Wednesday beginning of class (unedited) |
Where is the light coming from? What type of lighting is this?
|
Wednesday, November 28
|
Goals: Student will research types of available light that photographers can use to enhance their images (reading and speaking) as well as experiment with capturing images around school that exemplify the lighting techniques discussed.
Before leaving to shoot, you MUST: Finish your Fears & Phobias reflection. Turn in Google Slide research on types of light. STRONG Answers from Lighting QuestionLighting is important because it can drastically affect the outcome of image. Without proper lighting a photo will not develop enough or be over developed.
Lighting is important for photographers to consider because it dictates the images depth and values. This can create the mood of the photo.
Light is important to consider when you are a photographer because the light basically determines the overall aura of the picture and can give it a certain vibe.
Lighting is important to consider because it can make an image better or worse and you need to know how to manipulate it in your favor. You also need to be aware of where the sun is so you do not have glare or a washed-out image.
|
LIGHTING PROMPTS (Photo Shoot):
COMPOSITION IS EVERYTHING!
Extra Credit:
|
Tuesday, November 27
Goals: Students will critique their work and the work of others through group discussion and written self reflection (speaking, listening, and writing).
1. Answer Exit Ticket from yesterday
2. Group critique on Fears & Phobias.
3. Take a photo of your final piece.
4. Write self reflection on your project (GC).
1. Answer Exit Ticket from yesterday
2. Group critique on Fears & Phobias.
3. Take a photo of your final piece.
4. Write self reflection on your project (GC).
Monday, NOvember 26
|
Goal: Students will finish their presentation of their Fear & Phobia project as well as start researching types of available lighting that photographers can use to enhance their images (reading and speaking).
1. Overview of next 3 weeks 2. Finish matting your Fears & Phobias Project. Carefully hang it in the gallery for the critique tomorrow. 3. Research exemplars for out lighting study (see right). Create a Google Slide presentation and label your found images. 4. Answer Exit Ticket in Google Classroom Tomorrow: Critique of Fears & Phobias Passion Project Images need to be shot by Monday, December 3 |
MOOD BOARD RESEARCH
Find one example of each of the following: Sunrise Sunset Midday light Cloudy (soft, diffused light) Window Light (side lighting) Back Lighting Sun Flare Shade/overhang Low light Flash at sunset Turn into Google Classroom |
Week of November 11
|
Goal: Students will complete their Fears & Phobias image by experimenting and analyzing what background materials would best enhance their idea (listening & speaking). Students will also finish research and planning for their Passion Project and meet with the teacher to discuss their ideas (writing and speaking).
This week, you need to get the following done:
Fears & Phobias final image (printed, added background, matted) due by Friday end of class |
EXTRA CREDIT TUTORIALS

|
NOVEMBER 9
|
Hello everyone!
Please get the following done:
You may check out cameras after school with Ms. Baker or Ms. Walsh. I can't wait to see what you come up with for your Fears & Phobias Project! |
|
November 7
Today you need to:
Finishing your mood board and summary for Fears & Phobias - turn into GC
You may go shoot for your fears and phobias project (but NOT in the gallery). You may bring a light with you and I have a couple large spiders you can use. Ms. Walsh also has some cool sheer scarves that may work for your idea.
Not ready to shoot yet? Start planning and filling out the Passion Project Contract in GC.
Be the awesome kids you can be! I will be back by 12:30ish.
NOVEMBER 6
|
Goal: Students will explore ideas for their fear and phobia project through image analysis and research. Students will then craft a planning document to share their ideas. (writing & reading).
1. Field trip next week - who is going? 2. Introduce Passion Project - note deadlines! 3. Introduce Fears & Phobias - video and requirements. 4. Work on Mood Board and writing - turn into GC |
|
November 5
|
Goal: Students will finish their extended exposure images, write a reflective statement, and update their website to demonstrate their understanding of photography concepts introduced so far in this course.
1. Finish editing your extended exposure images ( 2 or 3) and turn in all components into GC (DUE TODAY) 2. Finish updating your website. See the Projects Page for more information. DUE TODAY 3. Fill out the Google Form (in GC) with your web address (EVERYONE!) DUE TODAY 4. Find 10+ images that communicate your fear or phobia that you want to work with. Turn into GC. |
PEOPLE WHO CAN GO OUT AND DO A PHOTO CHALLENGE
Briaja Marcus |
NOvember 2
Goal: Students will finish their extended exposure images, write a reflective statement, and update their website to demonstrate their understanding of photography concepts introduced so far in this course.
1. Finish editing your extended exposure images ( 2 or 3) and turn in all components into GC (DUE TODAY)
2. Finish updating your website. See the Projects Page for more information. DUE TODAY
3. Fill out the Google Form (in GC) with your web address (EVERYONE!) DUE TODAY
Homework: Start thinking about what fear or phobia you would like to work with for the next project.
October 29 - 31
|
Goal: Students will curate their images from their extended exposure shoot and edit them to enhance the composition and camera effects they captured. (listening and speaking).
Things to think about:
Heads up!: Website due by Friday. See the Projects page for more information. MCA entry is due Tuesday! See Art Shows and Opportunities Page PAST DUE: ANTI-CLICHE PAST DUE extended exposure tutorials - how to fake the effecthttps://www.digitalphotomentor.com/how-to-create-a-long-exposure-look-using-photoshop/
https://www.picturecorrect.com/tips/how-to-simulate-a-long-exposure-in-photoshop/ https://www.behindtheshutter.com/how-to-create-long-exposure-light-trails-in-photoshop/ https://www.youtube.com/watch?v=Mmd286ijddg&disable_polymer=true https://www.photoshopessentials.com/photo-effects/light-streaks/ |

Properly exposed long exposure - notice the range of tones each image has.
|

Week of OCtober 24
|
Goal: Students will curate and edit their photos from the Denver Botanic Garden to demonstrate their understanding of unique compositions. Students will also continue to work on their Extended Exposure project outside of class. (listening & speaking).
Wednesday:
Friday:
Homework for the weekend: last chance to shoot for Extended Exposure |
MCA Teen Show Submissions due 10/30
Theme is "Still Loading" I encourage you to submit something! Maybe even one of your self portraits? |
Overby's image from the garden
|
 Overby's image from the Garden Overby's image from the Garden
|
Wednesday, Oct 17 - FOR THOSE NOT GOING ON THE FIELD TRIP
You may do the following:
1. Finish any missing assignments (including yesterdays) and get them turned in
2. Finish updating your website (see Oct 4)
3. Plan an artwork for the MCA show
4. Find a tutorial online and complete for extra credit.
YOU WILL BE RESPONSIBLE FOR GOING ON A PHOTO SHOOT ON YOUR OWN TIME TO COMPLETE THIS ANTI_CLICHE ASSIGNMENT WE ARE DOING TODAY
Week of OCtober 15
|
Monday - 10/15
Goal: Students will discover the effects of changing shutter speed in an SLR camera by analyzing images, learning techniques, and manipulating the camera through group discussion and collaboration (listening and speaking). Last Day to use class time to experiment with shutter speed. Remember to save your images to turn in for credit. Tuesday - 10/16 Goal: Students will plan for their extended exposure assignment by collecting images and writing a summary of what they will attempt (reading and writing). 1. Make a contact sheet of all your experiments the last few days. You may need to share images and/or contact sheets with your partners. Write a brief summary of what you did and what you learned about the shutter. 2. Create a 10+ image slide that best visualizes what you want to do. Find an article or tutorial that could help you with this project. Turn this into GC with a short statement of your project. Your unedited images are due Monday, October 29th. 2. Go over expectations and assignment for the Botanic Gardens. 3. Keep updating your website. Wednesday - 10/17 Goal: Students will conduct a photo shoot in the Botanic Garden using the camera skills that we have learned so far and capture unique images that demonstrate creative approaches to shooting landscape elements (listening, speaking). 1. Meet in classroom NO LATER THAN 11:40. Check out cameras and walk to garden. 2. Arrive at garden by Noon - shoot for about an hour (anti-cliche). 3. Meet at front entrance at 1pm - walk back to school. 4. You MUST upload your images off the camera BEFORE you go to 8th hour. I will have passes. |
MCA Teen Show Submissions due 10/30
Theme is "Still Loading" I encourage you to submit something! Maybe even one of your self portraits? |
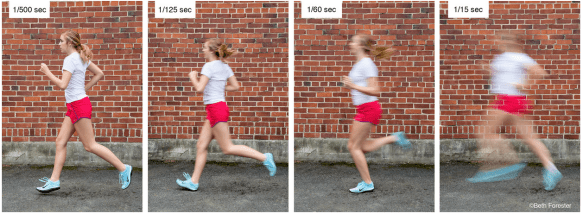
October 9-12
Goal: Students will discover the effects of changing shutter speed in an SLR camera by analyzing images, learning techniques, and manipulating the camera through group discussion and collaboration (listening and speaking).
What does the shutter do?
What does the shutter do?

SHUTTER PRACTICE (due Monday 10/15)
You will work in groups of 2-4 people Using a camera and a tripod, take images showing both stopped and blurred motion. Try your hand at panning (set the shutter at 1/50) Experiment with extended exposure using our laser pointers, your cell flash light, glow sticks, etc. You will turn in one contact sheet with all your group's attempts (at least 50 images) You need to pick YOUR best 2 motion captures to edit and turn in. |
Waiting your turn? Got all of this done?
Finish Aperture Practice Finish web page uploads Work on MCA Submission Examples of extended exposure photography
|
October 8
|
Goal: Students will use their time wisely to finish up past assignments, clarify misunderstandings, and prepare for new content in tomorrow's class. (speaking and listening).
Please finish: 1. Aperture Practice (some of you need to redo this) 2. Uploading all work to your website (see October 4) 3. Beautiful Decay Done? 1. Finish Extra Credit tutorial 2. Look at MCA show call and plan for an image that you could submit. 3. Start looking at what the shutter does in the camera Tomorrow: Make sure you have a jacket - we will be shooting outside |
October 4
Goal: Students will start to create their personal portfolio to document their growth as a photographer using the Weebly interface (speaking, reading, and listening).
|
WEBSITE CHECKLIST
Go to students.weebly.com User Name = firstnamelastname Password = studentIDp6 Make the following pages: - Home - Semester 1 - Portfolio - Inspiration (returning students - make two new pages/tabs - one called Photo 2 and one called Photo 1. Make your other pages subpages of these) Home Page - Personalized with your text and images Semester 1 Page/Project Page – - 7 Questions (images, contact sheet, & reflection) - Composition Project (images, contact sheet, & reflection) - Identity Project (images, contact sheet, reflection, & research) - Beautiful Decay (images, contact sheet, & reflection) Inspiration Page - Find 10+ images of professional photography that inspire you - Bach vs Beethoven activity Think about how you want to present yourself as a photographer (and as a person online in general). What do you want to communicate about your work?
|
TIPS:
Choose a theme that is clean and professional looking. Start getting all stock photography out of your website. Replace the stock photos with your own! Give enough space to "breathe" between the projects Make your images nice and big - this is a photography portfolio 
BAD WEB DESIGN

GOOD WEB DESIGN
|
October 3
|
Goal: Students will critique their work and the work of others through group discussion, peer sharing, and written self reflection.
1. Take 5 minutes to open your Beautiful Decay photos and choose your best image - make this nice and large on your screen. 2. Gallery walk of images and give feedback to 4 people. 3. With the color chips provided, vote for your favorite images for each category. You can talk with your peers to help you decide. 4. Group discussion of "winners". Why do some images stand out above the others in each category? 5. Look at your feedback and get images ready for turn in. 6. Write your self reflection and turn in all parts of your assignment. 7. Done? Make sure all your photos from our projects so far are available to upload in tomorrow's activity. TOMORROW: SETTING UP WEBPAGES |
|
October 1 & 2
Goals:
Students will apply their understanding of aperture and aperture priority mode to capture photos that demonstrate depth of field concepts.
Students will apply their understanding of aperture and aperture priority mode to capture photos that fit the theme of "Beautiful Decay".
Students will curate their images from their Beautiful Decay shoot(s) and edit them appropriately.
1. Check IC - is everything turned in? Make sure to add your late work to the clipboard.
2. Assess your Aperture Practice - did you capture all the images you need? Turn into GC.
3. Look at your Beautiful Decay photos. Edit your best 3 images for a critique on Wednesday.
Homework: Shoot more images with the theme of "Beautiful Decay". You can check out a camera after school or use your phone.
September 28
|
Goals:
Students will assess their progress of class assignments and projects and finish missing components. Students will apply their understanding of aperture and aperture priority mode to capture photos that demonstrate depth of field concepts. Students will apply their understanding of aperture and aperture priority mode to capture photos that fit the theme of "Beautiful Decay". 1. Check IC - is everything turned in? Make sure to add your late work to the clipboard. 2. Assess your Aperture Practice - did you capture all the images you need? Turn into GC. 3. Look at your Beautiful Decay photos. Do you need more photos? If everything is turned in, you may walk around school grounds and try to capture more. Homework: Shoot more images with the theme of "Beautiful Decay". You can check out a camera after school or use your phone. |
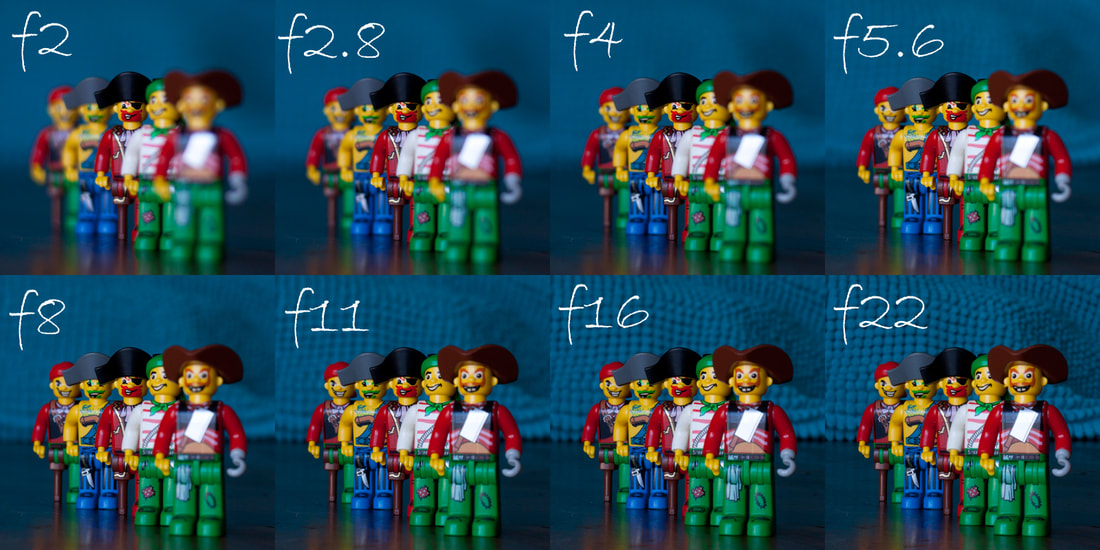
APERTURE PRACTICE (see 9/25)
Take 3 objects/people outside and try getting different focus effects by changing the aperture (f2.8, f5.6, f8, f11, f22). Open these in Photoshop and make small edits if needed. Save these as the aperture you used - f56_name.jpg, f8_name.jpg, etc. Turn into GC. MISSING IDENTITY PROJECTS - YOU MAY NOT GO OUTSIDE UNTIL THESE ARE TURNED IN
DANIEL REED BRADEN KALI - PLEASE FINISH WILL M - PLEASE FINISH ELANA - PLEASE FINISH |
September 26
|
Goal: Students will apply their understanding of aperture and aperture priority mode to capture photos that fit the them of "Beautiful Decay".
Photo Shoot Day! How can you make something considered ugly, dilapidated, or decayed into something beautiful? Using your skills in composition and aperture, shoot 24+ images that communicate the idea of beautiful decay. Shoot in Aperture Priority Mode White Balance = Daylight or Auto ISO = 200 or 400 File Size = Large or Fine Come back at 12:55 to upload your images (they will be erased next hour off the card!) |
|
SEPtember 25
|
Goal: Students will be introduced (or review) the concept of aperture and how it works in a DSLR camera. They will then practice the effects of aperture in a quick exercise.
1. What is aperture? 2. How do I manipulate aperture on our cameras? 3. Practice time: With a partner, take 3 objects outside and try getting different focus effects by changing the aperture (f2.8, f5.6, f8, f11, f22). Turn these results in GC. 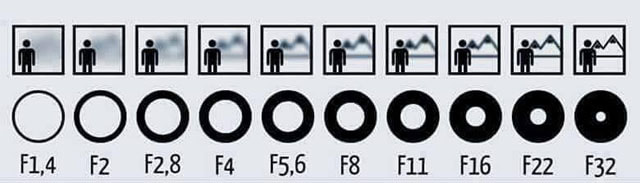
|
You MUST have your Identity Project turned in BEFORE you can go out and practice aperture 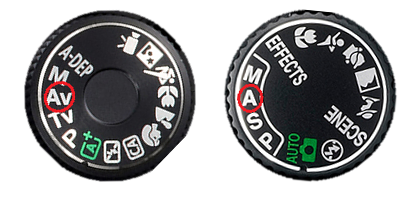
Aperture Priority Mode - you choose the f-stop and the camera chooses the shutter speed for a proper exposure
|
SEPTEMBER 24
GOAL: Students will critique their work and the work of others through small group work, class discussion, and self reflection (speaking, listening, and writing).
1. Pull up your two photos on your display.
2. Pick a partner to work with. With your partner, critique 2-3 other person's projects using the critique sheet at their computer.
3. Whole group discussion - what to do with feedback?
4. Finish editing and turn in all components of your project (including a self reflection) in google Classroom.
TOMORROW: REVIEW OF APERTURE PRIORITY
BLOCK DAY: PHOTO SHOOT ON COLFAX
September 19 and 21
|
Goal: Students will choose and edit their images that best represent their identity as well as demonstrate an experimental approach to their image making (speaking and listening).
1. Create your contact sheet of ALL your images you have shot for this project. 2. Choose your top images to edit - I encourage you to edit more than two. 3. How to create an effect? Ask a peer, look up a tutorial, get help from Dr. Overby. LAST DAY TO EDIT IS FRIDAY - Critique on Monday.   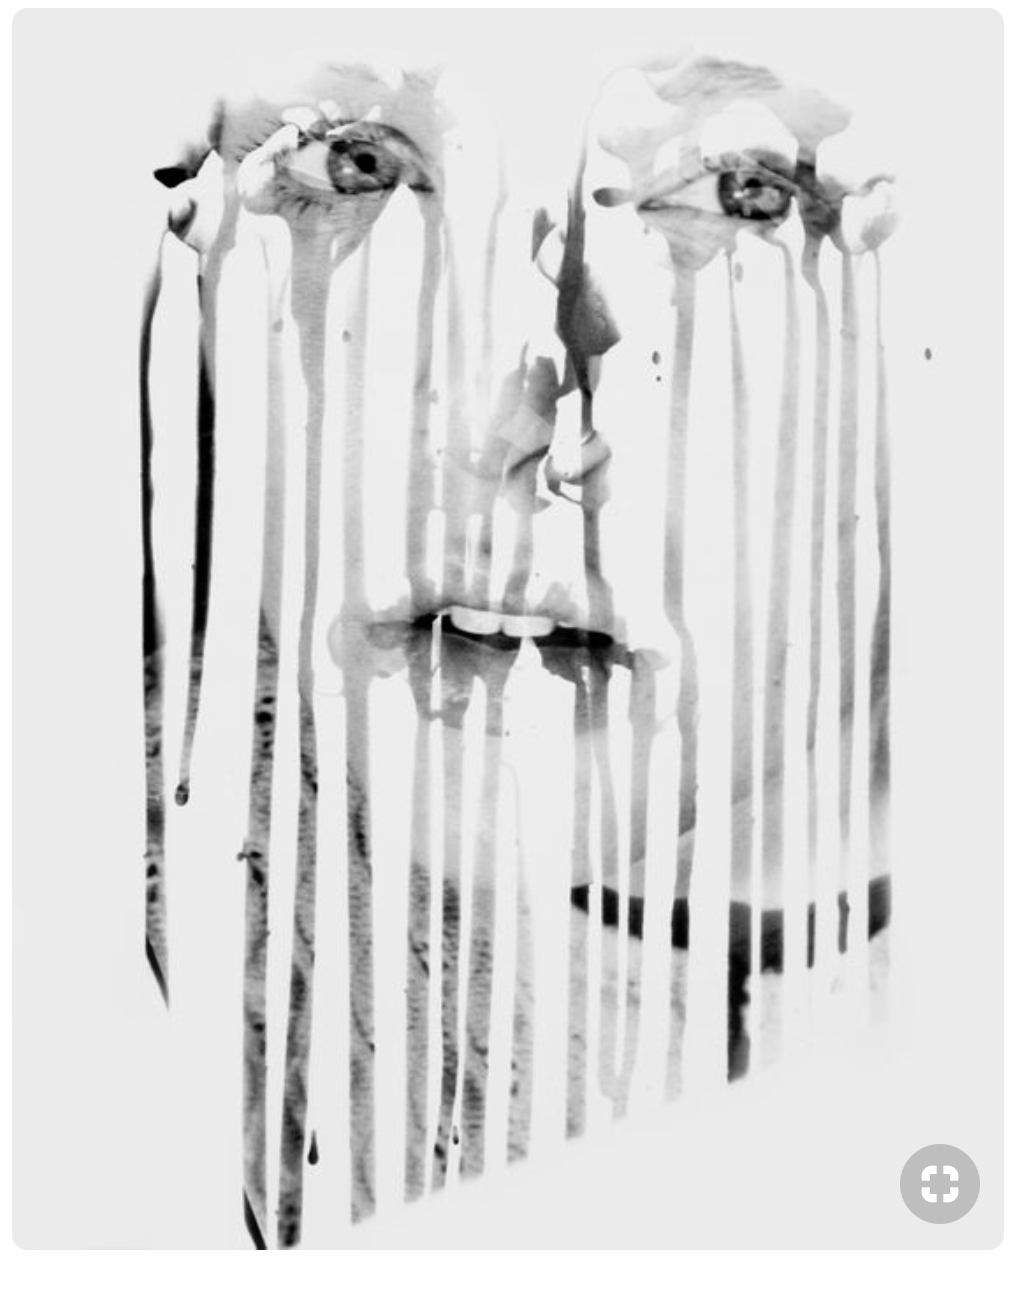 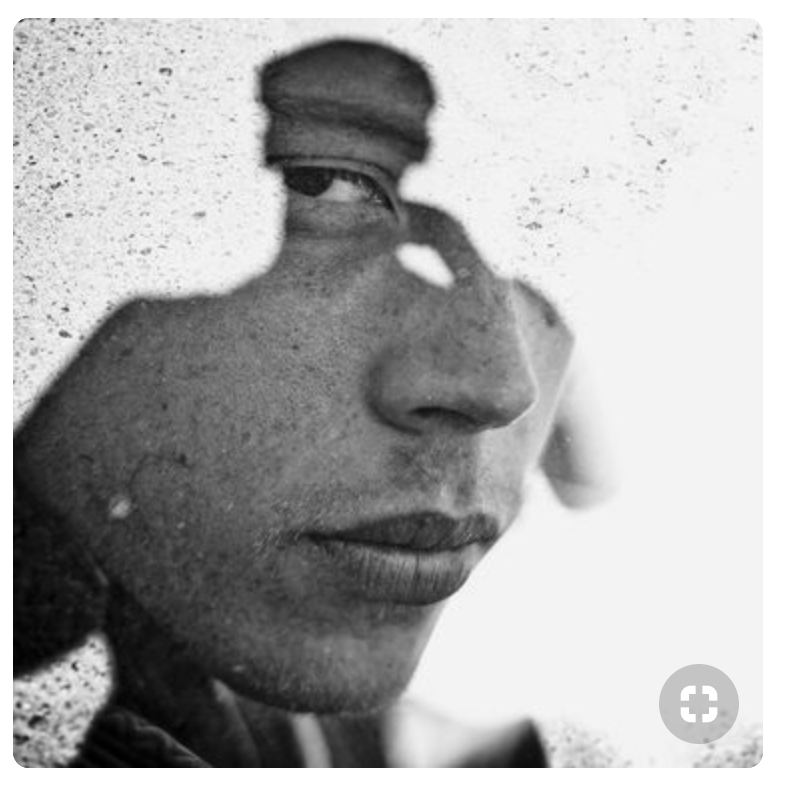   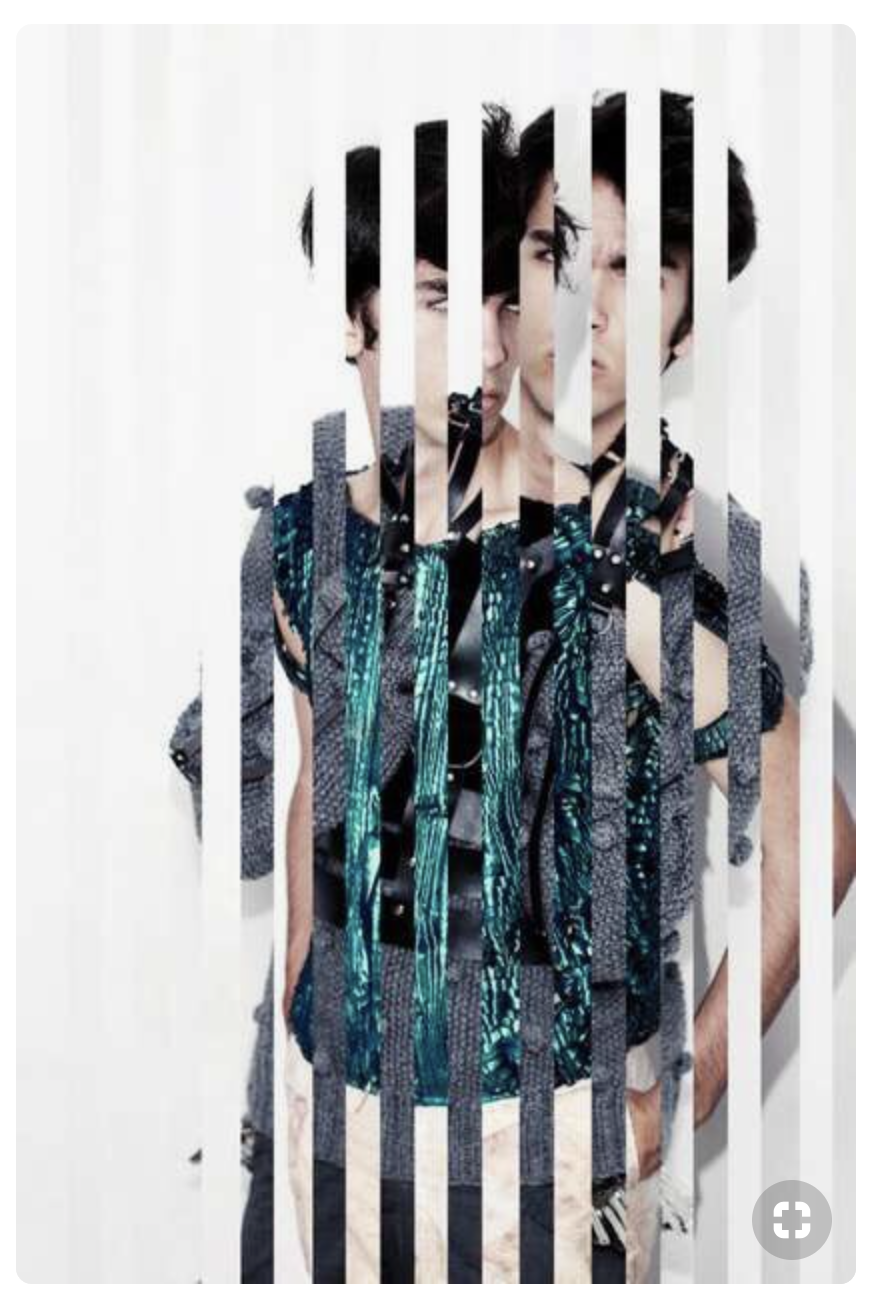 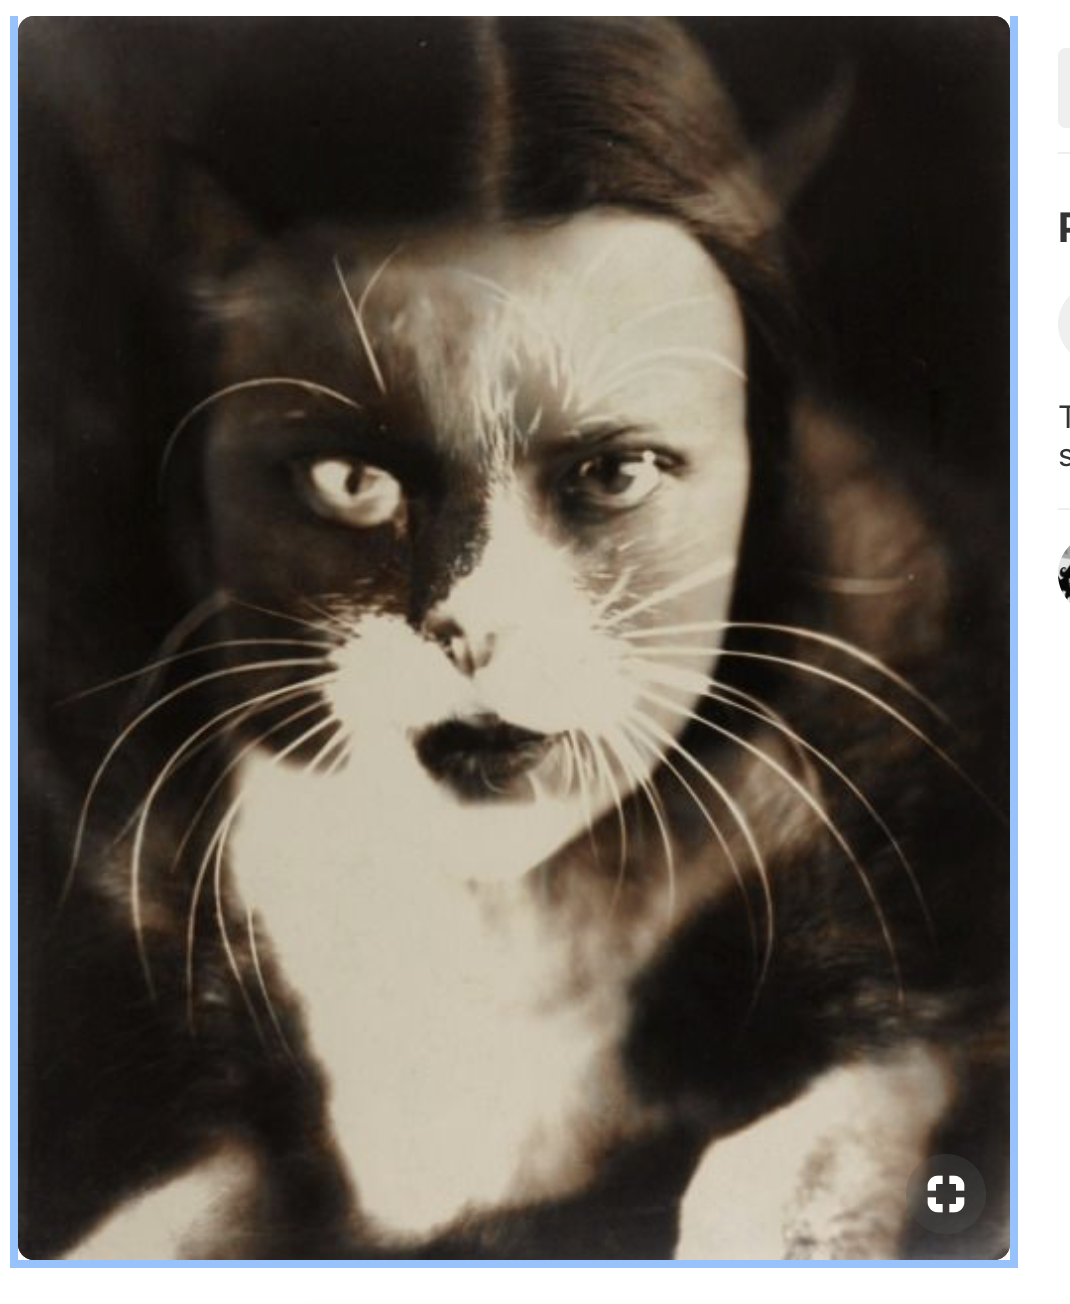  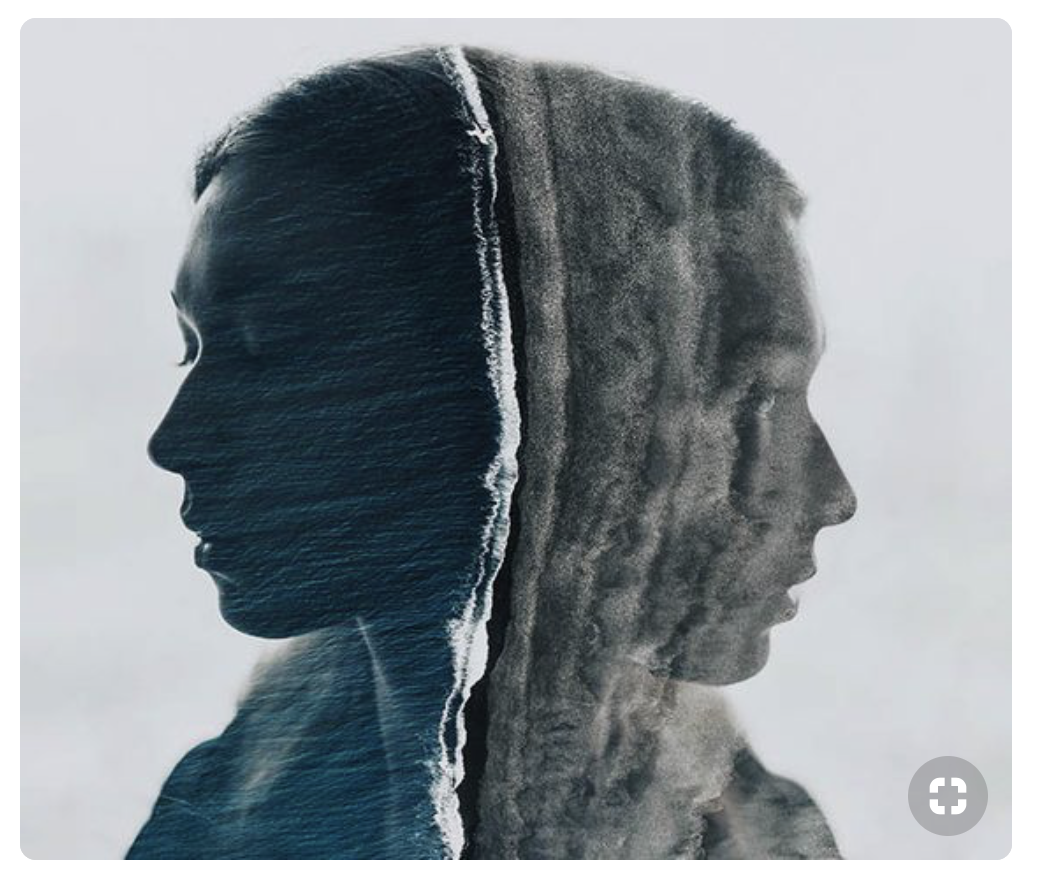    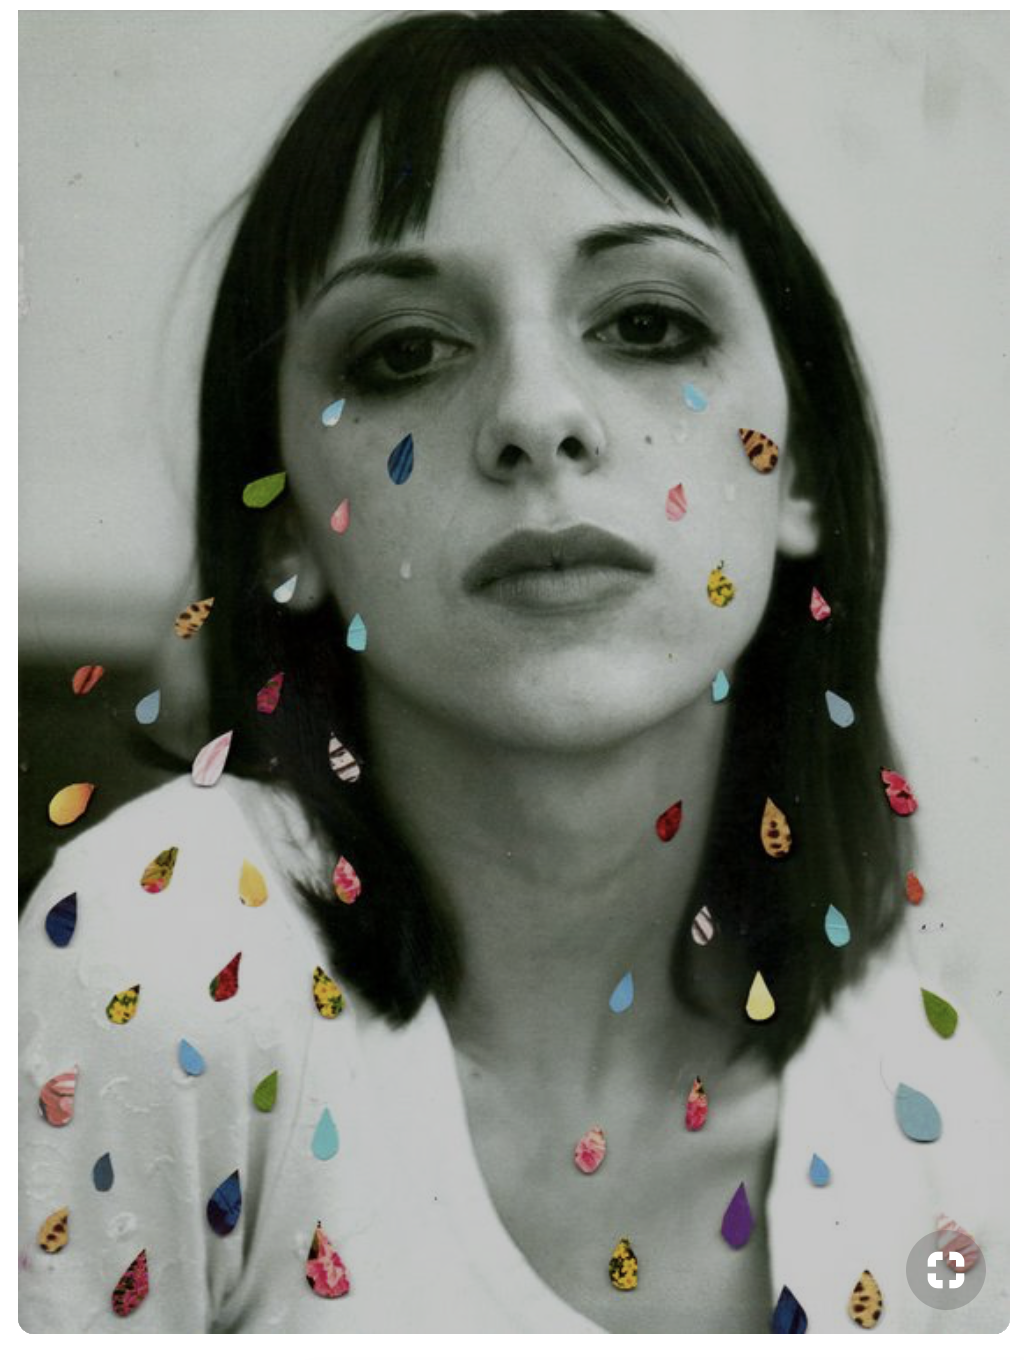  |
OPTIONS FOR EDITING:
Dodge/Burn Vignette Color Splash Toning Double Exposure Color Overlay Pixelate Filters (use sparingly) |
SEPTEMBER 18
Goal: Students will learn techniques to help enhance their identity portraits as well as start curating the images they want tp use to represent their identity (speaking and listening).
1. Group tutorial on dodging, burning, and vignettes. (Use image in Google Classroom and turn in your results).
2. Start culling through your images and choose potential images to edit for your project.
More advanced way to dodge and burn (it's pretty cool)
1. Group tutorial on dodging, burning, and vignettes. (Use image in Google Classroom and turn in your results).
2. Start culling through your images and choose potential images to edit for your project.
More advanced way to dodge and burn (it's pretty cool)
September 17
|
Goal: Student will finish capturing images for their Identity Project through collaboration with peers and experimentation with the camera. (speaking and listening).
LAST DAY TO SHOOT IMAGES IN CLASS - make it count! You need at least 24 images on your contact sheet. Make sure that you clean up if you use the gallery to take images (and turn off the lights!) Did you watch the video on camera operations and answer the questions in GC? (due last Friday) PAST DUE: Composition Practice |
|

SEPTEMBER 12 and 14

Peyton's experiments with altering her identity
|
Goal: Students will start to explore the idea of self portraits and identity through demonstration, research, and brainstorming (speaking, reading, and listening).
Unedited images due by Tuesday, September 18 - you need at least 24 images on your contact sheet! IDENTITY PROJECT REQUIREMENTS:
Research: List of 10+ words that describe you Slide of 10+ images of portraits that inspire you Contact Sheet; 24+ images that show a variety of ideas Images: One image of how you want to represent yourself One image of experimentation (being a character, distortion, manipulation, absurd, etc.) |
SEPTEMBER 11
|
Goal: Students will start to explore the idea of self portraits and identity through demonstration, research, and brainstorming (speaking, reading, and listening).
1. Review Identity Project requirements 2. Demo of equipment and props that we have 3. Finish your research and turn in 4. Make sure your Composition Assignment is turned in 3. Check out a camera and experiment with what is possible! TOMORROW, FRIDAY & MONDAY: Camera Tutorial as well as shooting time. Unedited images due by Tuesday, September 18 - you need at least 24 images on your contact sheet! |
IDENTITY PROJECT REQUIREMENTS:
Research: List of 10+ words that describe you Slide of 10+ images of portraits that inspire you Contact Sheet; 24+ images that show a variety of ideas Images: One image of how you want to represent yourself One image of experimentation (being a character, distortion, manipulation, absurd, etc.) |
September 10
|
Goal: Students will start to explore the idea of self portraits and identity through group discussion, research, and brainstorming (speaking, reading, and listening).
1. Intro to new project: Identity 2. Start research for ideas for your self portraits. 3. Finish your Composition Project. PAST DUE: 7 Questions RESEARCH FOR SELF PORTRAITS
|
Some of the great composition work that has been turned in already!
|

|
Crush Walls Festival this Week!
Check out the website to see a map and list of events. Extra Credit to go (take a selfie). EXTRA EXTRA Credit to be brave, meet an artist, and take a selfie with them! |
september 7
|
Goal: Students will apply their understanding of photo editing to refine their composition project images. (speaking to peers and teacher as well as reading tutorials for support).
1. Curate and edit your Composition Project photos. Find your best 5 examples to edit. Be sure to use your knowledge of repair tools to eliminate distractions in your images. 2. Save your photos with the compositional rule in the file name - for example - "name_leadinglines.jpg" 3. Done? Choose a tutorial from this site. Use your own photo and turn into Google Classroom for extra credit. PAST DUE: Repair Tutorials, 7 Questions Project |
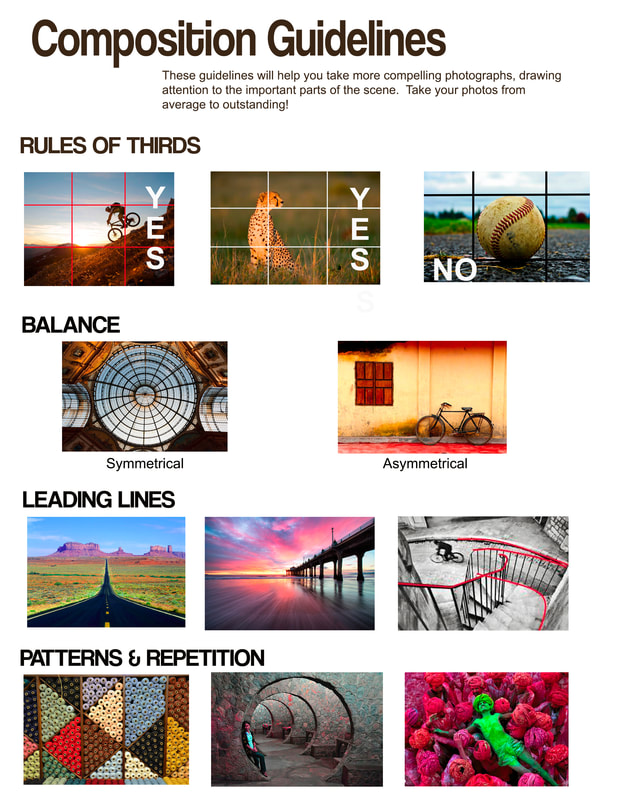
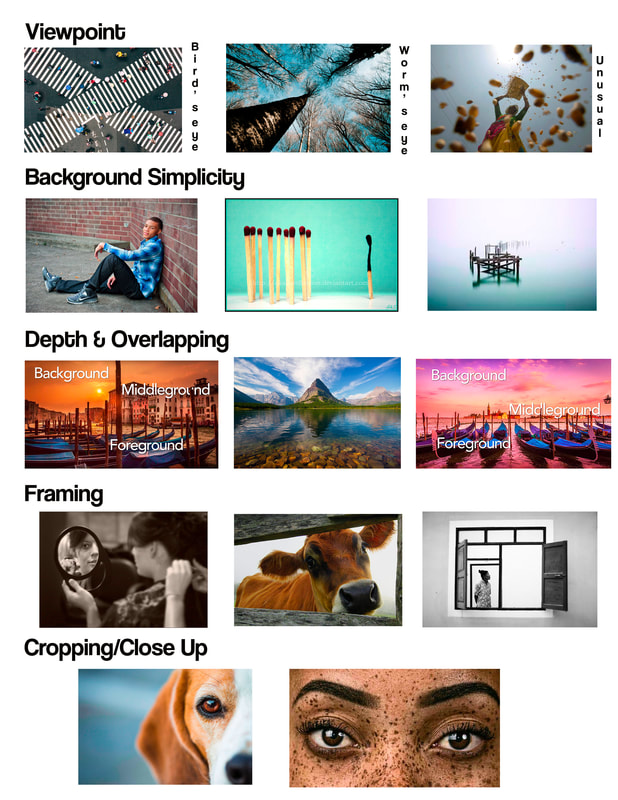
COMPOSITIONAL GUIDELINES
Rules of Thirds Balance (Asymmetrical and Symmetrical) Leading Lines Pattern/Repetition Viewpoint (Bird's Eye, Worm's Eye, Unusual) Background Simplicity Framing Cropping/Close Up Look to Aug 29th for images of these guidelines |
September 5
|
Goal: Students will apply their understanding of photo editing to refine their composition project images. (speaking to peers and teacher as well as reading tutorials for support).
1. Check your grade in IC - what are you missing? 2. Finish your repair tutorials and turn into GC (look at yesterday's post for tutorials) Ask a friend or Dr. O for help if you need it. 3. Curate and edit your Composition Project photos. Find your best 5 examples to edit. Be sure to use your knowledge of repair tools to eliminate distractions in your images. 4. Save your photos with the compositional rule in the file name - for example - "name_leadinglines.jpg" |
COMPOSITIONAL GUIDELINES
Rules of Thirds Balance (Asymmetrical and Symmetrical) Leading Lines Pattern/Repetition Viewpoint (Bird's Eye, Worm's Eye, Unusual) Background Simplicity Framing Cropping/Close Up Look to Aug 29th for images of these guidelines |
September 4th
|
Goal: Students will reflect upon their work and the work of others through group discussion. Students will also experiment with repair tools in Photoshop/Lightroom in order to refine their skills in photo editing.
1. Group critique on 7 questions 2. Introduction of repair tools in Photoshop & Lightroom 3. Practice time with repair tools - download the images via Google Classroom 4. Turn in your repair results into Google Classroom (due Wednesday) 5. Double check to make sure all elements of 7 Questions are turned in. |
Images to download for repair assignment - look in Google Classroom
Need more support? Check out these tutorials!
Beginning students (Photoshop)
Retouching Images Advanced Students (Lightroom)
Spot Removal Tool |
AUGUST 31
Goal: Students will finish their responses to the 7 Questions project, reflect on their learning, and learn how to submit their work via Google Classroom (reading tutorials, asking questions of peers and teacher).
AGENDA:
1. DO NOW in Google Classroom - Composition Poll
2. Finish your 7 Questions Project - turn in your contact sheet, 7 edited images, and reflection to Google Classroom.
3. Finish any missing work in Google Classroom.
4. Look through your Composition photo shoot - do you have at least 7 different examples of compositional guidelines?
Homework: Shoot more images for your Composition project. Using your cell phone is fine. DUE TUESDAY
AUGUST 29
Goal: Students will demonstrate their understanding of compositional techniques by capturing specific compositions during a photo shot in City Park. (listening to instructions, speaking/collaborating with peers)
Agenda:
Agenda:
- Introduction/Review to DSLR Cameras
- Introduction/Review of Compositional Guidelines
- Photo Shoot at City Park - aim for 7 out of the 9 guidelines
- Upload images to Computers
|
|
AUGUST 27 & 28
Goal: Students will be able to download/upload their images, create a contact sheet, and edit their images in order to create “answers” to the seven questions posed. (reading tutorials and support documents, asking questions of peers and teacher for help).
In these next two days, you need to:
In these next two days, you need to:
|
Get your images onto your computer
From your phone:
From a SD card:
|
|
Edit your best photos (Photoshop or Lightroom)
You should crop, adjust exposure (levels), and sharpen each image See this video for help Save your images correctly! Save as: room_name, school_name, fear_name, hope_name, love_name, beautiful_name, place_name Save as a jpeg! Turn in contact sheet and 7 photos into Google Classroom |
Week of August 20

|
Welcome back!
This week we will: - Get to know one another - Set up the computers and accounts - Introduction to Photo 2 - Start Introduction and Review of Photography Concepts |
WEDNESDAY
|
Zoom Activity
Finish Tyler Mitchell Analysis Log into Student account... 1) Bookmark class website 2) Join Google Classroom Go Over Syllabus Get parent slip signed by Friday Go Over 7 Questions Project Shot images due Monday, August 27 Aim for 20+ images for your contact sheet Interest Survey (Google Classroom) Image Analysis (Google Classroom) Homework: start shooting for 7 questions, get parent slips signed |
|
THURSDAY
|
About You Slides
What I Like/Don't Like Choose an example of photography that you like and one example that you don't like Write a short description as to why you like (and hate) those images 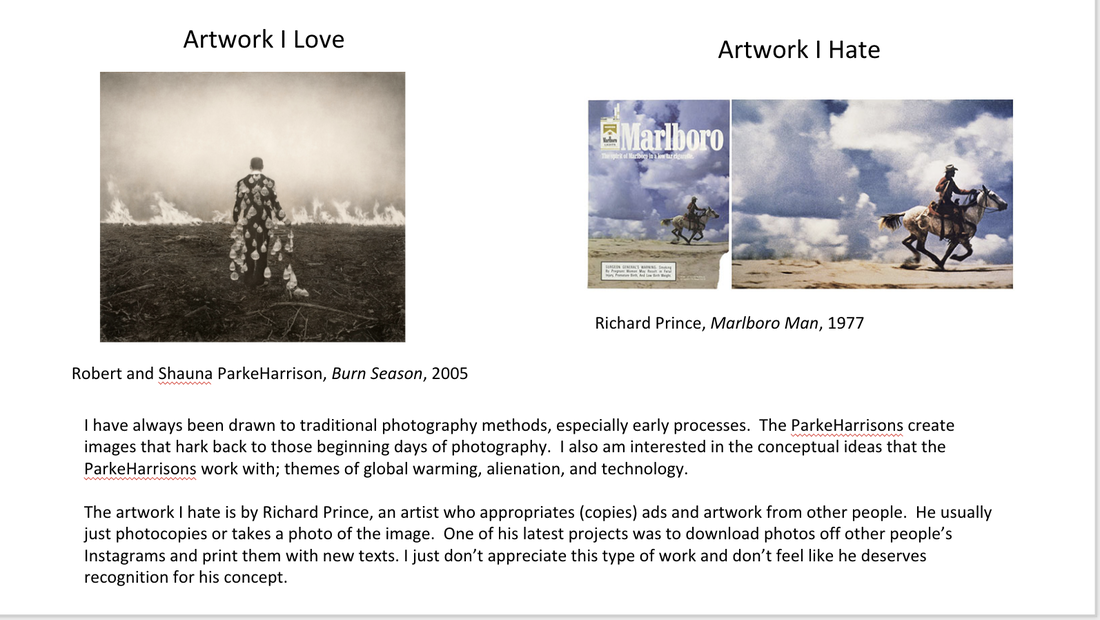
|
What I like, activities, my life
Types of photography I find interesting
|
FRIDAY
|
Beginner Tutorials
|
Advanced Tutorials
(Light Room) |
1) Go through the tutorials that best fit your skill level at the moment. Practice the skills shown with the downloadable files in the tutorials. Save your files as crop_name.jpg, bright_name.jpg, etc.
2) Turn in your reflection and all your edited photos into Google Classroom.
Make sure to turn in all your work from the Introduction to Photo 2 folder in Google Classroom.
2) Turn in your reflection and all your edited photos into Google Classroom.
Make sure to turn in all your work from the Introduction to Photo 2 folder in Google Classroom.