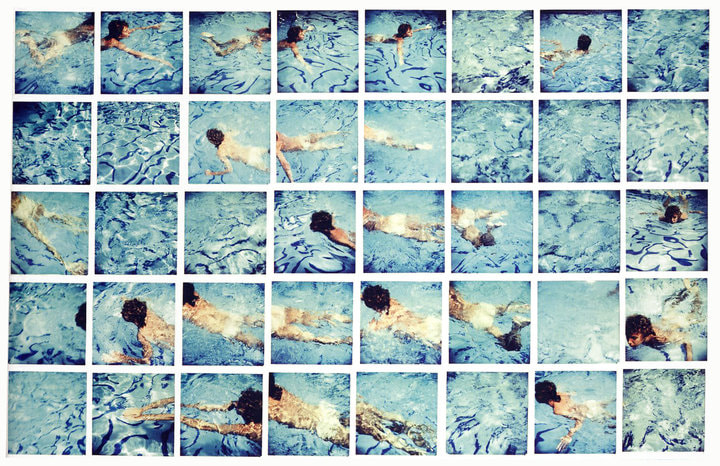
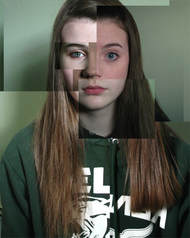
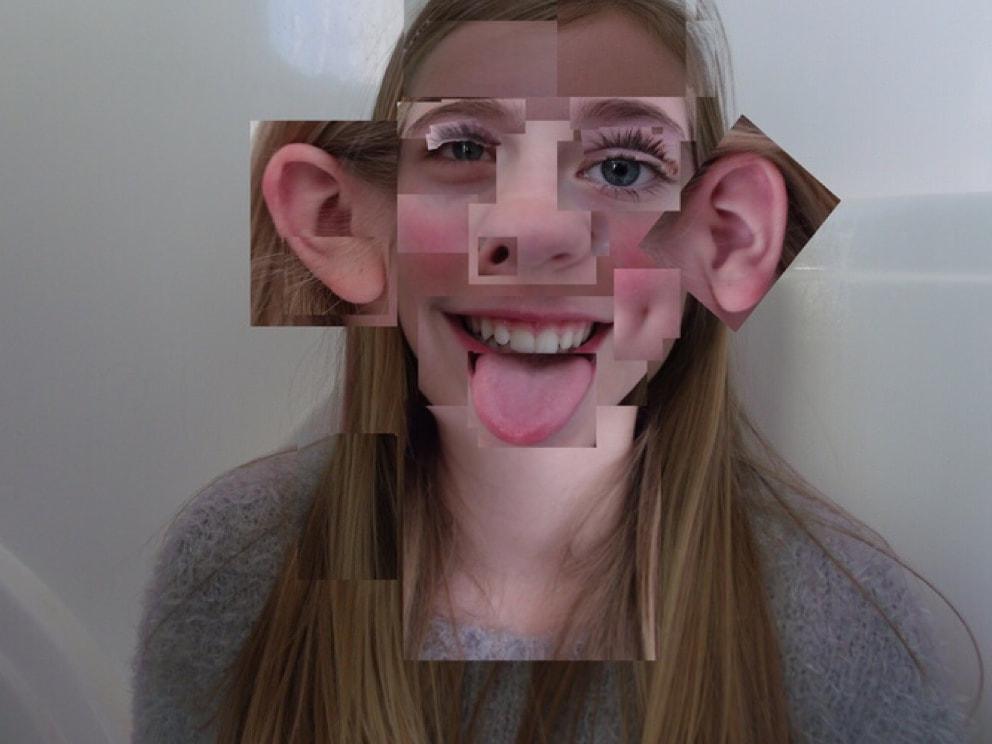
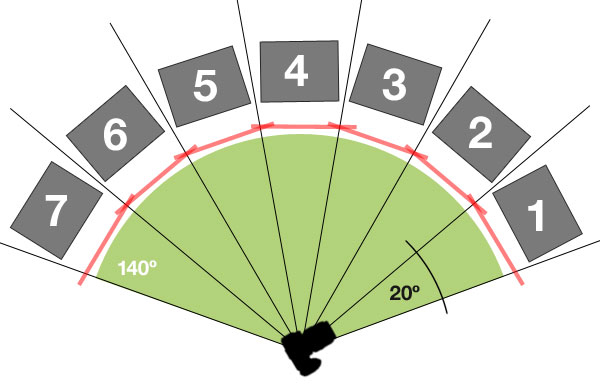
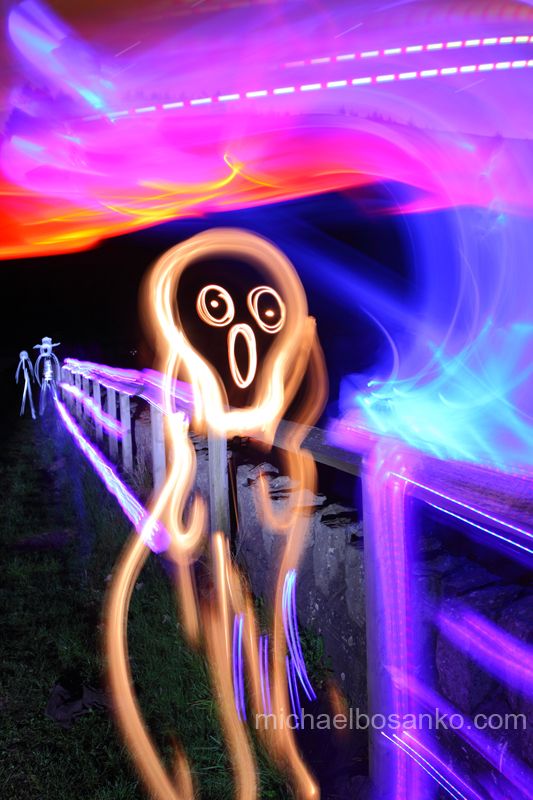
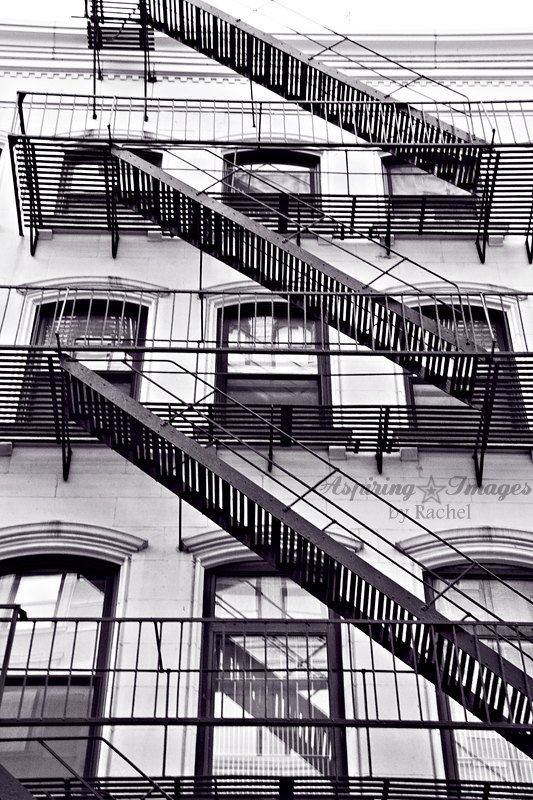
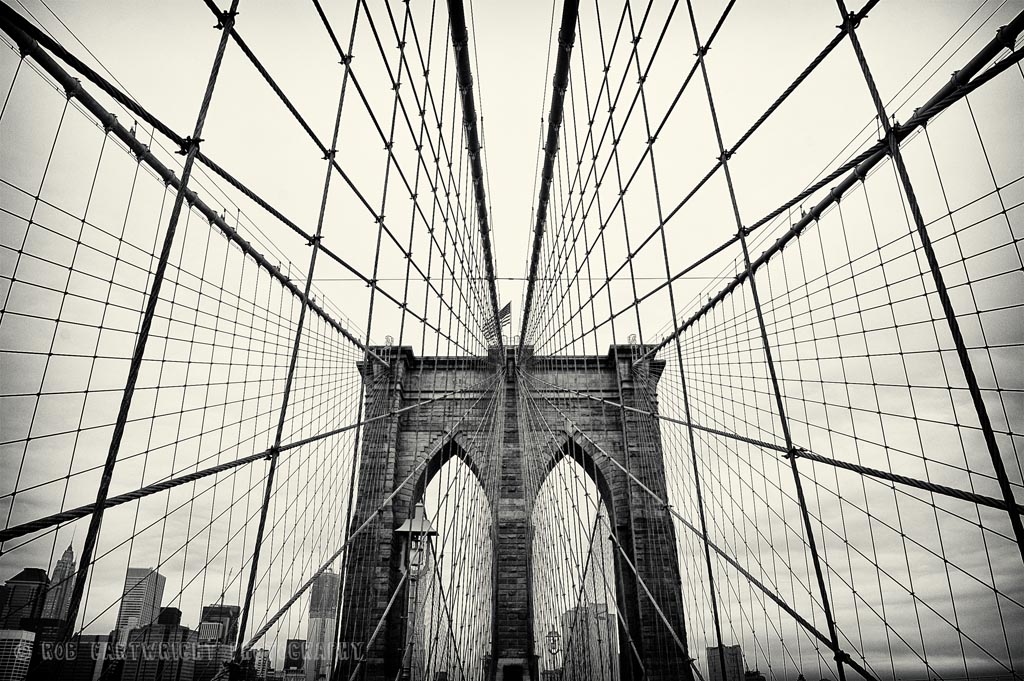
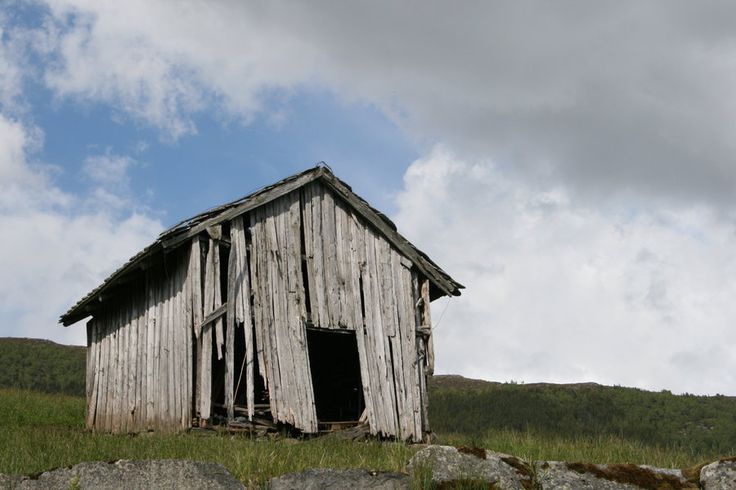
MAy 24
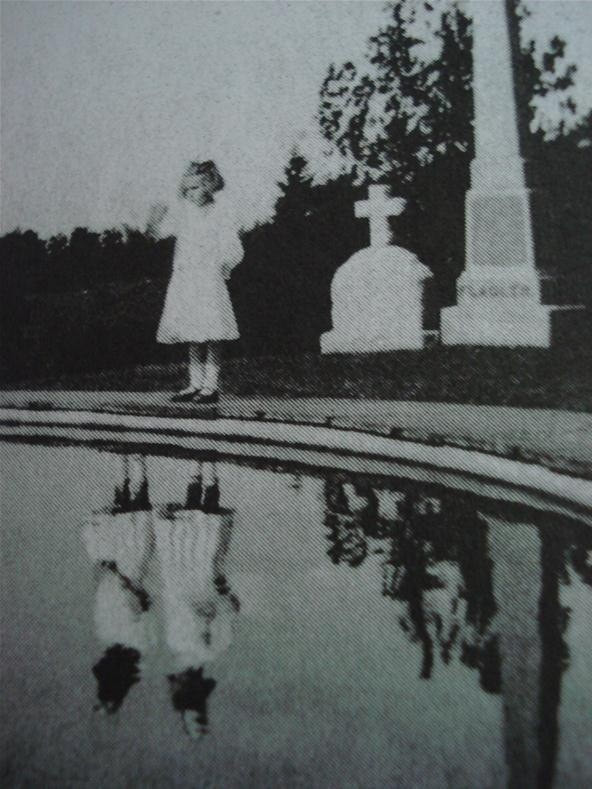
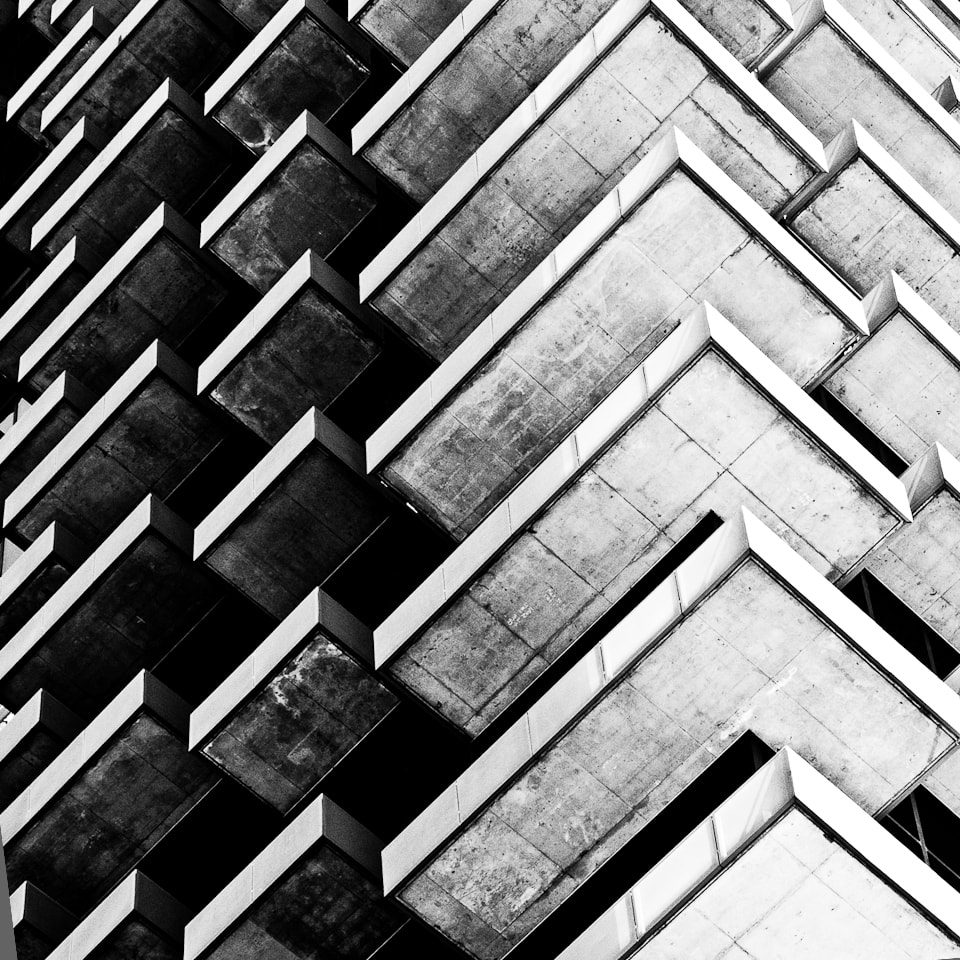
TODAY WE WILL BE EXPLORING IDEAS OF MIRRORING AND CREATING A KALEIDOSCOPE.
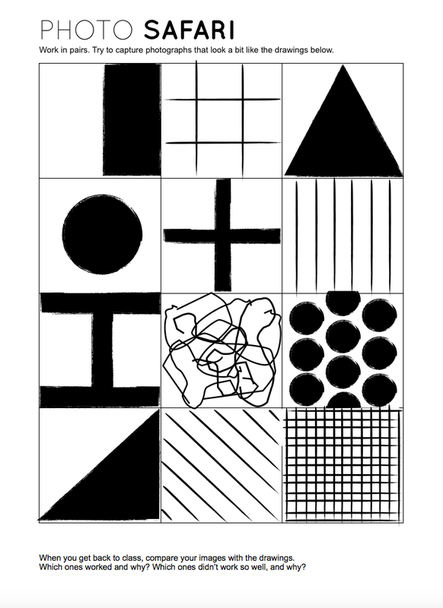
Please use your images from the photo challenges.
Please use your images from the photo challenges.
|
|
|
May 22
|
Take 1 image from your photo challenges and alter it 9 ways (filters, special effects).
Make a grid of these 9 images. Don't like the Photoshop editing options? Try: Pixlr Pic Monkey (may be blocked at school, need to sign up for a free account) FotoFlexer Pixlromatic There are many others out there. Also, you may want to explore some editing apps on your phone (try the free ones). TURN IN GRID BY THE END OF THE HOUR |

Example of a filter assignment - same image, 9 different filters
|
MAy 21
TURN IN CONTACT SHEET BY END OF PERIOD |

|
May 18th

|
TURN IN CONTACT SHEET AT END OF HOUR |
Week of May 14th
|
Monday & Tuesday - Senior Presentations
Thursday - share websites (sophomores & juniors), finish up missing work Friday - Photo Challenge #1 |
Website Presentation
Show off your Projects Page - what was your favorite project and why? Show off your Portfolio Page. Point out a few of your favorite images from this year - why are they your favorite? Show off your Personal Photography Page. What do you take photos of in your spare time? |
Week of May 7
|
Goal: Students will create a mini series of work that is based on the students' interests and demonstrates their technical photography skills (speaking and listening).
Monday & Tuesday - edit your mini series, finish your Aperture & Shutter Review Project Wednesday - Turn in mini-series, update websites Thursday - critique mini series, update websites Next Week: Monday & Tuesday will be senior presentations (this is the senior's final exam) Extra Credit - attend the Artswalk on Thursday
EXTRA EXTRA CREDIT - I need photographers to capture the event |

|
WEEK OF APRIL 30
Goal: Students will review the concepts of Aperture and Shutter in order produce a series of images that demonstrate their understand of the course (listening and speaking).
|
(Monday, Tuesday, Wednesday -
Review of Aperture and Shutter Modes on your camera In Aperture Mode: - Shoot 10 images with SHORT depth of field - Shoot 10 images with LONG depth of field In Shutter Mode: - Shoot 10 images using STOPPED motion - Shoot 10 images using BLURRED motion Using "P" Mode, shoot the same image at: ISO 100 ISO 200 ISO 400 ISO 800 ISO 1600 Make a contact sheet of all 45 images Edit your BEST example fo each: - Short depth of Field (save as shortDOF_name) - Long Depth of Field (longDOF_name) - Stopped Motion (stop_name) - Blurred Motion (blue_name) |
Friday: Mini Series Images (unedited) due!
You will edit your best 3 images to create your mini series. See the Projects Page for more info. PAST DUE: Panorama Project Hockney Project |
April 23 - 25
a more controlled way to create the same effect
|
Goal: Students will, through collaborating with peers and reading tutorials, create a Hockney style image using the techniques of collage and creating actions.
You have until the end of Wednesday to: 1) finish your panoramic project and turn in 2) Complete the Hockney tutorial (see April 18) 3) Learn how to create an action in Photoshop (see April 18) 4) Create your Hockney image - think about making it more complex by adding white borders, drop shadows, polaroid effect, etc. |

EXTRA CREDIT ON THURSDAY!
|
Hi everyone - I have a sick kid at home today. Please continue to finish your panorama project, finish the hockney tutorial, and start on your hockney project.
APRIL 18 & 20
THERE ARE A LOT OF MISSING PANORAMA PROJECTS - PLEASE GET THESE TURNED IN TODAY!
|
Goal: Students will learn how to create actions and assemble a "Hockney style" collage in Photoshop by watching videos, reading tutorials, and using peers for help.
STEP ONE: COMPLETE THE TUTORIAL 1. Using the images provided in Google Classroom, create a sample Hockney image and turn in. See the instructions on the right STEP TWO: LEARN HOW TO CREATE AN ACTION AND SHRINK YOUR IMAGES 1. Watch this video on how to create an action. You will need to shrink all your photos before you build your own Hockney collage. 2. Create your action in Photoshop. Look to the right to see the steps you should have to batch shrink all your images. 3. Make sure your images are in a designated folder for just your Hockney images. Apply your action to your images. STEP THREE: START CREATING YOUR OWN HOCKNEY PROJECT Done? Start putting together your Hockney image. See below for some ways to create more interest in your collage. |
STEPS TO RECORD YOUR ACTION
1. Open one image in Photoshop. 2. Set up your action. Hit record. 3.. Go to Image>Image Size 4. Change the tabs to percent. Make sure your height and width are locked. 5. Change the percentage of the image to 50%. Hit OK. 6. Go to File>Save 7. Go to File.Close. 8. Stop your action. |
Ways to Make your Hockney Collage More Interesting
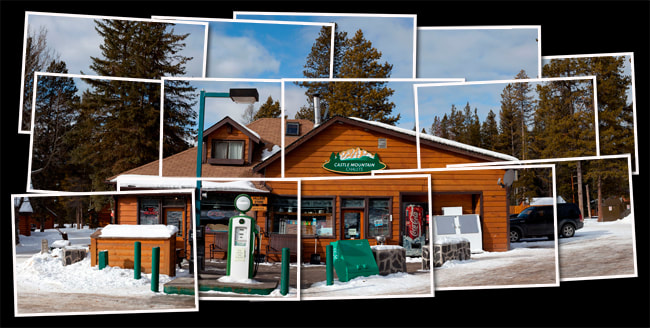
adding white borders (stroke function), maybe adding a drop shadow
|
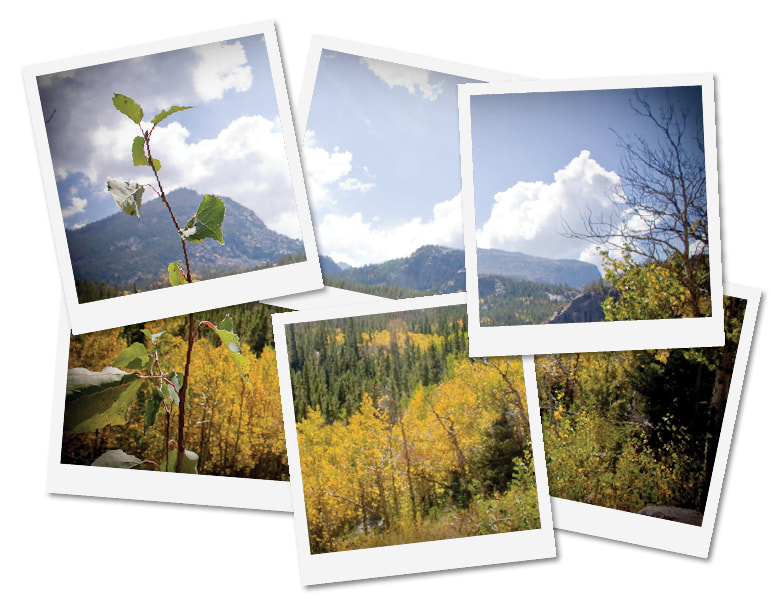
Polaroid Effect with an added drop shadow
|
strips or different shapes beyond the traditional rectangle
|
THINGS I DO NOT WANT TO SEE
too static/boring
|
unbalanced, bad lighting
|

not altered enough - too "safe"
|
April 17
|
Goal: Students will experiment with different points of view to shoot multiple images of their chosen subject matter to create a Hockney effect (listening and speaking).
AGENDA: 1. Review concept of Hockney/Joiner photography 2. Listen and watch demo on shooting images for this technique 3. You need to shoot TWO different subjects with 30-40 images each. 4. Download all your images onto your computer, TOMORROW: Tutorial on how to piece your images together. |
|
APRIL 16
|
Goal: Students will demonstrate their understanding of multiple panoramic effects by presenting their finished images and writing a reflection on their learning (writing). Students will then be introduced to a different way to manipulate perspective in photography through joiner/Hockney technique (listening and speaking).
AGENDA: 1. 1st half of the period - finish your panoramic images and turn in to Google Classroom. The reflection questions are in GC. 2. Intro to Hockney/Joiner Project TOMORROW: Photo shoot for Hockney Project WEDNESDAY: Tutorial on Hockney, start work on images |
Panoramic Project Components
You will be graded on the technical aspects of creating panoramas and tiny planets as well as your compositions (basic landscape rules). |
April 12 & 13
 My favorite pano I took at the Grand Canyon My favorite pano I took at the Grand Canyon
|
Goal: Students will demonstrate understanding of compositing together images into a panorama by participating in a demo, analyzing their photo shoot for possible images, and then applying the techniques to their own photos. (listening, speaking, and reading).
Part Two of the Panoramic Assignment: Tiny Planets Tiny Planet Tutorial Tutorial with gradient Tips:
|
Panoramic Project Components
You will be graded on the technical aspects of creating panoramas and tiny planets as well as your compositions (basic landscape rules). Due Monday, April 16th |
April 6
Goal: Students will demonstrate understanding of compositing together images into a panorama by participating in a demo, analyzing their photo shoot for possible images, and then applying the techniques to their own photos. (listening, speaking, and reading).
|
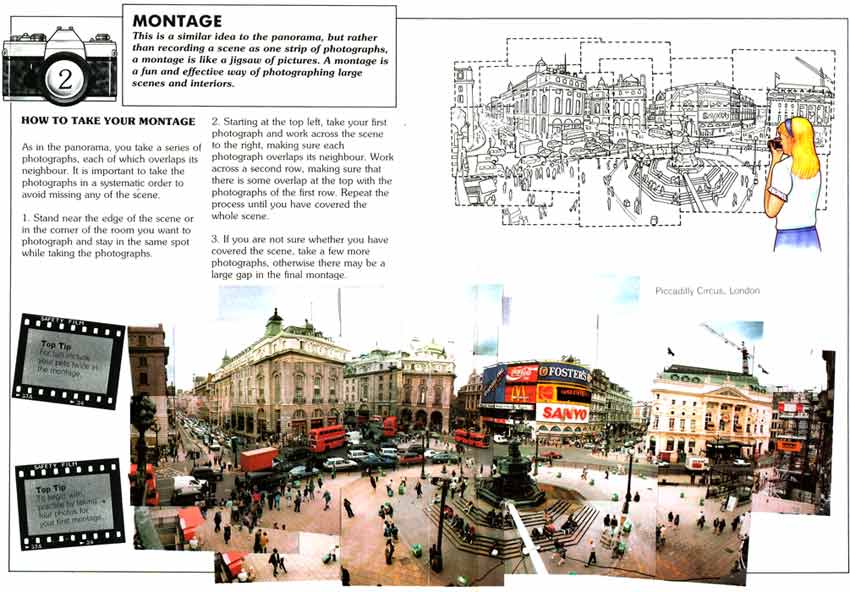
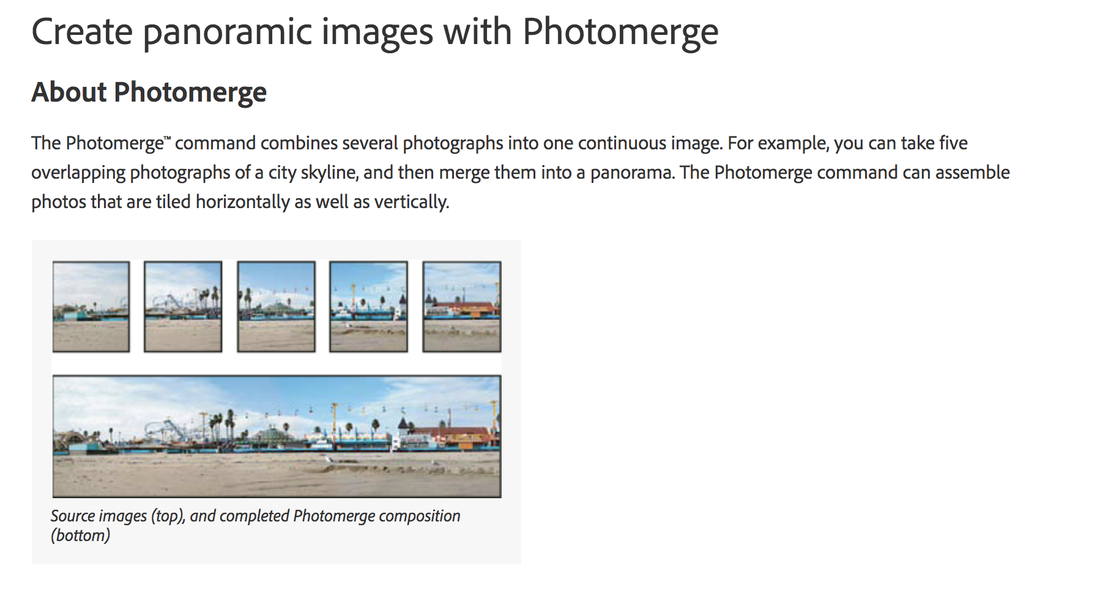
Tutorial on PhotoMerge
1) Watch the demo on Photomerge 2) Download all your cell phone panos to your computer. 3) Make a contact sheet of all your attempts (including your cell phone panos) 4) Create 3 different panoramas using your DSLR images. Make sure to crop and edit any strange seams. Adjust panoramas for color, exposure, and sharpen. |
|
April 4
|
Goal: Students will create panoramic images through both traditional and contemporary methods by working together in small groups and analyzing the scene for the most effective composition.
Shooting (aim for at least 3-4 panoramas in each technique (cellphone & DSLR) DSLR Panoramas (see image at the right) - you want to aim for 5-8 overlapping images for each panorama On Friday, you will create two final panoramas:
|
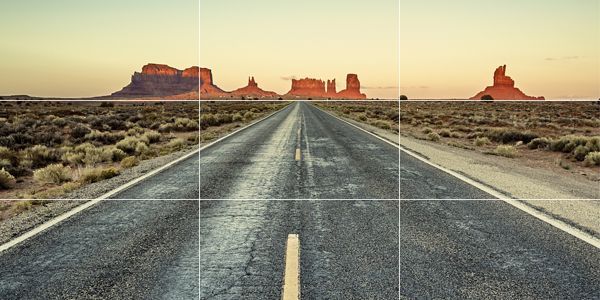
TYPICAL RATIOS
Overall image - 2:1 or 3:1 Remember the Rules of Thirds (see below)
|

APril 3
Just a wee bit cold in Scotland!
|
Goal: Students will critique their work and the work of others through visual analysis (writing and speaking).
Grading Day! 1) Website peer grading 2) Culture Jamming peer grading 3) Write reflection for Culture Jamming Project in Google Classroom TOMORROW: Panorama Demo and Shooting Day |
Week of March 19
|
Friday
Update your webpage and finish turning in your Culture Jamming Project - we are grading BOTH of these on Tuesday when we return. Culture Jamming Criteria on Google Classroom. Website Needs: Projects Page
On Personal Photography Page
|

When you turn in your project, you will also need to mock up a layout like this (both ads on one doc)
|
Goal: Students will create a culture jamming advertisement in response to an actual ad aimed at the consumer. (speaking & reading)
Monday, Tuesday, Wednesday
First, create an ad EXACTLY (or as close to) the original. That means taking the photos, editing, recreating the layout, and dealing with the text. You may need to complete a tutorial and/or do additional research to figure out the effects.
Next, create your culture jamming ad. How are you going to cleverly respond to the original ad? It is most effective when you keep the ad very similar to the original so that it takes a moment for the viewer to realize the commentary (and makes them think).
You will turn in:
Concept Board
Contact Sheet
Original ad
Recreation of original ad
Spoof of Ad
Reflection
Need a new font than what is in Photoshop? Try dafont.com
Week of March 12

AUM PERMISSION FORM AND IMAGE DUE BY MONDAY!!!!!!
|
Goal: Students will create a culture jamming advertisement in response to an actual ad aimed at the consumer. (speaking & reading)
You have this week to create your ad. First, create an ad EXACTLY (or as close to) the original. That means taking the photos, editing, recreating the layout, and dealing with the text. You may need to complete a tutorial and/or do additional research to figure out the effects. Next, create your culture jamming ad. How are you going to cleverly respond to the original ad? It is most effective when you keep the ad very similar to the original so that it takes a moment for the viewer to realize the commentary (and makes them think). You should have a contact sheet of all your photos shot to turn in at the end of the project. We will have a peer review on Friday to see how we are doing and help each other finish this project out. Need a new font than what is in Photoshop? Try dafont.com |
March 7
|
Goal: Students will design their plan for their culture jamming project by curating images, finding tutorials, and writing about their ideas (reading and writing).
Design Your Project Day! On a Google slide or doc, create a concept board for your culture jamming idea. It should have:
When you are finished, have a quick meeting with Dr. Overby to share your thoughts (and turn into GC). Did you turn in your type tutorial and culture jamming mood board? |
Zoe, Leo, Juniper, Lauren, Jazmin - turn in your contact sheets of yesterday's shoot on Colfax
Key Words for Searching:
persuasive advertising famous ads propaganda ads toy ads cereal ads Some good websites to find ads http://www.thebigad.com/category/print-ads/ 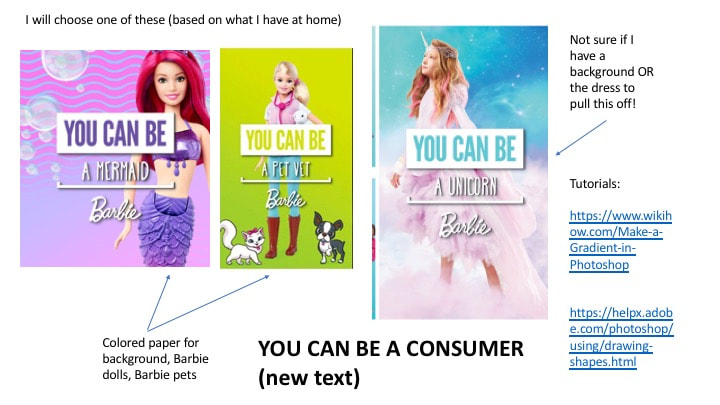
|
MArch 6
|
Goal: Students will research examples and techniques in preparation to create a culture jamming image (reading and speaking).
Today is the final research day for the culture jamming project. 1) You may go out to Colfax for 20-25 minutes to observe how advertisements are used to capture your attention. You will need to take 10+ images while you are out and create a contact sheet of your images (turn into Google Classroom) 2) Finish your mood board and turn in (GC). 3) Finish the typography tutorial and turn in (GC). Tomorrow: You will sketch and write up your plan for this project as well as research tutorials you need to complete to create the effects you want. By Monday 3/12 - you should have your images ready for editing |
|
March 5

What is the main message of this image?
Social Media Series
|
Goal: Students will research examples and techniques in preparation to create a culture jamming image (reading and speaking).
1) Collect 10+ examples of culture jamming (spoofs and/or responses to mass media advertising) for a mood board. You can use the ones you collected this weekend. Turn into Google Classroom. 2) Watch all three videos on typography and follow along to make your own. Use this image as the background. Turn into Google Classroom. |
Week of FEb 26
|
Goal: Students will finish their studio portrait unit by editing their best three images and getting peer feedback to improve the quality of their compositions and editing.
LAST CHANCE TO SHOOT IN THE STUDIO FOR PORTRAITS - we are moving on to the next project on Wednesday. Finish your portrait tutorials and turn in! Finish update on website - grading starts in Monday. Continue to edit portraits - don't forget to clean up the background, edit skin and eye, and use dodge/burn tools to bring attention to the subject. 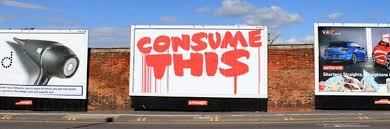
Done with everything?
Start collecting 10+ examples of culture jamming (spoofs and/or responses to mass media advertising) for a mood board. Homework: Find 3 examples of mass market ads that make you question their approach to selling you their product |
Visual reminder of must-dos for your portraits
EXTRA CREDIT
Read the article and complete the tutorial (use one of your own photos) to make the same effect as this photographer did (and got paid for!) 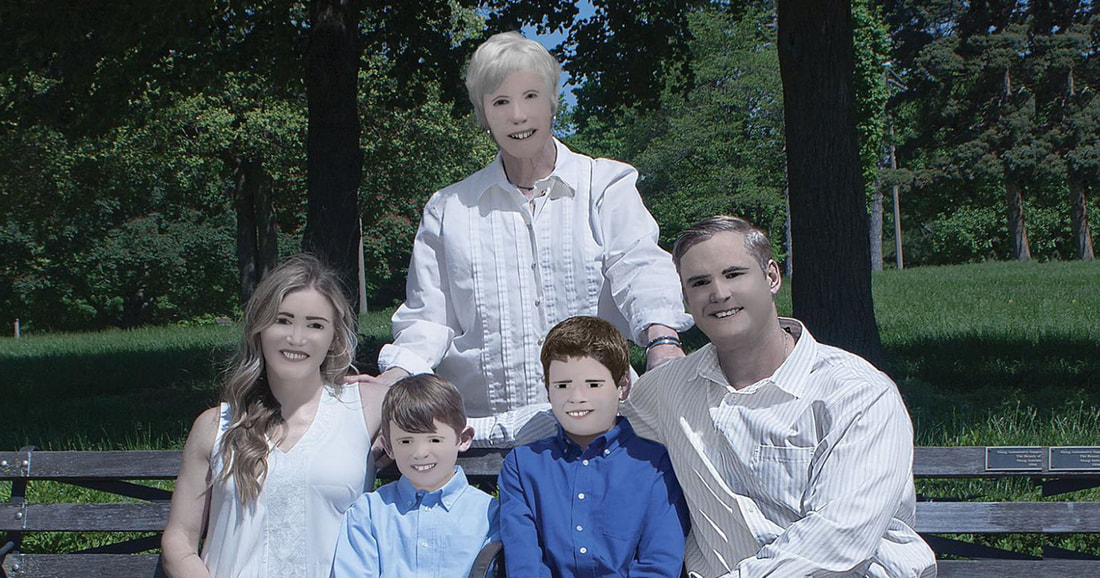
|
Wed Feb 21
Start updating website On Projects Page Grid Project (image and reflection) Veggie Head (image and reflection) Photo Composite (two images, sketches, research, reflection) Studio Portraits (research/sketches) On Personal Photography Page keep adding images that you take on your own |
Fri Feb 23Hi guys! Please get the following done:
1) Gabby - get a camera from Ms. Walsh and shoot your portraits Someone else can shoot after her if there is time. 2) Finish your portrait tutorials and turn in! 3) Finish update on website - grade on Monday 4) Continue to edit portraits - don't forget to clean up the background, edit skin and eye, and use dodge/burn tools to bring attention to the subject. |
FEb 16
|
Goal: Students will continue to build their understanding of portrait work through tutorials, research, and shooting images in the studio. (reading and speaking)
Things to Get Done Today: Have you signed up for a studio time? (must shoot by next Friday) Finish your tutorials, add your images to the template, and turn in Finish your sketches for your portraits Edit the images you have taken UPDATE your web page - check next Friday |
ADD TO YOUR WEBSITE:
PROJECTS Grid (image and reflection) Veggie Head (image and reflection) Photo Composites (two composites, planning sheet (take a photo if you still have it), and reflection * pull your reflections from Google Classroom PERSONAL PHOTOGRAPHY add more images that you have shot on your own (phone images are fine) |
Feb 12
Goal: Students will critique their work and the work of others through visual analysis and written reflection. Students will also start exploring ideas and skills behind studio light portraits.
1. Look at the composites that were turned in. Give FEEDBACK based on the image numbers you were assigned.
2. Look at your feedback - what will you do to make your images even stronger?
3. Intro to Studio Light Portraits (slide show and demo in studio)
4. Start planning for your portraits. Sign up for a time in the studio and create 10+ thumbnails on your portrait ideas.
5. Finished with your composites? Write your reflection in Google Classroom.
Feb 5 to Feb 7
|
Goal: Students will demonstrate their understanding of tools in Photoshop by creating two "impossible" photo composites that use student photographs and center on the idea of showing space (foreground, middle ground, background). (reading and speaking).
You need to: 1) Finish your planning worksheet (worth 20 pts) 2) Shoot images for your composites 3) Create two composites that have a sense of foreground, middle ground, and background while demonstrating the idea of "impossible photography" We will critique these on Friday! |
TUTORIALS TO HELP MAKE YOUR COMPOSITES AMAZING
|
Jan 29 to Feb 1
|
Goal: Students will demonstrate their understanding of tools in Photoshop by creating two "impossible" photo composites that use student photographs and center on the idea of showing space (foreground, middle ground, background). (reading and speaking).
You have the rest of the week to: 1) Finish your planning worksheet (worth 20 pts) - DUE MONDAY! 2) Shoot images for your composites 3) Create two composites that have a sense of foreground, middle ground, and background while demonstrating the idea of "impossible photography" We will finish these up early next week and then move onto Studio Lighting. |
EXTRA CREDIT!!!!!
Wednesday, 5:30 to 8pm Voices Choir and Art Show East HS Lobby FREE Come and stay for a little bit - take a selfie in front of the art if you don't see me 
|
January 26
Click on the photo to see how the photographer made this composite
|
Goal: Students will plan compositions for their Photo Composite project by sketching, researching exemplars, and organizing their photos. (reading and writing).
Brainstorm day! Using the worksheet provided, plan out TWO photo composites by sketching and labeling parts of the chosen compositions. Look at the research you have done, check out the article to the left, and figure out what you may have already in the photographs that you have taken. Homework: Shoot images for your photo composites. You will have all next week to build your two composites, but if you are waiting to take photographs during class time, you will run out of time. 
|
January 24
Caroline Silbough's work from last year
|
GOAL: Students will demonstrate understanding of selection tools and compositing in Photoshop as well as research ideas for their own photo composites (listening, reading, and speaking).
Today we will work on: 1. Group tutorial (download the images and open them in Photoshop) 2. Continuing our research for inspiration (turn into Google Classroom) 3. Brainstorming and sketching for two photo composites (get worksheet) PAST DUE: Veggie Head, Grid Project & Reflection |
JANUARY 23
|
GOAL: Students will explore the concept of photo compositing through listening to a lecture, discussing key ideas, and researching exemplars.
1. Look at ppt about photo composites. 2. Watch Erik Johansson's TED Talk 3. Research some exemplars - find 10 photo composites that may help you come up with your own ideas. 4. Finish your veggie head - make sure you have at least 8 components/parts on your project. TODAY: Turn in an image for the Voices Art Show into Google Classroom (what are you most proud of?) Tomorrow: We will create a sample photo composite and then you start planning your own. |

|
January 22
Goal: Students will reflect on their work in the Grid project and finish their selection tool project (Veggie Head) (listening, speaking, and writing).
1. Grid Critique: Each student will critique the work of 3 other students.
2. React to Feedback: Read over your feedback and edit your grid project to make it even better. Turn the new version into Google Classroom.
3. Reflect: Fill out the reflection questions in Google Classroom on the grid assignment.
4. Finish: Complete your veggie head and turn into Google Classroom.
5. Research: Start looking up photo composites
Tomorrow we will look deeper into what a photo composite is and what we will be doing.
January 19
|
GOAL: Students will explore the selection tools in Photoshop through reading tutorials and creating a veggie face/photo composite.
Today you will start to create a veggie head for the purpose of learning the selection tools in Photoshop. Learning how to use selection tools will allow us to work towards creating a dream-like photo composite. You will be graded on the technical quality of your selections as well as the creativity of your veggie head. Look on the Projects Page for more information. Make sure your collage is turned into Google Classroom as a jpg file |
|
January 16 & 17
|
Goal: Students will apply their knowledge of editing in Lightroom and Photoshop to create a grid artwork that focuses on the principles of composition (listening and reading).
Past Due: All work from Week 1 - Goal, Image Analysis, Winter Break Image, Lightroom Tutorials 1. In LIGHTROOM, finish importing and editing your photos from Friday (and this weekend's photo shoot). Crop each one to a 3" to 3" square. You should have 9-12 photos. 2. EXPORT the photos into a folder on your desktop (a sub-folder in your Photo Safari folder). 3. in PHOTOSHOP, create a document that is 9" x 9" or 9" x 12" (white or "clear" background) 4. Open your 9-12 images in PHOTOSHOP. 5. Drag each one individually onto your blank document using the Move Tool. Turn on the grid to line everything up. Put the images in order like the Photo Safari worksheet is laid out (as best you can). |
an example of using a grid layout
|
January 12
|
CLO: Students will use their knowledge of composition to shoot images that mimic the prompts they are given (listening and reading).
Make sure all your work from this week is completed and turned in!
Next week: Tuesday - edit Photo Safari Wednesday - finish Photo Safari, start learning about selection tools in Photoshop Friday - finish selection tool exercises |

|
January 10
CLO: Students will continue to develop their understanding of Lightroom through watching/listening videos about the program and trying tutorials on different effects.
FINISH YOUR WORK FROM DAY 1 - THERE ARE A LOT OF PEOPLE MISSING YOUR GOAL, IMAGE ANALYSIS, AND/OR BEST WINTER BREAK PHOTO.
1) WATCH THESE TUTORIALS:
Import photos into Lightroom
Editing in Lightroom
Moving from Lightroom to Photoshop
2) CHOOSE TWO OF THESE TUTORIALS TO TRY: (Click on the red text)
3) Turn in your results and your reflection on Lightroom to Google Classroom. (Due at end of the period).
DONE?: Start the Photo Safari Challenge (working on composition).
January 9
CLO: Students will start to navigate the Lightroom platform by watching videos, setting up their library, and discovering the basic tools/editing process (listening and speaking).
1. Add your best winter break image to Google Classroom (if you haven't done so already)
2. What are we going to cover this semester?
3. Intro to Lightroom (video and navigate through platform)
Go to Google Classroom and download the images from Lightroom Tutorials Lesson 1
Work as a class to start the process
January 8
|
CLO: Students will review and refocus in order to prepare for a new semester of learning through discussion, image analysis, and reflection.
Welcome Back! I am so happy to see all of you! 1. New computers, new seats (if you want) 2. In Google Classroom... Goal for the semester Image Analysis (compositional cheat sheet on right) 3. What are we going to cover this semester? 4. Intro to Lightroom (video and navigate through platform) Homework: Turn in your best image from Winter Break into Google Classroom |
|
December 15

|
10 min. Double check your website
20 min. Grade two peoples websites 10 min. Written reflection on Portfolio Page 10 min. Fix any issues with your websites (website grade is part of your final grade) Final Exam Monday: Photoshop Task and Image Analysis |
December 13
Website Day!
Look on the Projects page and get your website updated to everything that is listed. Make sure your your layout is easy to read/follow and looks professional. WE WILL GRADE THESE ON FRIDAY IN CLASS!
Turn in late work and add to clip board
Need something printed? Add file to Google Classroom (add comment if you want anything other than a 8/5" x 11" print or need copies)
Continue to work on Bokeh (extra credit)
LAB is open after school and at lunch EVERY DAY if you need it!
DECEMBER 11 &12
Goal: Students will experiment with the bokeh technique to produce holiday images (listening and speaking)
|
PROJECT: TURN IN TWO EDITED HOLIDAY IMAGES THAT SHOW BOKEH
Bokeh comes from the Japanese word boke (ボケ), which means "blur" or "haze", or boke-aji, the "blur quality." Bokeh is pronounced BOH-Kə or BOH-kay. Bokeh is defined as “the effect of a soft out-of-focus background that you get when shooting a subject, using a fast lens, at the widest aperture, such as f/2.8 or wider.” Simply put, bokeh is the pleasing or aesthetic quality of out-of-focus blur in a photograph. Although bokeh is actually a characteristic of a photograph, the lens used determines the shape and size of the visible bokeh. Usually seen more in highlights, bokeh is affected by the shape of the diaphragm blades (the aperture) of the lens. A lens with more circular shaped blades will have rounder, softer orbs of out-of-focus highlights, whereas a lens with an aperture that is more hexagonal in shape will reflect that shape in the highlights. = Nikon USA HOW TO TUTORIALS
|
Bokeh is achieved through a large aperture opening (like f2.8) and having the camera close to the subject.
By increasing the distance between the background and your subject, you can see bokeh in images that are shot at smaller apertures like f/8. |
DECEMBER 8
|
Goal: Students will critique their work and the work of others through discussion, visual analysis, and written reflection.
Critique Time! 10 min. Open your files and LABEL THEM CORRECTLY. (DE_cell_name.jpg, DE_borrow_name.jpg, DE_own_name.jpg). Make a contact sheet (label DEcs_name.jpg) Then, open all three images on your desktop, side by side. 10 min. Get into groups of 2-3 people. You will critique 4 different people's work. Listen for instructions. 5 min. Share out - wrap up of what we discovered. 25 min. Read your feedback. Apply any changes that you agree with to make your images better. Write your reflection and TURN IN ALL COMPONENTS (images, contact sheet, and reflection) to Google Classroom. Add them to your website as well. Done? Start uploading work to your website. All your projects (images, contact sheets, reflections) should be on the semester 1 page. MONDAY: Shooting assignment with the bokeh technique. Bring in Xmas lights and/or holiday items you may want to shoot. |
DOUBLE EXPOSURE REFLECTION
1. Which process did you like the best (cell phone, a particular photoshop technique)? Why? 4. What kind of feedback did you get? What feedback did you use to make your images better? 5. What are you proud of in this assignment? Explain. 6. What do you need to continue to work on? Explain. 7. What grade do you think you deserve and why? (an "A" would require you to have ALL components of the assignment). REST OF SEMESTER
Mon 12/11 - Bokeh mini project Tuesday 12/12 - continue Bokeh Wed 12/13 - Turn in Bokeh, finish website Friday 12/15 - Peer Grading of Websites Mon 12/18 - FINAL EXAM, open lab 11:30 to 3:15 Tues 12/19 - open lab 11:30 to 3:15 Wed - Open lab 9:30 to 3:15 |
december 4-6
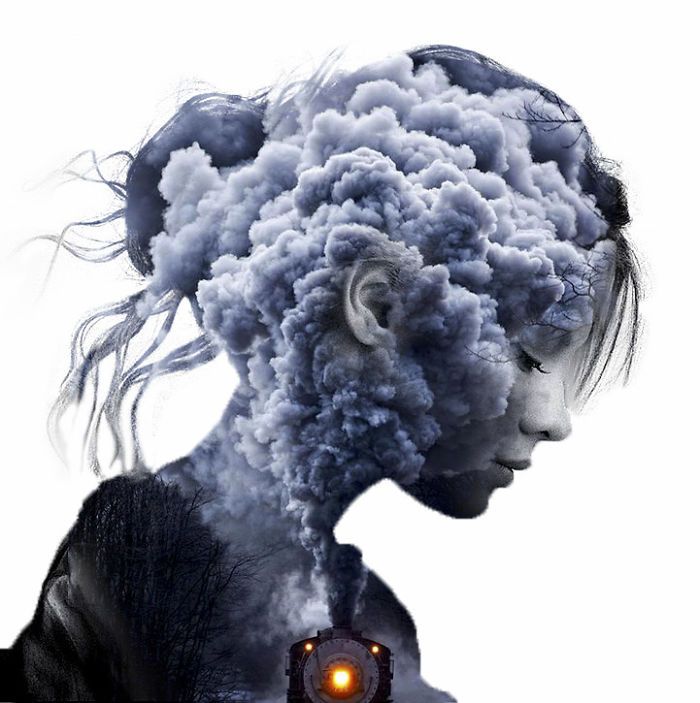
|
Goal: Students will explore the concept of double exposure through research and tutorials to create their own images using the techniques they learned (listening, reading, and speaking).
Key Concepts to Remember: 1) A white background is needed to contain the texture within the subject 2) Your subject and texture/background should be connected in some way (BE INTENTIONAL ABOUT YOUR COMBINATION) 3) Use masking and opacity to create more interesting photos 4) Can you make a triple exposure? A quadruple exposure? CHALLENGE YOURSELF |
DONE? Try an animated double exposure GIF!
|
november 29 & December 1
|
Goal: Students will continue to explore the concept of double exposure through image analysis, demonstrations, and experimentation.
Final Images You Will Need:
One double exposure done with your cell phone (use pixlr, snapseed, etc.) One to two images using photos you took One image you can use an image from Pexels or Unsharp for an interesting texture (s) Homework: Keep looking for interesting subject and textures that you can combine. CREATE YOUR CELL PHONE DOUBLE EXPOSURE (see Dr. O if you don't have a photo editing app that does double exposure) Double Exposure from 15/16
|
Some double exposure work from last year (below)
|
November 28
Hi all! I am on a field trip with my 8 year old - we are headed to the Symphony with the whole 3rd grade from Teller (wish me luck!). PLEASE get some stuff done today - remember, only 14 days class days left of this semester!
1. Make sure your Motion Project is turned in.
2. Go to the Projects Page and look over the information on Double Exposure
3. Create a mood board of 5+ images that demonstrate the concept of double exposure. Turn into Google Classroom.
4. Choose ONE tutorial and complete it. There are headphones on the middle table if you need them. Grab some images from Pexels or Unsplash. You will want to look for a portrait with a white background to make your life easier when doing the tutorial. Turn in the finished result in Google Classroom.
I will be back for 7th and 8th hours and after school if you need me :)
november 27
|
Goal: Students will demonstrate their understanding of motion photography by presenting their final images, contact sheet(s), and reflection.
Welcome back! I hope all of you got some much needed rest and family & friend time... BACK UP YOUR FILES ONTO GOOGLE DRIVE Today you need to turn in: Your best STOPPED MOTION Your best BLURRED MOTION Your best PANNING Your best EXTENDED EXPOSURE (extra credit) Contact sheet(s) of all your motion attempts Reflection Which image is your strongest image? Why? What was challenging about this project? Why? What additional techniques would you like to learn about? |
Our next project is Double Exposure. If you finish your motion project, start researching some ideas for double exposure and create a mood board of 5+ images.
|
November 16

|
- MOVE YOUR FILES TO YOUR GOOGLE STUDENT DRIVE (new computers after Turkey Day)
Extended Exposure Day! Set your Camera to Manual Mode (M) Set your Aperture to f22 or smaller Set your Shutter Speed to Bulb (B) - one person will be counting the exposure time You will need to Manually focus your cameras Adjust shutter speed after seeing first exposure. YOU MUST USE A TRIPOD! HOMEWORK: Have fun and capture some cool action shots if you have the opportunity :) |


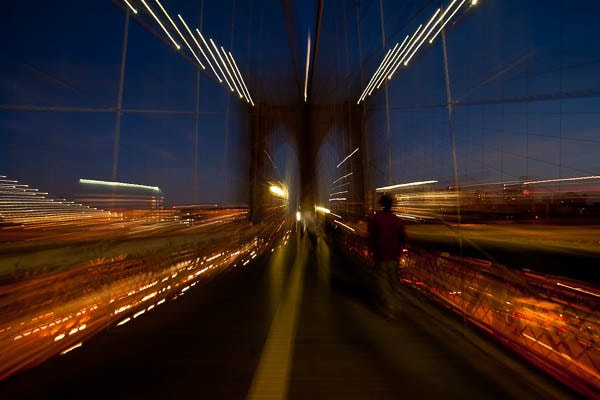
We will learn how to do extended exposure like this on Friday!
|
November 15
Today you need to get done... - MOVE YOUR FILES TO YOUR GOOGLE STUDENT DRIVE (new computers after Turkey Day) - Finish your motion tutorials and writing and turn into Classroom. - Finish your Motion research and turn into Classroom. - Edit your motion photos (one stopped, one blurred, one panning) - you can always edit more for extra credit Make sure your COMPOSITIONS are strong - you may have to CROP or BLUR the background to make the image more effective. I will be able to help you the last 30 minutes of class. |
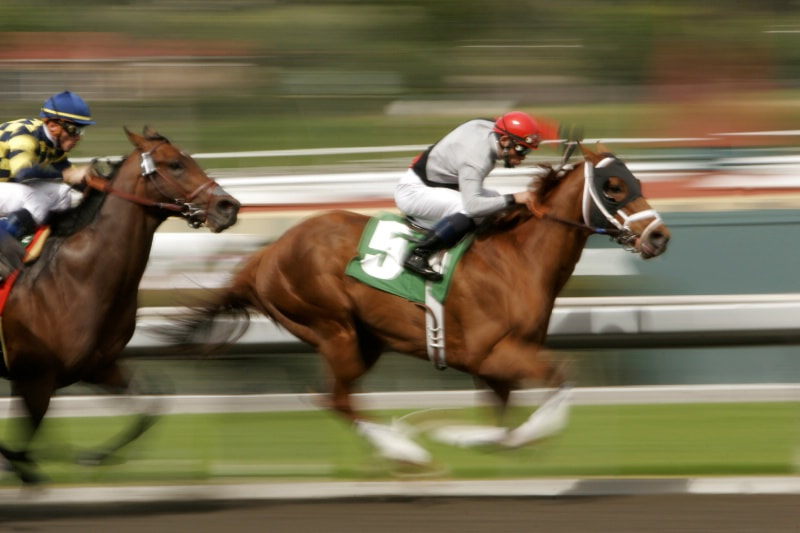
November 8-15
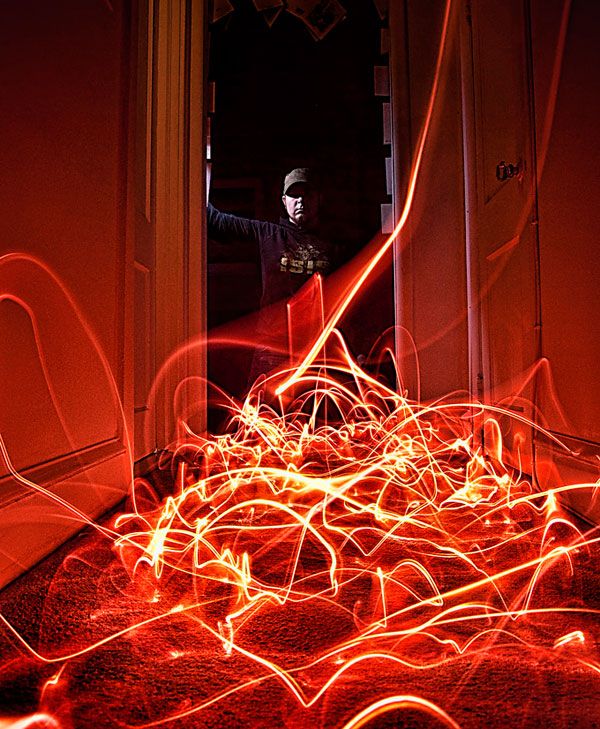
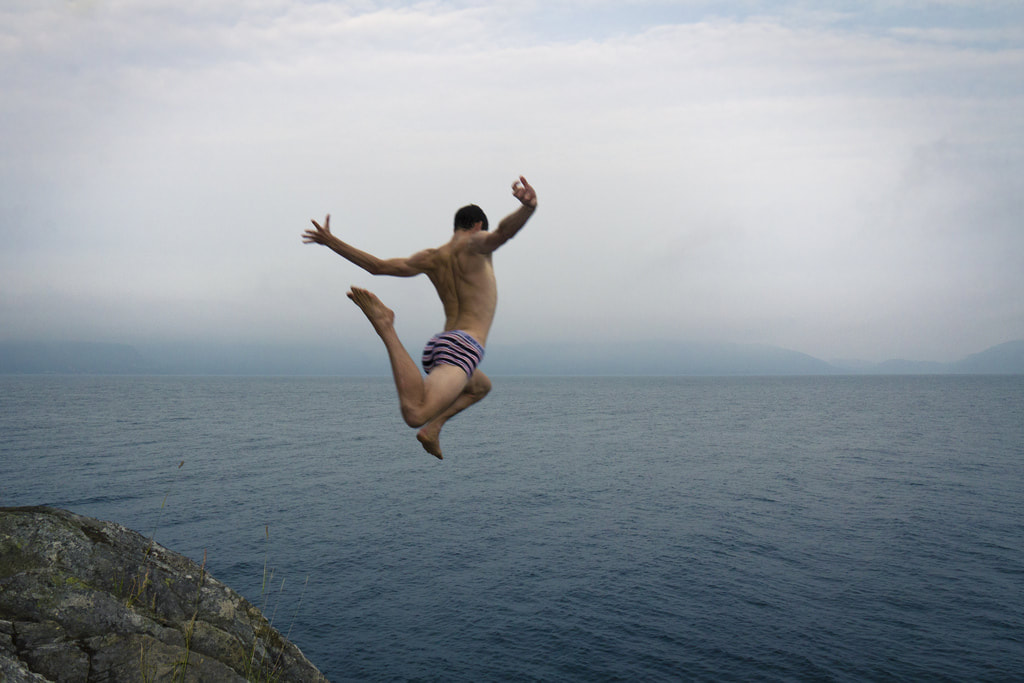
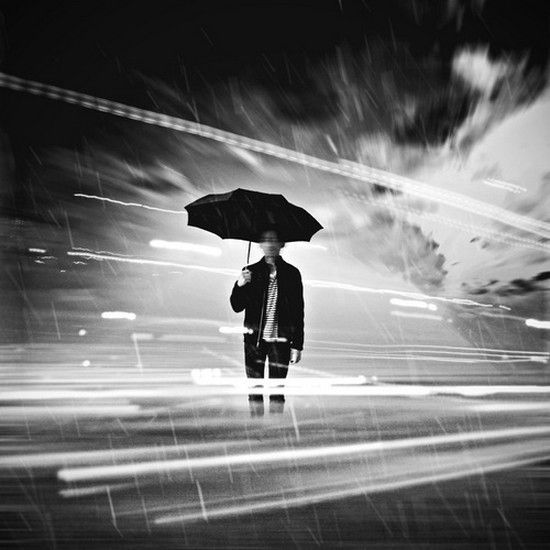
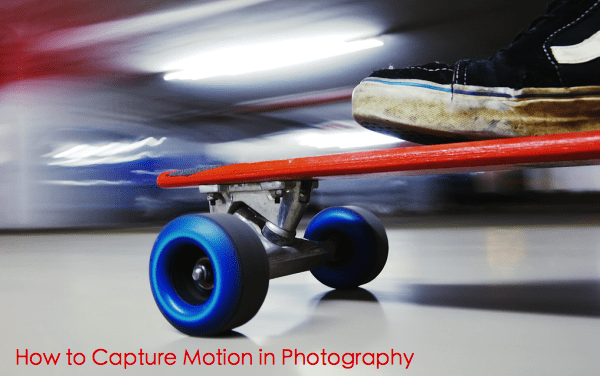
Goal: Students will demonstrate how to capture different types of motion using shutter priority mode on a DSLR camera, paying close attention to composition and unique points of view (listening and speaking)
|
GOOD EXAMPLES OF MOTION PHOTOGRAPHY
|
NOT-SO-GREAT EXAMPLES OF MOTION PHOTOGRAPHY
|


|
You will eventually turn in:
Your best STOPPED MOTION Your best BLURRED MOTION Your best PANNING DUE NOW: Motion Tutorials Motion Research Doc 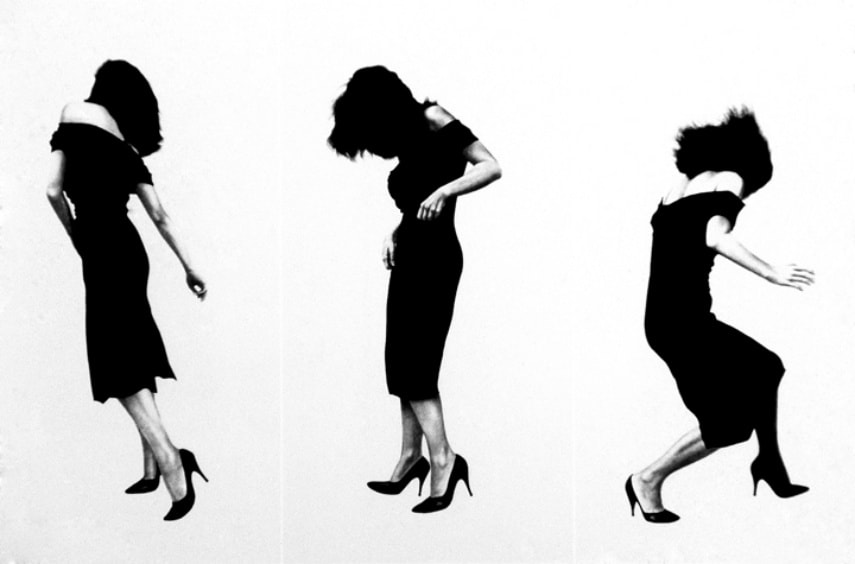
|
Think about COMPOSITION - how can you make your motion photography exciting?
PRACTICE ALOT...the more you experiment, the more interesting results you will get. You should have over 30 images on your contact sheet! Extended Exposure & Light Painting is extra credit 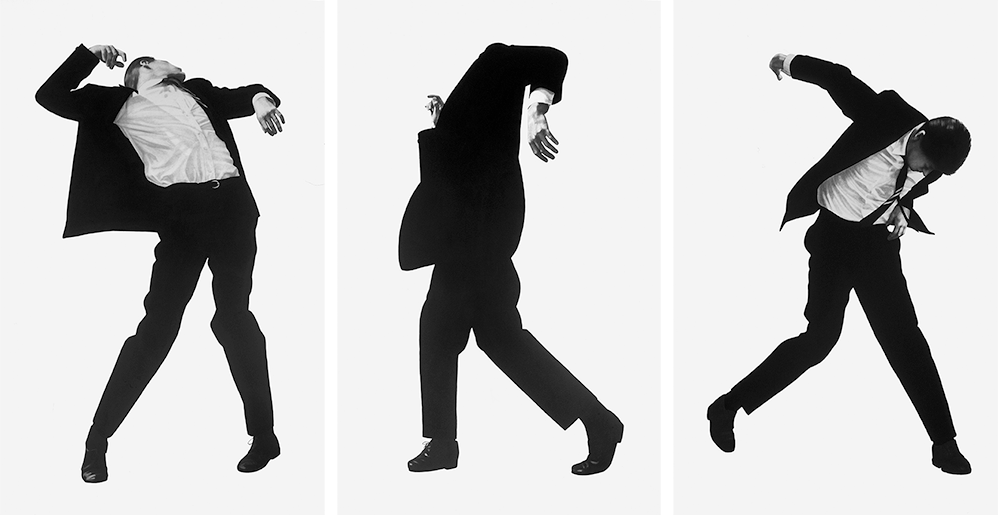
Work of Robert Longo (these are drawings)
|
november 7
|
Goal: Students will demonstrate their knowledge of shutter speed by creating a research document that defines how shutter speed affects motion in a photograph.
Today you will create a research document that defines what shutter speed is and how it affects motion in a photograph. When you are finished, turn it into Google Classroom. What you need to have in your research document (Google slide): –Explain what E = I x T means - Three photos of Stopped Motion and a description of how to get the effect (be specific) –Three photos of Blurred Motion and a description of how to get the effect (be specific) –Three photos of Panning and a description of how to get the effect (be specific) –Three photos of Extended Exposure and a description of how to get the effect (be specific) Did you turn in your motion tutorials? TOMORROW AND FRIDAY: You will be shooting your motion images. Dress appropriately for the weather and bring items that could help make your photos interesting (soccer ball, hula hoop, jump rope, etc.) |
NOvember 6
|
Today you will be learning how to "fake" the appearance of motion TWO WAYS - motion blur and radial blur.
Choose ONE out of the THREE tutorials on motion blur. You can use a photo off the Internet to do the tutorials. Speeding Car Effect (video and text) - Advanced How to Create Motion Blur (text) - beginner How to Add Motion Blur to Background - intermediate THEN, you will try out the idea of radial blur with the following tutorial:
How to Create Radial Blur Turn BOTH finished tutorial images into Google Classroom. Done? CameraSim - practice trying our different camera settings Check your grades in IC - if you see a problem, come see me on Monday during lunch or after school. |
Motion Blur

Radial Blur
|
OCTOBER 31
|
GOAL: Students will critique their work and the work of others through writing and discussion.
1. Put all 3 images up on your screen and write your name on your worksheet. 2. Group critique: find a partner and choose TWO other students' projects to critique. Make sure you fill out the worksheet as completely as possible - it is worth points AND you will be supporting one another in our learning process. 3. Read your feedback and act upon it. 4. Write out your reflection and post everything to your website (images, contact sheet, reflection) 
|
SPOOKY REFLECTION:
|
October 30
Goal: Students will finish their Spooky Project by editing their images and finishing their tutorials.
Today is the LAST DAY to finish your spooky project. You will need:
I have attempted to grade your Aperture assignment in both Google Classroom and your websites. Many people are missing pieces to the assignment. If you want a better grade, please post all the components to your website and add to the "late work checklist"
Tomorrow we will critique your Spooky images and start learning how to use the Shutter Priority mode.
Today is the LAST DAY to finish your spooky project. You will need:
- Three finished examples of the tutorials you tried (turn these into Google Classroom) with a written reflection.
- Three images that you shot and edited that fit the concept of Spooky
I have attempted to grade your Aperture assignment in both Google Classroom and your websites. Many people are missing pieces to the assignment. If you want a better grade, please post all the components to your website and add to the "late work checklist"
Tomorrow we will critique your Spooky images and start learning how to use the Shutter Priority mode.
October 23-25
GOAL: Students will shoot and edit their images to fit the assigned prompt of Spooky. (listening and speaking).
1. Finish up your research. Remember, sketching out ideas is extra credit!
2. Choose 3 spooky tutorials to try (on Projects page). Save your results.
3. Shoot and edit your images.
Finished images due Wednesday, October 25th by the end of class.
You MAY shoot this project on campus IF it makes sense for what you want to do. Your cell phone can work for this project.
Missing grades? Finished older projects? Please see Dr. Overby.
October 17 -20
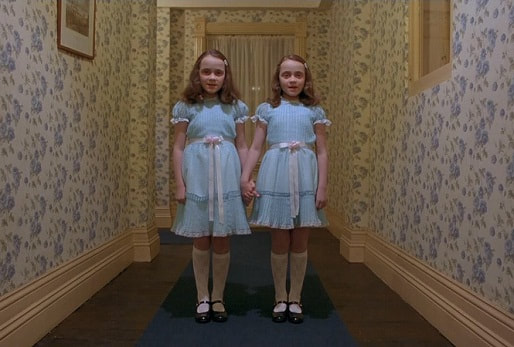
Still from "The Shining"
|
Goal: Students will research ideas for their Spooky/Creepy Project by curating images off the web, choosing and completing tutorials that create special effects, and sketch out compositional ideas. Students will then shoot and edit their images using the techniques they have learned. (listening, reading, & speaking).
!. Finish up your research. Remember, sketching out ideas is extra credit! 2. Choose 3 spooky tutorials to try (on Projects page). Save your results. 3. Start shooting for your images. Finished images due Wednesday, October 25th by the end of class. You MAY shoot this project on campus IF it makes sense for what you want to do. Your cell phone can work for this project. Website and Aperture Project - Missing pieces? Please turn in your missing work (and your grade slip) by Friday. |
October 16
|
Goal: Students will research ideas for their Spooky/Creepy Project by curating images off the web, choosing and completing tutorials that create special effects, and sketch out compositional ideas. (listening, reading, & speaking).
1. Watch trailer for Miss Peregrine...(book). Review parameters of Spooky/Creepy. 2. Together as a group, learn how to add texture overlays to your images. 3. Continue research for your project - what direction are you going in? You MAY shoot this project on campus IF it makes sense for what you want to do. Your cell phone can work for this project. Website and Aperture Project - Missing pieces? Please turn in your missing work (and your grade slip) by Friday. |

Still from Donnie Darko
|
October 13
|
Goal: Students will be introduced to the concept of spooky/creepy through discussion, video, and images. Students will then research possible ideas for their own interpretation of the concept of spooky/creepy (listening & speaking).
1. Introduction to the new Project: Spooky/Creepy. 2. Creepy or not? Quick image analysis 3. Start research on possible ways you want to approach the assignment. Create a mood board (single slide) of 10+ images. 4. Finish your aperture assignment OR start working through a spooky tutorial that would help you create your project idea. Homework: Either take advantage of the full fall color here in Denver or start shooting your Spooky/Creepy project. |
October 9-11
|
Goal: Students will continue to explore depth of field (DOF) by completing exercises and shooting images in Aperture Priority.
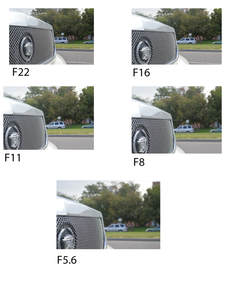
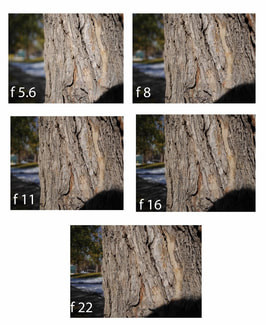
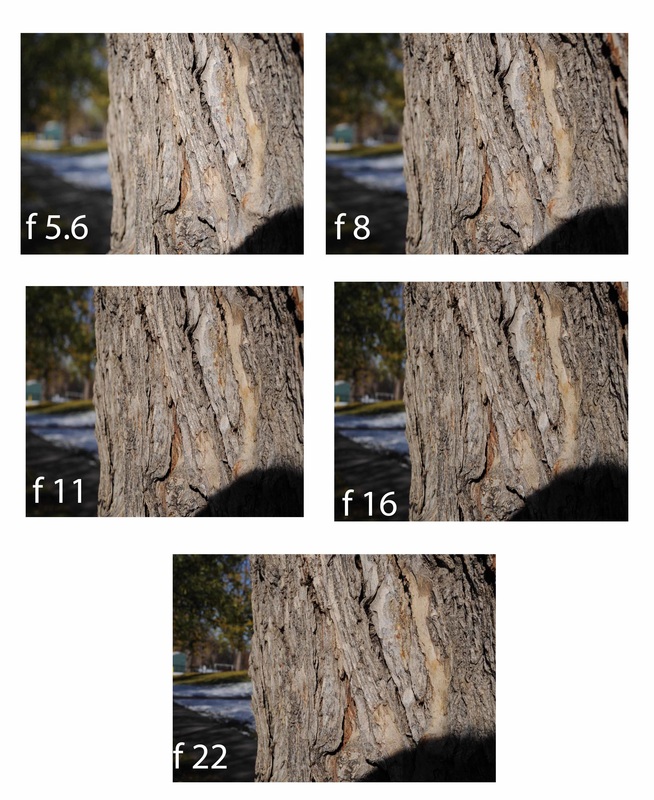
By the end of Wednesday, you will need to have turned in: 1. Aperture Study (a few of you need to redo this - see IC) 2. Iris Blur and Tilt Shift tutorials 3. Two short depth of field and two long depth of field photos (with contact sheet) - see Projects page for details 4. Powerpoint slide of explaining DOF - see Projects page 4. Updated website (see checklist to the right) APERTURE REFLECTION QUESTIONS
1. On a scale from 1 to 4 (1 = I still have no idea how to use aperture, 4 = I could teach aperture to someone else), how well do you feel you understand aperture? 2. What else do you still need to know in order to manipulate depth of field? (What resources can Dr. Overby provide?) 3. Which image is your strongest photo? Why? |
WEBSITE CHECK
Home Page
|
October 6
Goal: Students will continue to explore the concept of depth of field by finishing their aperture study and exploring the iris blur and tilt shift in Photoshop.
1. Turn in the following assignments: Aperture Study, Iris Blur, and Tilt Shift. Info on those assignments are below on Wednesday's post.
2. Update your website and show Dr. O (worth points)
3. Start your Aperture Project. You will need to turn in 2 SHORT DEPTH OF FIELD and 2 LONG DEPTH OF FIELD images (using aperture priority mode on the DSLR camera). See the Projects Page for more details.
October 4
|
Goal: Students will continue to explore the concept of depth of field by finishing their aperture study and exploring the iris blur and tilt shift in Photoshop.
1. Finish your aperture study. Save as "aperturestudy_name.psd" and turn into Google Classroom. 2. Watch this video (use headphones or earbuds). Apply the Iris Blur to one of your photos (save as irisblur_name.jpg). Turn in your original photo and your blurred photo to Google Classroom. 3. Read this tilt shift tutorial. Use the image on the tutorial to follow along with the tutorial (in case our filters don;t allow Flickr, the file is also below). Save as tiltshift_name.jpg. Turn in this altered photo into Google Classroom. 4. Update your website. Are all your projects uploaded (images, contact sheets, reflections?) Can you add some photographer you admire to your Inspiration page?
|

Bravo to Jamaika and Gabby for these excellent aperture study examples!
| ||
october 2-3
|
Goal; Students will apply their knowledge of aperture and ISO to create various depths of fields in their images (speaking and listening).
Things to turn in by the end of the class period on Tuesday: 1. Aperture Study - one document made in Photoshop that demonstrates all 5 aperture settings (see example). Make sure your depth of field changes with each f-stop switch. 2. Turn in your colorizing assignment (4 images, contact sheet, and reflection) 2. Have your website up to date and show Dr. Overby. Your Aperture Study should all be on one Photoshop document and each photo needs to be labeled with the correct f-stop.
|
|
SEPTEMBER 29
|
Goal; Students will apply their knowledge of aperture and ISO to create various depths of fields in their images (speaking and listening).
1. Quick review of aperture, ISO, and basic camera operations. 2. Photo shoot outside - you may work together, but each person needs to shoot their own images. 3. Upload your photos to your computer. 4. Make sure all your Colorize Project is turned in. 5. Make sure your website is up-to-date (check next week for points). APERTURE EXERCISE: Shoot the SAME SCENE with the following apertures: f5.6 (f4), f8, f11, f16, f22 |
|
September 27
|
Goal: Students will critique their work and the work of others. Students will then be introduced to DSLR camera parts and operations.
1. Pull up your 4 images - it's ok if they are not quite done. 2. Critique the work of 3 other people - make sure to give them both positive feedback and suggestions on how to make their work even better. 3. Once you receive your feedback, act upon it and finish out your images and write your reflection. 4. Turn in your images, contact sheet, and reflection to Google Classroom. 5. Introduction to DSLR cameras
|
REFLECTION (after critique)
1. Which color technique did you like the best? Why? 2. Out of your four images, which one ended up being the strongest? Why? 3. What kind of feedback did you get? Did you follow any of it? |
September 25 &26
|
Goal: Students will curate and edit their images that work most effectively with photo editing coloring techniques. (speaking & reading).
1. Create a contact sheet - label it as "colorcontact_name" 2. Choose your four BEST images that you could try different techniques on (black and white, toning, color splash, painting) 3. Start editing - don't forget to make basic editing adjustments (levels, sharpening, cropping, remove distractions) first BEFORE you add the colorize effect. 4. Done? Update your website with ALL your projects and have Dr. O look at it (worth points, due by Friday). Tuesday last half of class: Group critique and reflection END OF 6 WEEKS IS THIS FRIDAY!!
|

A little something to make you smile...the 3 foster kitties at my house right now.
REFLECTION (after critique)
1. Which color technique did you like the best? Why? 2. Out of your four images, which one ended up being the strongest? Why? 3. What kind of feedback did you get? Did you follow any of it? |
September 22
|
Goal: Students will curate and edit their images that work most effectively with the photo editing techniques we learned this week.
1. Photo painting technique - open the carnival image for the group demo) 2. Finish uploading all your images and make a contact sheet (save as colorize_name.jpg) 3. Choose your four BEST images that you could try different techniques on (black and white, toning, color splash, painting) 4. Start editing - don;t forget to make basic editing adjustments (levels, sharpening, cropping, remove distractions) first BEFORE you add the colorize effect. |
    |
September 20
|
Goal: Students will shoot images that can be used with the photo editing techniques they learned the day before (listening & speaking).
Colfax Photo Shoot Using your knowledge of compositional guidelines and the photo editing techniques we learned yesterday, shoot at least 24+ images that capture the little details of our neighborhood. Make sure you sign out, including writing down your pass #. Come back by 10:30 to upload your images. Friday we will learn how to "paint" an image and start looking at what you captured on this photo shoot. |
|


September 19
|
CLO: Students will practice coloring techniques by reading tutorials and listening to directions.
Agenda: Download the images to your right. We will work through a series of tutorials. If you need to read the tutorial as we work through them, they are on the right.
BLOCK DAY: Shoot out on Colfax - bring your camera! |
September 18
|
Goal: Students will design their digital portfolio and upload their beginning assignments that demonstrate their learning so far in the course. (speaking & listening).
Go to the Links page of our site. Click on the "student weebly login"
Done? Start adding examples of professional work to your Inspiration Page - what kind of photography is interesting to you? |
September 11 - 15
Goal: Students will continue to deepen their understanding of compositional guidelines by taking pictures and creating a research document that shows professional examples of these guidelines.
|
RESEARCH DOC ON COMPOSITIONAL RULES
•Collect examples of each compositional rule and place them in a Google slide presentation. Don’t forget to label each image. Save as compositionalimagesearch_name –Rules of Thirds –Asymmetrical Balance –Leading Lines –Symmetrical Balance –Pattern –Point of View (4 images) •worm’s eye • bird’s eye • close up • unusual –Depth (2 images) • Long Depth •Shallow Depth –Framing –Cropping |
SHOOTING ASSIGNMENT
Shoot the following compositional guidelines: –Rules of Thirds –Asymmetrical Balance –Leading Lines –Symmetrical Balance –Pattern –Framing Try a variety of subjects around school to get the best (and most interesting) images. Make a contact sheet of all your attempts. Edit your BEST example of each of the 6 guidelines. Save as "thirds_name.jpg" "asymmbalance_name.jpg" "leading_name.jpg" "symmbalance_name.jpg" "pattern_name/jpg" "framing_name.jpg" |
REFLECTION
1. Have you ever heard about these compositional guidelines before? Where? When? 2. How does knowing about compositional guidelines help you become a stronger photographer? 3. Out of your shooting assignment, which image ended up being your favorite/best? Why? What compositional rule did you use? 4. Look at your contact sheet. Is there a compositional guideline that you tend to shoot a lot? Why do you think that guideline is easier for you to see? 5. Which guideline if the hardest for your to capture? Why do you think that? |
We may continue to work on this for a bit on Wednesday. Quality over speed!
|
Healing Brush, Spot Healing Brush, Clone Stamp, & Patch Tool
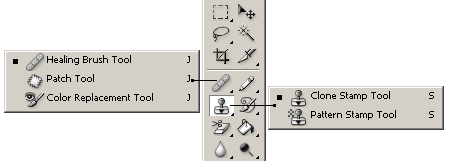
Download the file below for a class demo
|
|
| clonestamp_healingbrushdemo.jpg |
September 8
|
Goal: Students will shoot photographs to demonstrate understanding of compositional rules (speaking & listening).
Shoot the following compositional guidelines: –Rules of Thirds –Asymmetrical Balance –Leading Lines –Symmetrical Balance –Pattern –Framing Try a variety of subjects around school to get the best (and most interesting) images. Stay on campus and come back by 10 am to start uploading your images. Didn't finish? Shoot some more this weekend. Due Tuesday along with the Web Scavenger Hunt. |
|


SEPTEMBER 5 & 6
|
Goal: Students will demonstrate their understanding of point of view and support one another through giving verbal and written feedback on their images.
1. Continue to finish your point of view images - edit your best bird's eye, worm's eye, close up and unusual. 2. Feedback time! Group critique to help each other out. 3. Refine you images BASED OFF THE FEEDBACK YOU ARE GIVEN. 4. Write your reflection in a Google doc. You will have to mention the feedback you got, so use your critique sheet. 5. Turn in your 4 images, contact sheet, and reflection to Google Classroom. Turn in your critique sheet to Dr. Overby. 6. Demo on Compositional Guidelines. If time, start your web search for examples. Friday: Photo Shoot around school. If you have a camera, please bring it. |
Point of View Reflection Questions
1. What was the purpose of this project? 2. Did you find yourself gravitating toward a particular point of view? Why do you think that? 3. Out of the four images you edited, which one if your strongest? Why? 4. What feedback did you get? How did you refine your images based off that feedback? 5. What is one thing you did better on this assignment than the first assignment (30 in 30)?
|

|
•Collect examples of each compositional rule and place them in a Word doc or Powerpoint presentation. Don’t forget to label each image. Save as compositionalimagesearch_name.doc (or pdf)
–Rules of Thirds –Asymmetrical Balance –Leading Lines –Symmetrical Balance –Pattern –Point of View (4 images) •worm’s eye • bird’s eye • close up • unusual –Depth (2 images) • Long Depth •Shallow Depth –Framing –Cropping |
|
September 1
|
Goal: Students will continue to familiarize themselves with the process of uploading/downloading, creating contact sheets, editing photos and turning in assignments.
1. Make sure all 3 components of the 30 in 30 assignments are turned into Google classroom (contact sheet, edited photo, reflection). 2. Check IC to make sure all previous assignments were turned in and given credit. 3. Download your Point of View photos to your computer 4. Make a contact sheet (Photoshop or Bridge) 5. Start choosing your BEST image for each viewpoint - bird's eye, worm's eye, close up, unusual Homework for the weekend: Shoot more images if you need them, get your fee paid Tuesday: Finish point of view and conduct our first critique |

An unusual point of view I shot this summer in upstate NY - I think the color is the strongest aspect of it!
|
August 30
|
GOAL: Students will be introduced to the concept of point of view and then apply the concept to their image making (Listening and speaking).
Presentation on Point of View Photo Shoot Rules Pass & camera checkout We will all walk over together Stay in pairs, small groups Be back by 10:30 City Park Shoot Shoot 6 images of each viewpoint - bird's eye, worm's eye, close up, and unusual Return to class and upload images Finish turning in 30 in 30 assignment to Google Classroom |
|
August 28 & 29
|
GOAL: Students will be able to upload and download their images, create a contact sheet, and start the basic editing process in Photoshop. (Listening & Speaking)
Upload/Download Images Make sure all your images are in your Drive Download these images to your machine Create a folder on your Desktop - label as "Name 30 in 30" Place your downloaded images into this folder Making a contact sheet
Choose your best image Looking at your contact sheet, choose ONE image to edit (what makes a good photo?) Edit Your Photo
Reflection In a Google doc, answer the following questions:
TURN INTO GOOGLE CLASSROOM Contact Sheet Edited Photo Reflection TOMORROW - SHOOT AT CITY PARK LET'S TRY TO EDIT TOGETHER
Download img_4347.jpg and open into Photoshop Homework: Get your syllabus slip signed, pay your class fee ($20 per semester) .
|

|
AUGUST 25

|
GOAL: Students will demonstrate their CURRENT level of understanding the concepts of photography by shooting 30 images in 30 minutes.
30 in 30 Project You will take 30 photos in 30 minutes around the school. This is to demonstrate your current level of understanding about image making. The "non-negotiable"
After you take your photos
HOMEWORK: Get your syllabus slip signed, pay your class fee ($20 per semester) |
AUGUST 24
|
Goal: Students will share information about themselves and the types of photography they are drawn to by creating a visual presentation
FINISH creating your slides
Done? Look on our Links page and the Tutorial page and start exploring the possibilities of photography and Photoshop. HOMEWORK: Get your syllabus slip signed, pay your class fee ($20 per semester) TOMORROW: You will shoot your first assignment - make sure your cell phone is charged and ready or bring your camera |

What I like, activities, my life
Types of photography I find interesting
|
August 23
Goal: Students will share what they know and start learning about how the class is run.
1. Using the student account....
2. Go over syllabus
3. Start creating your slides
1. Using the student account....
- Join our Google Classroom - code z1kdlpn
- Fill out the survey
- Complete the image analysis
2. Go over syllabus
3. Start creating your slides
- one slide should have images about what you like, activities, your life, etc.
- one slide that shows what type of photography that you find interesting
August 22

|
Welcome to Photo 1!
This first day we will be getting to know each other, but we will start using this website later in the week. |